
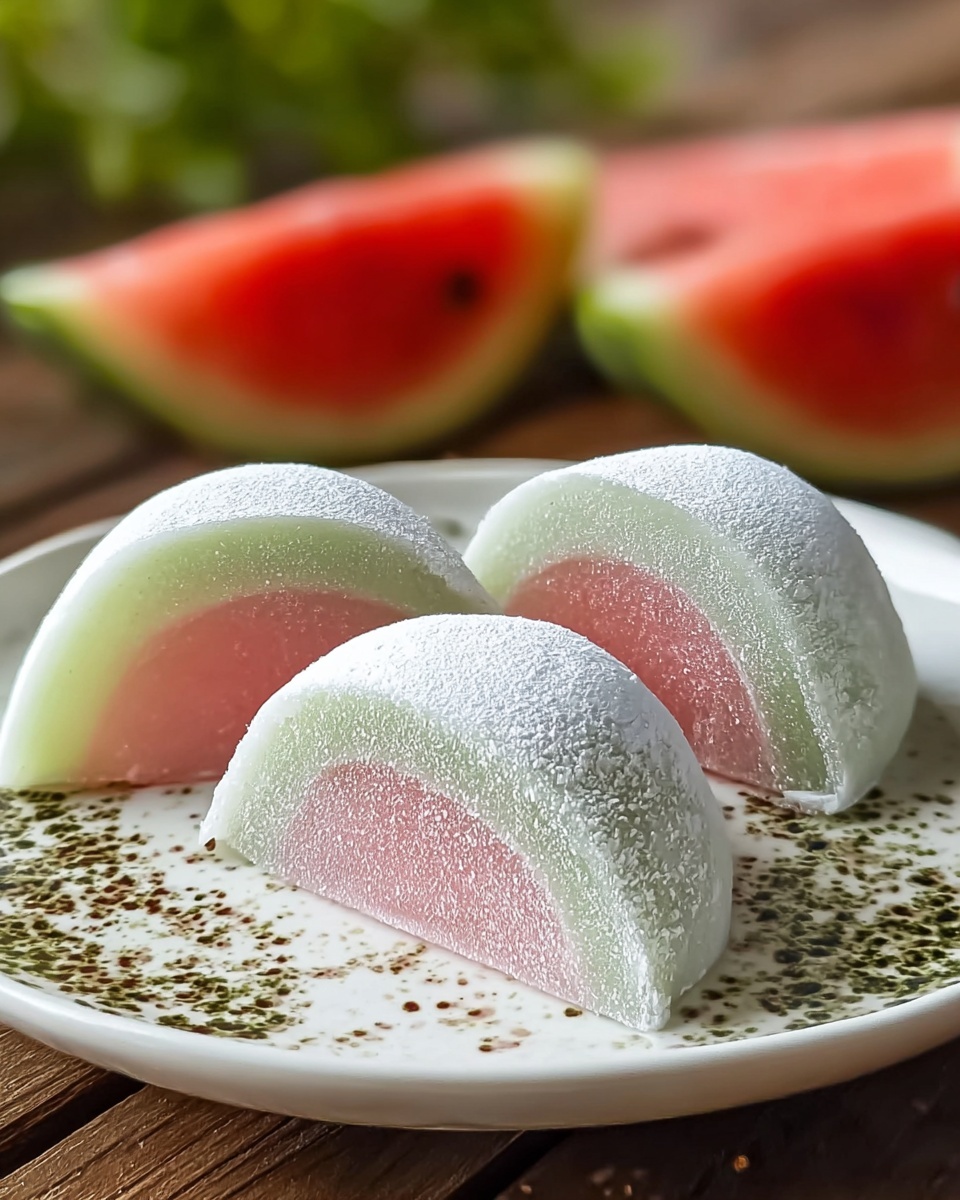
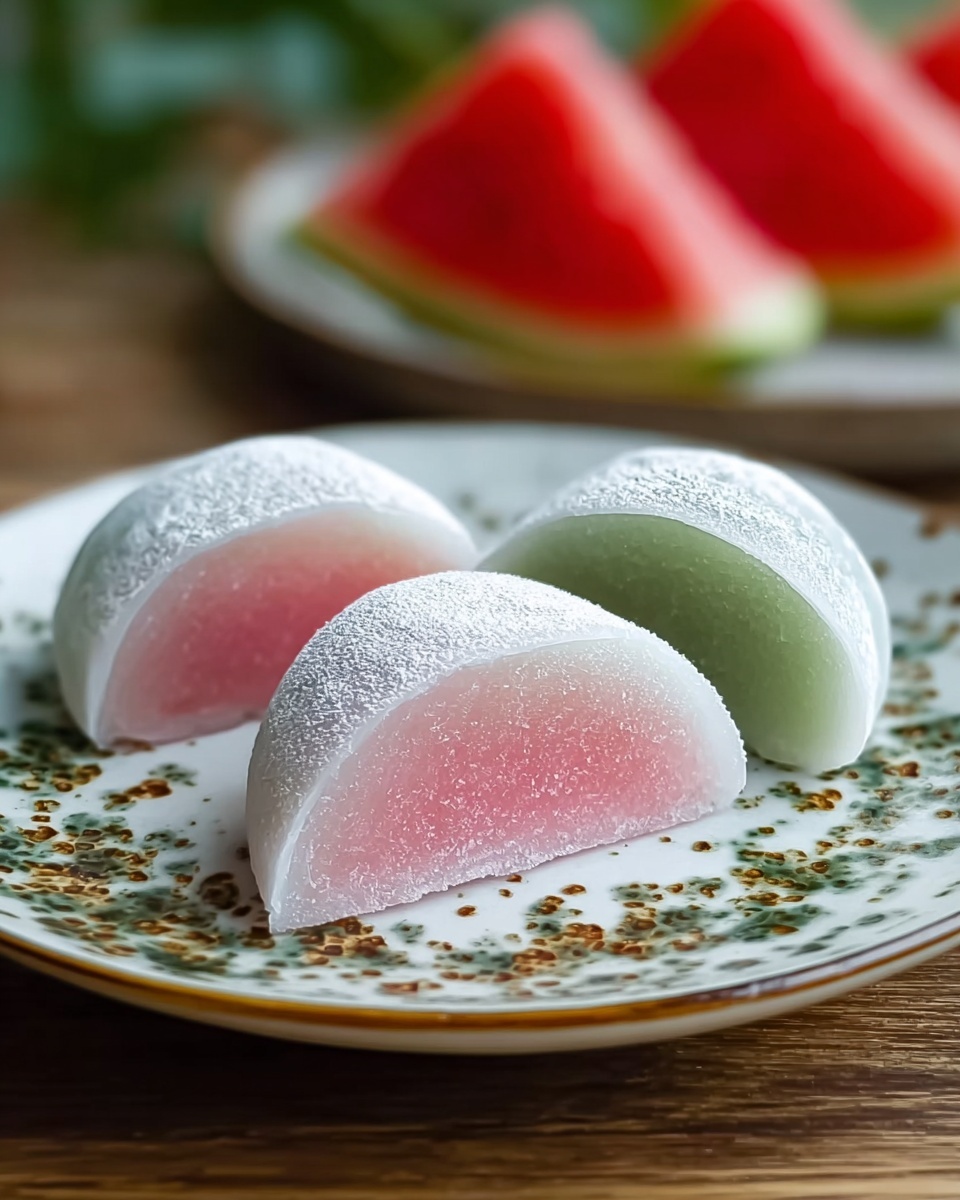
There’s something truly magical about the combination of fresh, juicy watermelon and the satisfyingly chewy texture of mochi. This Watermelon Mochi Recipe brings those delightful sensations together in a sweet, refreshing treat that’s perfect for warm days or whenever you want a playful dessert that’s as charming to look at as it is to eat. The bright pink hues from real watermelon juice make each piece pop with color, and the buttery softness within keeps every bite irresistibly tender. I’m so excited to share this recipe with you—it’s simple, fun, and guaranteed to brighten up your dessert table!
Ingredients You’ll Need
What I love about this Watermelon Mochi Recipe is how deceptively simple the ingredients are, yet each one plays a vital role in creating the perfect balance of flavor, texture, and color. From fresh fruit to the essential glutinous rice flour, every element works together seamlessly.
- Ripe watermelon: Fresh, sweet watermelon gives the mochi its vibrant pink color and refreshing taste.
- Glutinous rice flour (230 g): This key ingredient creates the characteristic chewy texture essential to mochi.
- Cornstarch (65 g): Helps lighten the dough and prevent excessive stickiness during preparation.
- Sugar (40 g): Adds just the right amount of sweetness to balance the watermelon’s natural tartness.
- Watermelon juice (300 g): Made fresh from the fruit itself, this juice infuses the mochi with authentic flavor and color.
- Butter (30 g): Adds richness and smoothness to the dough, making each bite melt in your mouth.
- Cooked glutinous rice flour: Used to dust the surface and keep your mochi dough from sticking during assembly.
How to Make Watermelon Mochi Recipe
Step 1: Prepare the Watermelon Juice
Start by slicing your watermelon in half and carefully scooping out the flesh, taking care to remove any seeds. Then, place the chunks in a blender and whirl until completely smooth. You’ll want about 300 grams of fresh watermelon juice to incorporate that authentic fruity flavor throughout the mochi dough.
Step 2: Mix the Dry Ingredients
In a large mixing bowl, combine the glutinous rice flour, cornstarch, and sugar. Stir everything well so the ingredients are evenly distributed—this step ensures your mochi will have a consistent texture and a perfectly balanced sweetness.
Step 3: Combine Watermelon Juice and Dry Mix
Slowly pour the watermelon juice into the dry ingredients, stirring constantly to avoid lumps. The goal is to create a smooth, even batter. If you want an ultra-silky finish, you can sift this mixture before moving on—trust me, it makes a noticeable difference!
Step 4: Microwave to Cook the Dough
Cover your bowl loosely with plastic wrap and poke a few holes to allow steam to escape. Microwave the batter on high for about five minutes. You’ll notice the mixture starting to set and develop a glossy sheen, which means it’s almost ready for the next step.
Step 5: Incorporate Butter and Knead
While the mochi dough is still hot, add the butter and stir vigorously until fully blended. This enriches the dough and gives it a silky texture. Then, let the dough cool to room temperature before kneading it by hand for about five minutes. This kneading process is key for developing that signature elastic, smooth mochi texture.
Step 6: Chill to Set
Once kneaded, transfer the dough to a parchment-lined container and spread it flat. Cover and place it in the refrigerator for at least three hours. This chilling step allows the mochi to firm up and fully develop its wonderfully chewy texture.
Step 7: Shape the Mochi
After chilling, dust your workspace generously with cooked glutinous rice flour to prevent sticking. Cut the dough into strips, then slice each strip into bite-sized pieces. Lightly toss each piece in the cooked rice flour—the flour gives a delicate finish that keeps the mochi soft but non-sticky.
How to Serve Watermelon Mochi Recipe
Garnishes
Serving watermelon mochi is as much about the visual appeal as the flavor. Consider a sprinkle of toasted coconut flakes or a faint dusting of matcha powder for a subtle earthiness that pairs beautifully with the fruity sweetness. Fresh mint leaves are also fantastic—they bring a pop of green and a cool brightness that complements the watermelon perfectly.
Side Dishes
Watermelon mochi shines wonderfully as a light dessert, especially after a refreshing meal. Pair it with a mild green tea or jasmine tea to cleanse the palate between bites. For a more indulgent spread, serve alongside creamy vanilla ice cream or a fruity sorbet to elevate the experience with contrasting textures and temperatures.
Creative Ways to Present
Want to wow your guests? Arrange the watermelon mochi pieces on a colorful serving tray garnished with edible flower petals for a festive look. Alternatively, try skewering individual mochi bites with decorative toothpicks for a fun, bite-sized party treat. You can even wrap small pieces in edible rice paper for a modern twist that adds a layer of surprise.
Make Ahead and Storage
Storing Leftovers
If you have leftovers, store them in an airtight container in the refrigerator to keep their freshness. The texture remains pleasantly chewy for up to 2 days, though I recommend enjoying Watermelon Mochi Recipe as fresh as possible for the best taste experience.
Freezing
Freezing mochi can be tricky because the delicate texture might change, but if you want to store it longer, place individual mochi pieces in a single layer on a baking tray and freeze them before transferring to a sealed container. When you’re ready to eat, thaw them at room temperature to retain softness.
Reheating
To bring back that just-made warmth and softness, gently microwave the mochi for 10 to 15 seconds. Avoid overheating as that can make the mochi tough or rubbery. Reheating like this revives its signature chewiness and buttery flavor wonderfully.
FAQs
Can I use frozen watermelon instead of fresh?
While fresh watermelon is ideal for capturing the bright flavor and juiciness of the mochi, you can use frozen watermelon as long as it’s fully thawed and well-drained to avoid excess liquid that might alter the dough’s consistency.
What if I don’t have a microwave? Can I cook the mochi dough another way?
Absolutely! You can steam the mixture in a heatproof bowl over boiling water for about 15 minutes instead of microwaving. Just ensure you stir the batter occasionally to achieve an even texture.
Is the butter necessary in this Watermelon Mochi Recipe?
Butter adds richness and tenderness to the mochi, making the texture smoother and more melt-in-your-mouth. If you prefer a dairy-free version, you could try substituting with coconut oil, though it will slightly change the flavor profile.
Why do I have to use cooked glutinous rice flour for dusting?
Cooked glutinous rice flour prevents the mochi from sticking to surfaces and your hands without drying out the dough, which can happen with uncooked flour. It’s an essential finishing touch to maintain the ideal texture.
Can I add fillings inside the mochi?
Definitely! Popular fillings include sweet red bean paste or even small pieces of fresh fruit. Just wrap the mochi dough around your filling after Step 7 before dusting. It’s a delightful way to customize this Watermelon Mochi Recipe.
Final Thoughts
This Watermelon Mochi Recipe is one of those recipes that feels like a little celebration every time you make it. From the gorgeous pink color to the chewy, buttery texture, it’s a treat you can feel proud sharing with family and friends. Give it a try soon—you’ll find it hard to resist going back for just one more piece!
Print
Watermelon Mochi Recipe
- Prep Time: 15 minutes
- Cook Time: 5 minutes
- Total Time: 3 hours 20 minutes
- Yield: 16 pieces
- Category: Dessert
- Method: Microwaving
- Cuisine: Japanese
- Diet: Vegetarian
Description
This Watermelon Mochi recipe blends the refreshing flavor of ripe watermelon with the chewy texture of traditional Japanese mochi. Using glutinous rice flour and fresh watermelon juice, the mochi is steamed in the microwave for a quick yet satisfying treat. Perfect for summer, these bite-sized mochi pieces offer a fruity twist on a classic dessert, with an elastic texture and natural sweetness.
Ingredients
Fresh Ingredients
- 1 ripe watermelon
- 300 g watermelon juice (blended from watermelon)
- 30 g butter
Dry Ingredients
- 230 g glutinous rice flour
- 65 g cornstarch
- 40 g sugar
- Cooked glutinous rice flour (as needed for dusting)
Instructions
- Prepare Watermelon Juice: Slice the watermelon in half and scoop out the flesh, carefully removing any seeds. Place the flesh into a blender and blend until smooth to yield 300 g of watermelon juice for the mochi recipe.
- Mix Dry Ingredients: In a large mixing bowl, combine the glutinous rice flour, cornstarch, and sugar, stirring well to evenly distribute all ingredients.
- Combine Juice and Dry Mix: Gradually add the blended watermelon juice to the dry mixture, stirring continuously until a smooth, lump-free batter forms. For a finer texture, sift the mixture before proceeding.
- Cook Mochi Batter: Cover the bowl with plastic wrap and poke small holes to allow steam to escape. Microwave the batter on high for 5 minutes, or until it starts to set and becomes glossy.
- Incorporate Butter and Knead: While hot, add butter and mix until fully melted and combined. Let the dough cool to room temperature, then knead by hand for about 5 minutes until elastic and smooth.
- Chill Mochi Dough: Transfer the dough to a parchment-lined container, flatten evenly, cover, and refrigerate for at least 3 hours to set and develop chewiness.
- Shape and Finish Mochi Pieces: Dust a work surface with cooked glutinous rice flour to prevent sticking, cut the dough into strips then bite-sized pieces, and toss each piece lightly in more cooked glutinous rice flour to finish.
Notes
- Using cooked glutinous rice flour for dusting prevents the mochi from sticking without altering flavor.
- Ensure all seeds are removed from the watermelon to avoid unwanted texture in the mochi.
- Microwave cooking time may vary depending on your microwave’s wattage; adjust accordingly.
- Kneading is important for developing the chewy texture classic to mochi.
- Refrigeration time is essential; do not skip as it helps mochi firm up properly.

