
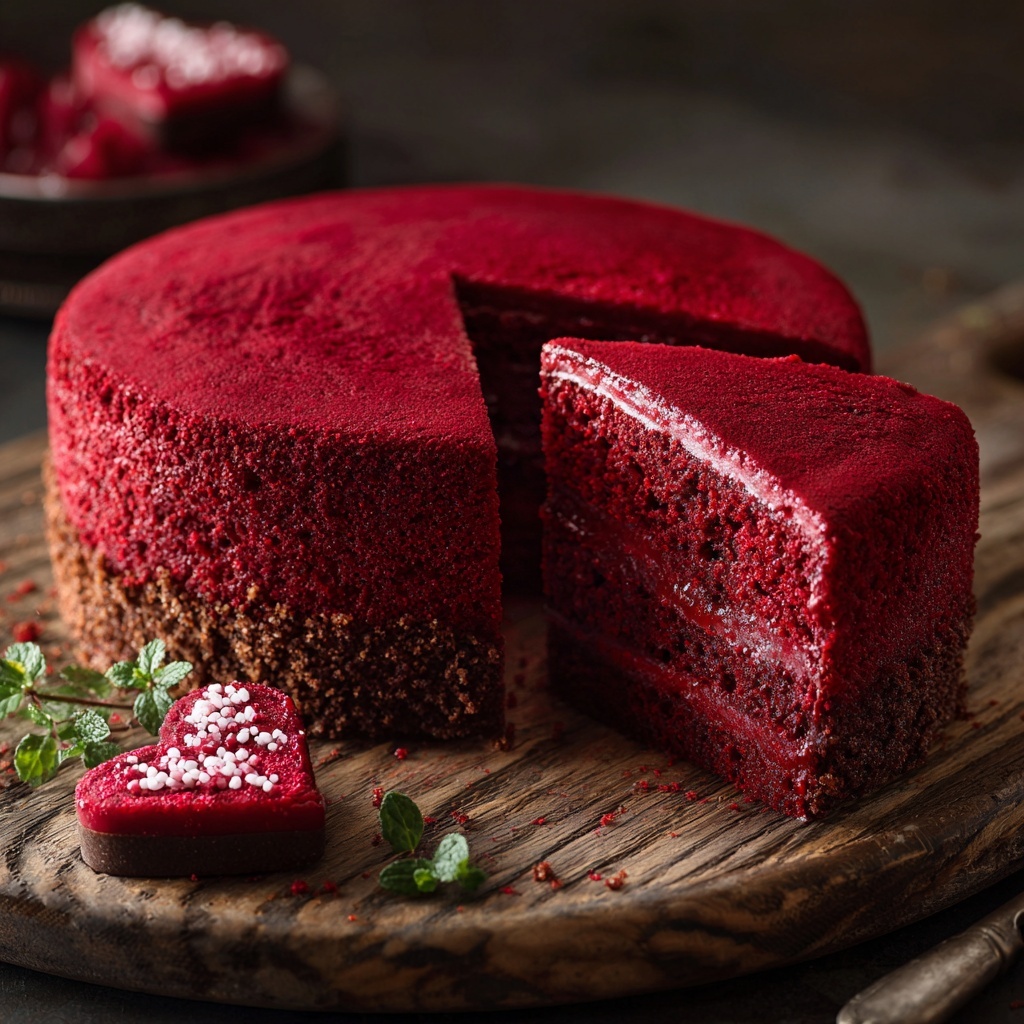
If you’re looking to wow your sweetheart with an unforgettable dessert, this Valentine’s Day Red Velvet Cheesecake Recipe is your new go-to showstopper. It’s a luscious blend of rich cream cheese and that iconic red velvet charm, all nestled atop a chocolatey crust that adds just the right crunch. Every slice offers a velvety smooth texture with a delicate hint of cocoa and just enough tang from buttermilk and sour cream to keep things perfectly balanced. Whether you’re a seasoned baker or a dessert-loving novice, this cheesecake will fill your kitchen with love and your table with smiles.
Ingredients You’ll Need
Every ingredient in this Valentine’s Day Red Velvet Cheesecake Recipe plays a starring role. From the buttery chocolate crust that brings depth, to the vibrant red food coloring that gives it that romantic glow, and the creamy, dreamy filling that melts in your mouth—each component is simple but essential for making this dessert truly irresistible.
- Chocolate cookie crumbs (1 1/2 cups): Use crushed Oreos without filling for a rich, chocolaty base that complements the red velvet flavor perfectly.
- Unsalted butter (1/4 cup, melted): Binds the crust ingredients together while adding a subtle richness.
- Cream cheese (3 packages, softened): The heart and soul of the cheesecake, providing that silky smooth texture and tangy flavor.
- Granulated sugar (1 cup): Sweetens the filling, balancing the cocoa and cream cheese.
- Unsweetened cocoa powder (1 tablespoon): Adds a delicate chocolate hint, deepening the flavor without overpowering the red velvet theme.
- Sour cream (1 cup): Introduces creaminess and a subtle tang to lighten the richness of the cheesecake.
- Buttermilk (1/2 cup): Enhances the tender texture and gives that classic red velvet tang.
- Eggs (2 large): Help with structure and create a luscious, firm filling once baked.
- Vanilla extract (2 teaspoons): Brings warmth and depth to the overall flavor.
- Red food coloring (1 tablespoon): The signature hue that makes this cheesecake festive and perfect for Valentine’s Day.
- Heavy cream (1/2 cup): For whipping into a light topping that adds an elegant finish.
- Powdered sugar (1 tablespoon): Sweetens the whipped cream topping gently.
- Fresh berries or heart-shaped sprinkles (optional): Adds a playful and fresh decorative touch.
How to Make Valentine’s Day Red Velvet Cheesecake Recipe
Step 1: Prepare the Crust
Begin by preheating your oven to 325°F (160°C) and greasing a 9-inch springform pan. Wrap the outside with foil to prevent leaks, which will come in handy later. Mix the chocolate cookie crumbs and melted butter in a small bowl until completely combined. Press this crumbly mixture firmly into the bottom of your pan, creating an even layer that acts as the perfect base. Bake for 8 minutes and then set it aside to cool. This step ensures your crust is beautifully crisp and holds up to the creamy cheesecake above.
Step 2: Make the Cheesecake Filling
In a large mixing bowl, beat the softened cream cheese until it’s smooth and luxuriously creamy. Add the sugar and cocoa powder, mixing until fully blended. The subtle cocoa flavor makes all the difference here. Next, stir in the sour cream, buttermilk, eggs, vanilla extract, and the all-important red food coloring. Beat until everything is combined and the batter has a consistent, vibrant red color. Be sure to scrape the bowl sides occasionally so nothing gets left behind. This mixture is the magic behind a perfectly silky and flavorful red velvet cheesecake.
Step 3: Bake in a Water Bath
Pour your gorgeous red velvet filling over the cooled crust inside your prepared springform pan. Set this pan into a larger roasting pan, then carefully pour hot water into the outer pan until it comes about an inch up the side of your cheesecake pan. This water bath helps your cheesecake cook evenly and prevents cracking. Bake for 60 to 70 minutes—your cheesecake is done when the edges are set but the center still jiggles slightly. Turn off the oven, crack the door open, and let it cool inside gently for an hour. Once out of the oven, chill it in the refrigerator for at least 4 hours or overnight to develop those dreamlike textures.
Step 4: Finish with Whipped Topping
When you’re ready to serve your masterpiece, whip the heavy cream and powdered sugar until soft peaks form. Spread or pipe this luscious topping over the chilled cheesecake for that extra indulgence. If you’re feeling festive, scatter fresh berries or heart-shaped sprinkles atop for a pop of color and celebratory flair. This final touch makes the Valentine’s Day Red Velvet Cheesecake Recipe irresistible and visually stunning.
How to Serve Valentine’s Day Red Velvet Cheesecake Recipe

Garnishes
Garnishing this dessert is your chance to add personal charm. Fresh berries like raspberries, strawberries, or blueberries bring a refreshing burst of natural sweetness and vibrant color that complements the rich cheesecake perfectly. Heart-shaped sprinkles or edible glitter can add fun, romantic touches that make slices feel extra special for Valentine’s Day celebrations.
Side Dishes
While this cheesecake is a star on its own, pairing it with light sides enhances the experience. A cup of freshly brewed coffee or a glass of champagne balances the sweet richness. For something lighter, crisp mint leaves or a citrusy sorbet on the side provides contrast and refreshment.
Creative Ways to Present
To really impress, present your Valentine’s Day Red Velvet Cheesecake Recipe on a decorative cake stand or plate lined with rose petals for the ultimate romantic vibe. Cutting the cheesecake with a hot, clean knife ensures smooth, neat slices. You can even pipe extra whipped cream around each slice before serving to add elegance. Personalizing with edible gold leaf or piping sweet messages with chocolate or icing can take presentation to the next level.
Make Ahead and Storage
Storing Leftovers
This cheesecake keeps beautifully in the refrigerator for up to two days. Be sure to cover it tightly with plastic wrap or store it in an airtight container to maintain freshness and prevent it from absorbing other flavors. Leftover slices still taste creamy and divine the next day and make for a happy breakfast treat or mid-afternoon indulgence.
Freezing
If you want to make your Valentine’s Day Red Velvet Cheesecake Recipe ahead of time, freezing is a great option. Wrap the whole cake or individual slices tightly in plastic wrap, then in aluminum foil, and freeze for up to one month. Thaw it overnight in the refrigerator before serving. The texture remains impressively smooth, making it perfect for celebrations planned well in advance.
Reheating
Cheesecake is best served chilled, so reheating is generally unnecessary. However, if you prefer the whipped cream topping slightly softened, leave the cheesecake at room temperature for about 20 minutes before slicing and serving. Avoid microwaving to keep the texture intact and avoid changes in flavor.
FAQs
Can I use a different crust instead of chocolate cookie crumbs?
Absolutely! While the chocolate cookie crust complements the red velvet beautifully, you can use graham cracker crust or even crushed pecans mixed with butter for a different but delicious base.
Is there a way to make this recipe without food coloring?
The red food coloring is what gives this cheesecake its signature Valentine’s Day vibe, but you could substitute natural beet juice or powder for a more natural option. Just keep in mind the color may vary.
How do I prevent cracks from forming on my cheesecake?
Using a water bath as described in the recipe and avoiding overbaking are key to preventing cracks. Also, letting the cheesecake cool gradually inside the oven before chilling helps maintain a smooth surface.
Can I make this cheesecake gluten-free?
Yes! Use gluten-free chocolate cookies for the crust and ensure all other ingredients are gluten-free certified. This way everyone can enjoy the Valentine’s Day Red Velvet Cheesecake Recipe safely.
How long does the cheesecake need to chill before serving?
At least 4 hours in the refrigerator is ideal for the cheesecake to set fully and develop its creamy texture. Overnight chilling is even better if you can plan ahead.
Final Thoughts
There’s something truly special about sharing a dessert made with love, and this Valentine’s Day Red Velvet Cheesecake Recipe is a perfect expression of that. With its beautiful red color, indulgent creaminess, and subtle chocolate notes, it’s guaranteed to make your celebration sweeter and more memorable. So roll up your sleeves, gather your ingredients, and create a dessert that will have everyone asking for seconds and feeling the love in every bite.
Print
Valentine’s Day Red Velvet Cheesecake Recipe
- Prep Time: 25 minutes
- Cook Time: 1 hour 10 minutes
- Total Time: 5 hours 35 minutes
- Yield: 12 servings
- Category: Dessert
- Method: Baking
- Cuisine: American
- Diet: Vegetarian
Description
Celebrate Valentine’s Day with this luscious Red Velvet Cheesecake featuring a rich chocolate cookie crust, creamy red velvet cheesecake filling, and a delicate whipped cream topping. Perfectly baked in a water bath for a smooth and moist texture, this festive dessert is sure to impress and delight.
Ingredients
For the crust:
- 1 1/2 cups chocolate cookie crumbs (such as Oreos, without filling)
- 1/4 cup unsalted butter, melted
For the cheesecake:
- 3 (8-ounce) packages cream cheese, softened
- 1 cup granulated sugar
- 1 tablespoon unsweetened cocoa powder
- 1 cup sour cream
- 1/2 cup buttermilk
- 2 large eggs
- 2 teaspoons vanilla extract
- 1 tablespoon red food coloring
For the topping:
- 1/2 cup heavy cream
- 1 tablespoon powdered sugar
- Fresh berries or heart-shaped sprinkles (optional)
Instructions
- Prepare the crust: Preheat the oven to 325°F (160°C). Grease a 9-inch springform pan and wrap the outside with foil to prevent leaks. In a small bowl, combine chocolate cookie crumbs and melted butter thoroughly. Press the mixture firmly into the bottom of the prepared pan to form an even crust. Bake the crust for 8 minutes, then remove and set aside to cool.
- Make the cheesecake filling: In a large bowl, beat the softened cream cheese using a mixer until smooth and creamy. Add granulated sugar and cocoa powder, beating until well combined. Add sour cream, buttermilk, eggs, vanilla extract, and red food coloring. Continue beating until the mixture is smooth and evenly colored, scraping down the sides of the bowl as needed. Pour the batter over the cooled crust in the springform pan.
- Bake in a water bath: Place the springform pan inside a larger roasting pan. Carefully pour about 1 inch of hot water into the outer pan to create a water bath to ensure gentle, even baking. Bake at 325°F for 60–70 minutes, or until the center is mostly set but still slightly jiggly when gently shaken.
- Cool the cheesecake: Turn off the oven and crack the oven door open. Let the cheesecake cool inside the oven for 1 hour to reduce risk of cracking. Remove the cheesecake and water bath, then refrigerate the cake for at least 4 hours or preferably overnight to fully set and chill.
- Prepare the topping: Before serving, whip the heavy cream with powdered sugar until soft peaks form. Spread or pipe the whipped cream evenly over the chilled cheesecake. Garnish with fresh berries or heart-shaped sprinkles if desired.
Notes
- For clean slicing, warm a knife under hot water, wipe dry, and slice carefully between each piece.
- The cheesecake may be made up to 2 days in advance and stored in the refrigerator, covered tightly.
- Use full-fat cream cheese and dairy for the best texture and taste.
- Red food coloring can be adjusted to your preferred shade of red or replaced with natural alternatives.


