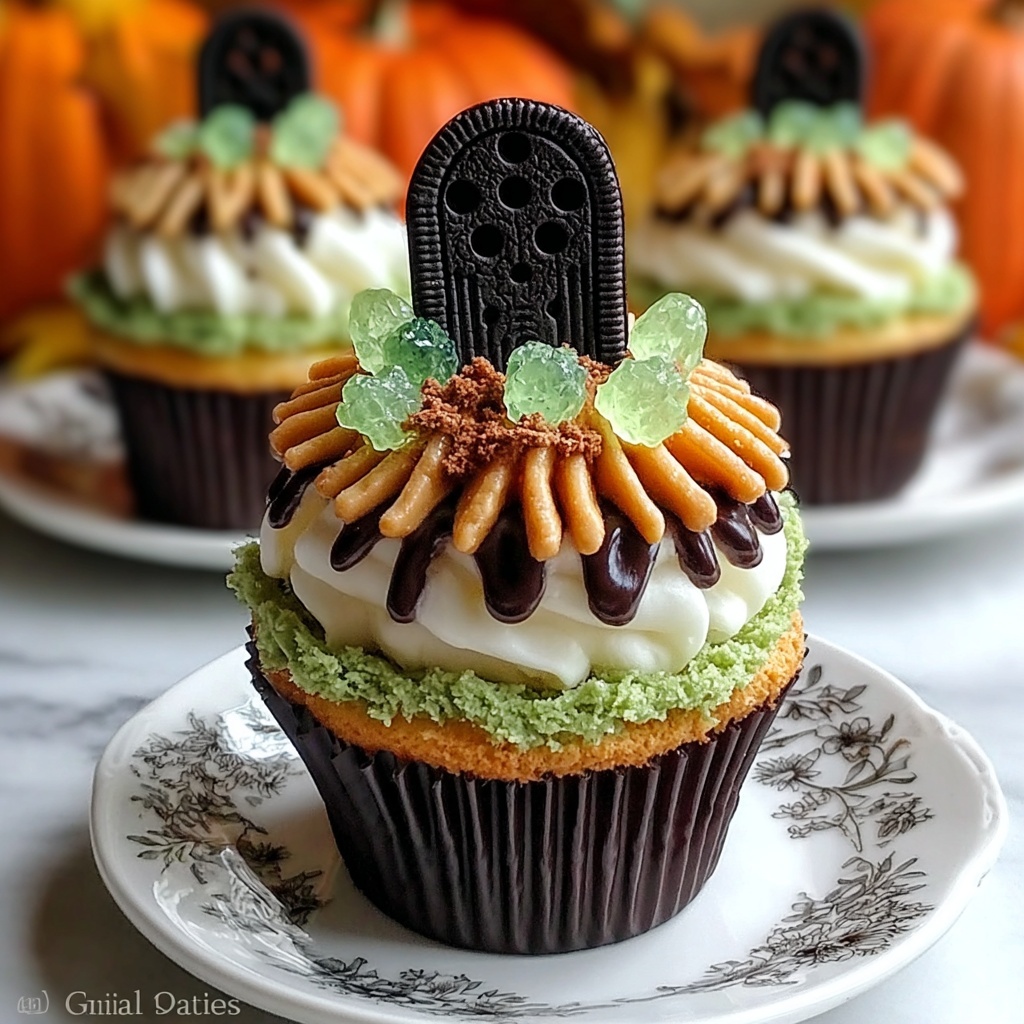
If you are looking to delight friends and family with a festive treat this season, the Spooktacular Halloween Graveyard Cupcakes Recipe is exactly what you need to conjure up some sweet magic. These cupcakes combine rich chocolate goodness with creamy fillings and spooky, edible decorations that mimic a haunted graveyard scene. Not only are they a feast for the eyes with their eerie gravestones and dirt-like Oreo crumbles, but they also boast a perfect balance of textures and flavors that will have everyone coming back for one more bite. Whether for a Halloween party or simply to impress your loved ones, this recipe is a guaranteed crowd-pleaser with a playful twist.
Ingredients You’ll Need
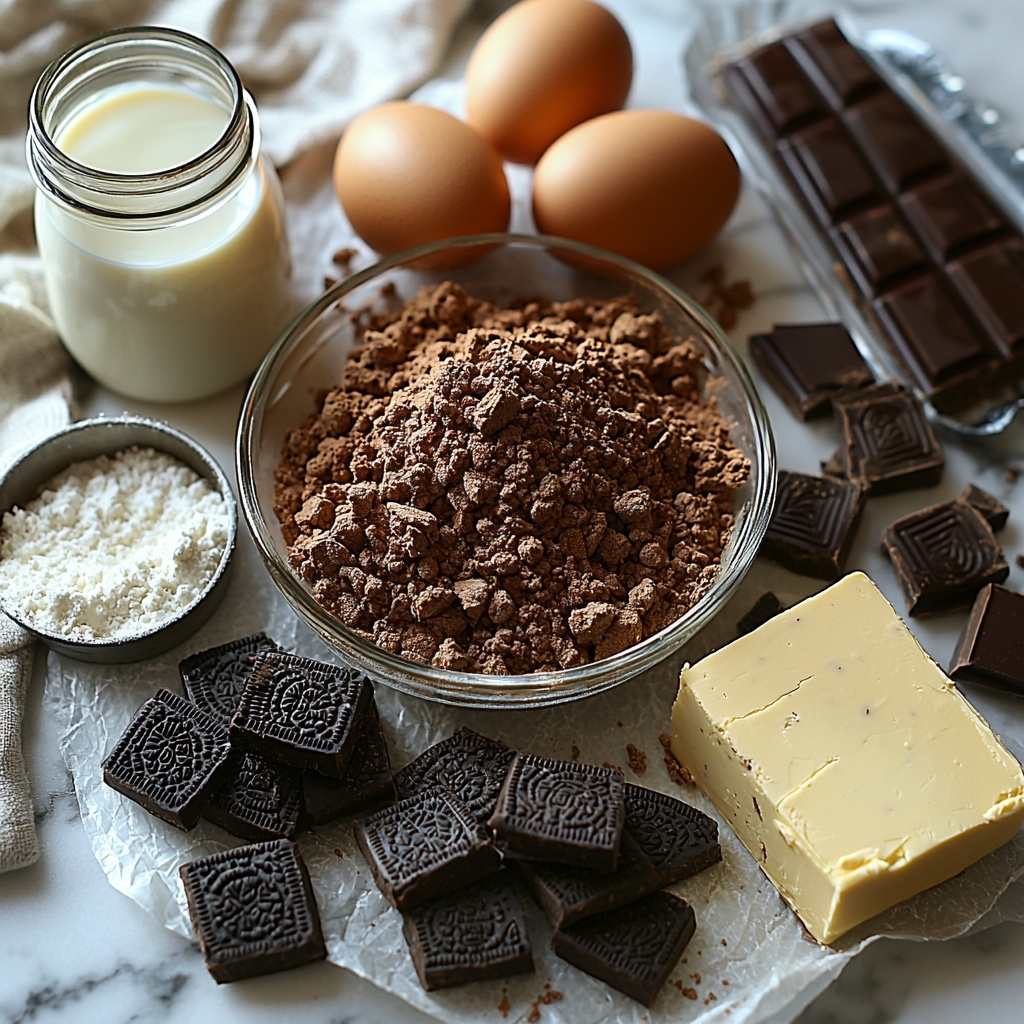
Every ingredient in this recipe plays a key role in building the texture, flavor, and visual appeal of your Halloween treat. These simple staples turn into something truly special when combined thoughtfully.
- Baking Spread (1 cup): Provides the base fat to keep your cupcakes moist and tender with a buttery richness.
- Caster Sugar (1 cup): Sweetens the batter finely, dissolving quickly for a smooth crumb.
- Large Eggs (2): Give structure and help bind all the ingredients perfectly.
- Milk (½ cup): Adds moisture; feel free to substitute with any non-dairy milk for a vegan-friendly twist.
- Self-Raising Flour (1½ cups): Contains leavening agents that help your cupcakes rise light and fluffy.
- Cocoa Powder (½ cup): Use natural cocoa for a deep chocolate punch that enhances the Halloween vibe.
- Full-Fat Cream Cheese (8 oz): Creates a smooth, tangy filling that complements the chocolate perfectly.
- Icing Sugar (1 cup): Sweetens and smooths the cream cheese filling and frostings.
- Vanilla Extract (1 tsp): Pure vanilla adds warmth and depth to all your components.
- Crushed Oreos (½ cup): Used twice; once folded into the filling and again for that spooky “dirt” effect on top.
- Lotus Biscoff Biscuits (4 pieces): Broken into gravestone shapes and dipped in chocolate for charming edible tombstones.
- Dark Chocolate (1 cup): Melted for dipping biscuits and making decadent chocolate buttercream.
- Green Food Coloring (a few drops): Optional, but adds a magical, creepy green hue to your frosting, perfect for the graveyard feel.
How to Make Spooktacular Halloween Graveyard Cupcakes Recipe
Step 1: Prepare the Gravestones
Start by breaking the Lotus Biscoff biscuits into charming gravestone shapes. Melt your dark chocolate and dip each biscuit piece, coating them evenly. Lay them out on parchment paper and allow to set completely. These will be the striking tombstones that top your cupcakes, so take your time to make them look just right.
Step 2: Make the Cupcake Batter
Preheat your oven to the recommended temperature. In a large bowl, cream together the baking spread and caster sugar until light and fluffy—this helps create that delightful tender crumb. Next, beat in the eggs one at a time, then stir in the milk for extra moisture. Gently fold in the self-raising flour and cocoa powder, combining just until smooth. This batter is rich and chocolatey, setting a decadent foundation for your graveyard theme.
Step 3: Bake the Cupcakes
Divide the batter evenly among muffin cups, filling each about two-thirds full. Pop them in the oven and bake until a skewer inserted comes out clean—usually around 18-20 minutes. Let the cupcakes cool in the tin for 10 minutes to firm up, then transfer to a wire rack. This process ensures your cupcakes bake evenly with that perfect rise and crumb.
Step 4: Prepare the Cream Cheese Filling
While the cupcakes cool, whisk together full-fat cream cheese, icing sugar, and vanilla extract to create a luscious filling. Fold in the crushed Oreos to add texture and a delightful cookies-and-cream punch. This filling will bring both creaminess and a little surprise inside each cupcake as you take a bite.
Step 5: Make the Frostings
Prepare two frostings: a rich chocolate buttercream using melted dark chocolate combined with butter and icing sugar, and a green buttercream where you tint classic buttercream with green food coloring. These contrasting frostings are essential—the chocolate buttercream grounds the cupcakes in deep flavor, while the green frosting brings the eerie grassy touch to your graveyard.
Step 6: Assemble Your Graveyard Cupcakes
Core the center of each cooled cupcake and fill with generous spoonfuls of the cream cheese filling. Swirl the chocolate buttercream over the top smoothly. Then gently insert the chocolate-dipped gravestones into each cupcake to create that iconic spooky scene. Finally, pipe the green buttercream around the gravestones like moss or grass, setting the stage for your haunted masterpiece.
Step 7: Add the Final Touches
Sprinkle crushed Oreos around the gravestones to mimic creepy dirt. These finishing touches are what really bring your graveyard cupcakes to life. Adding this extra texture not only looks fantastic but enhances the overall eating experience by balancing smooth frosting with crumbly crunch.
How to Serve Spooktacular Halloween Graveyard Cupcakes Recipe
Garnishes
For extra flair, consider adding edible spiders, candy bones, or even little plastic coffin picks to really boost the spooky factor. Edible glitter or shimmer dust lightly brushed over the green frosting can mimic morning dew or mystical fog.
Side Dishes
Serve your Spooktacular Halloween Graveyard Cupcakes Recipe alongside a steaming mug of spiced hot chocolate or a cold glass of pumpkin spice milkshake. Both complement the chocolatey depth of the cupcakes and add cozy seasonal vibes.
Creative Ways to Present
Arrange your cupcakes on a rustic wooden board with crumpled parchment paper to resemble tombstones in a forgotten graveyard. Place dry ice around the platter to create mystical fog effects that will wow your guests. You can also build mini edible “paths” using black licorice strands leading up to each cupcake for a playful touch.
Make Ahead and Storage
Storing Leftovers
Store your leftover cupcakes in an airtight container in the refrigerator to keep the cream cheese filling fresh. They will stay moist and delicious for up to 3 days, making them great for enjoying as little treats over several days.
Freezing
You can freeze undecorated cupcakes for up to 2 months. Wrap them tightly in plastic wrap and place in a freezer bag. When ready to serve, thaw completely and then add frostings and decorations fresh for best presentation.
Reheating
Warm refrigerated cupcakes slightly at room temperature before serving. Avoid microwaving frosting-covered cupcakes as it can melt the design; instead, allow them to reach room temperature for the best texture and flavor.
FAQs
Can I substitute the cream cheese in the filling?
Yes! You can use mascarpone for a lighter, less tangy texture or a dairy-free cream cheese alternative to make these cupcakes vegan-friendly. The flavor will be slightly different, but the creaminess remains perfect.
What’s the best way to shape the gravestones?
Use a small sharp knife to carefully break the Lotus Biscoff biscuits into tombstone shapes. Aim for rectangles with rounded tops or irregular edges to mimic real gravestones. Handle gently to avoid crumbs.
Can I make the green frosting without food coloring?
Absolutely! If you prefer a natural approach, try adding matcha powder or spirulina for a subtle green tint. Keep in mind that these may change the frosting flavor slightly.
How do I avoid cupcakes sinking in the center?
Make sure not to overmix your batter as this can cause dense cupcakes that sink. Also, avoid opening the oven door too early during baking, as temperature fluctuations affect rising.
Can these cupcakes be made gluten-free?
Yes, by substituting self-raising flour with a gluten-free baking mix that includes leavening agents. Be aware that texture might vary slightly but deliciousness isn’t compromised!
Final Thoughts
There is something truly magical about creating edible art that also tastes amazing, and the Spooktacular Halloween Graveyard Cupcakes Recipe does just that. It brings together rich chocolate, creamy fillings, and playful graveyard decorations in a way that’s sure to delight guests of all ages. Whether you’re a baking pro or just looking for a fun project, these cupcakes are easy to make and guaranteed to impress. So grab your ingredients, summon your inner baker, and get ready to create a spooky treat that everyone will remember!
Print
Spooktacular Halloween Graveyard Cupcakes Recipe
- Prep Time: 30 minutes
- Cook Time: 25 minutes
- Total Time: 1 hour 10 minutes
- Yield: 12 servings
- Category: Dessert
- Method: Baking
- Cuisine: American
Description
Create spooky and delicious Halloween Graveyard Cupcakes featuring rich chocolate cupcakes filled with creamy Oreo cream cheese filling, topped with chocolate and green buttercream frostings, and decorated with chocolate-dipped Biscoff biscuit gravestones and crushed Oreos to mimic eerie graveyard dirt. Perfect for impressing guests at your Halloween party.
Ingredients
Cupcakes
- 1 cup Baking Spread (or butter for creamier flavor)
- 1 cup Caster Sugar (or granulated sugar)
- 2 large Eggs (no substitutes recommended)
- ½ cup Milk (non-dairy options can be used)
- 1½ cups Self-Raising Flour
- ½ cup Cocoa Powder (natural cocoa for deeper flavor)
Filling
- 8 oz Full-Fat Cream Cheese (or mascarpone for lighter texture)
- 1 cup Icing Sugar
- 1 tsp Vanilla Extract (opt for pure vanilla)
- ½ cup Crushed Oreos
Decorations
- 4 pieces Lotus Biscoff Biscuits (for gravestones)
- 1 cup Dark Chocolate (or milk chocolate as an alternative)
- a few drops Green Food Coloring (omit for natural colors)
- ½ cup Crushed Oreos (for dirt effect)
Instructions
- Prepare Gravestones: Break Lotus Biscoff biscuits into gravestone shapes, then dip each piece in melted dark chocolate. Place them on parchment paper and let the chocolate set completely at room temperature or in the refrigerator.
- Make Cupcake Batter: Preheat your oven to 350°F (175°C). In a large bowl, cream together the baking spread and caster sugar until light and fluffy. Beat in the eggs one at a time, then stir in the milk. Sift together the self-raising flour and cocoa powder, then gently fold them into the wet mixture until just combined.
- Bake: Line a muffin tin with cupcake liners and fill each cup about two-thirds full with batter. Bake in the preheated oven for 18-22 minutes or until a skewer inserted in the center comes out clean. Let the cupcakes cool in the tin for 10 minutes before transferring them to a wire rack to cool completely.
- Prepare Filling: In a bowl, beat the full-fat cream cheese until smooth. Gradually add the icing sugar and vanilla extract, mixing well until creamy. Fold in the crushed Oreos gently, ensuring an even distribution without overmixing.
- Make Frostings: Prepare a chocolate buttercream by mixing melted dark chocolate with softened baking spread and icing sugar until smooth. Separately, make a green buttercream by blending softened baking spread with icing sugar and a few drops of green food coloring until fluffy and vibrant.
- Assemble Cupcakes: Using a small knife or cupcake corer, remove a small section from the center of each cupcake and fill with the Oreo cream cheese mixture. Pipe the chocolate buttercream over the filled cupcakes smoothly. Insert one chocolate-dipped Biscoff gravestone per cupcake.
- Final Touches: Pipe green buttercream around the gravestones to resemble grass. Sprinkle the remaining crushed Oreos around the gravestones to create a ‘dirt’ effect, giving your cupcakes an authentic graveyard appearance. Serve and enjoy your spooky creations!
Notes
- Use full-fat cream cheese for the best texture and flavor in the filling.
- Natural cocoa powder gives a richer chocolate taste compared to Dutch-processed cocoa.
- If making ahead, store cupcakes without decorations in an airtight container in the fridge for up to 2 days.
- Let cupcakes come to room temperature before serving for optimal taste and texture.
- For vegan options, substitute eggs with flax eggs and use plant-based butter and cream cheese alternatives.


