
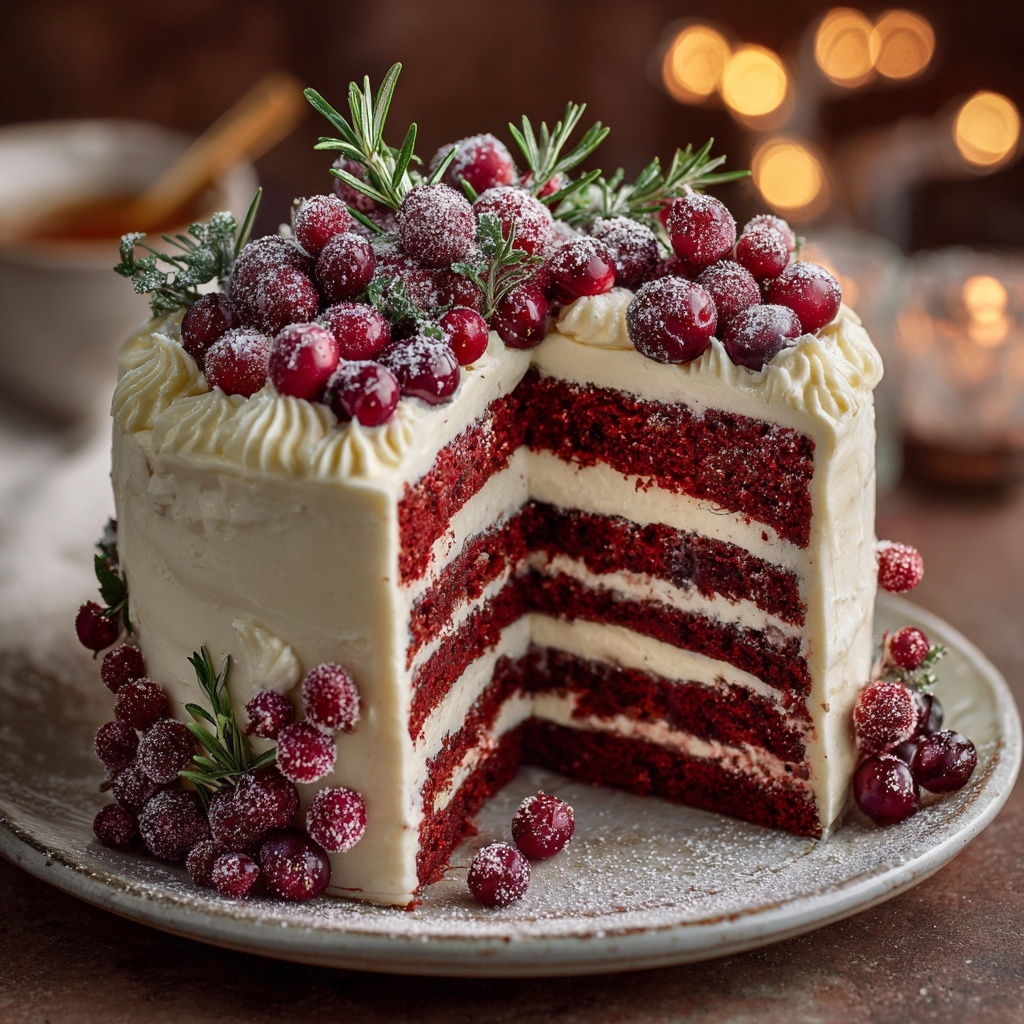
If you’re looking for a showstopper dessert that brings both festive cheer and irresistible flavor, this Red Velvet Tree Cake Recipe will have you grinning from the first bite to the last crumb. Picture a moist, tender red velvet cake shaped like a Christmas tree, adorned with luscious cream cheese frosting and sprinkles that sparkle like holiday lights. Not only does it capture the spirit of the season, but it also combines classic southern flavors with a playful twist that’s perfect for gathering around the table with loved ones or brightening any celebration.
Ingredients You’ll Need
Gathering simple, quality ingredients is the first step to creating this delightful cake. Each one plays a crucial role in bringing out that signature red velvet taste and that perfect moist texture which makes this recipe truly special.
- All-purpose flour: The foundation that gives the cake its structure and tender crumb.
- Granulated sugar: Adds sweetness and helps create a moist crumb.
- Baking soda: The leavening agent that ensures your cake rises beautifully.
- Cocoa powder: A hint of chocolate flavor that balances the sweetness perfectly.
- Salt: Enhances all the flavors in the cake for a more rounded taste.
- Vegetable oil: Keeps the cake super moist and tender.
- Buttermilk: Adds a subtle tanginess and contributes to the cake’s softness.
- Eggs: Provide structure and richness to your batter.
- Red food coloring: Gives the cake its signature vibrant red color that’s so festive.
- White vinegar: Reacts with the baking soda to help the cake rise and adds to its tender crumb.
- Vanilla extract: Brings warm, sweet notes that complement the cocoa and buttermilk.
- Cream cheese frosting: Made from cream cheese, butter, powdered sugar, and vanilla—this luscious frosting is the perfect creamy topping.
- Festive sprinkles or decorations (optional): For that magical holiday sparkle on top of your cake.
- Nonstick spray or butter: Essential for greasing your cake pan to prevent sticking.
How to Make Red Velvet Tree Cake Recipe
Step 1: Prepare Your Pan and Oven
Start by preheating your oven to 350°F (175°C). Grease your tree-shaped cake pan with nonstick spray or butter to ensure the cake releases perfectly after baking. If you don’t have a specialty pan, a bundt or tube pan works just fine for shaping.
Step 2: Mix Dry Ingredients
In a large bowl, whisk together your flour, sugar, baking soda, cocoa powder, and salt. This well-mixed dry base ensures even distribution of ingredients for a consistent texture throughout your cake.
Step 3: Combine Wet Ingredients
In a separate bowl, whisk the vegetable oil, room temperature buttermilk, eggs, red food coloring, white vinegar, and vanilla extract until everything is smoothly integrated. This blend of wet ingredients brings moisture and that vibrant red hue your cake is known for.
Step 4: Blend Wet and Dry Mixtures
Slowly pour the wet ingredients into the dry mixture, stirring gently just until the batter is smooth and combined. This careful mixing keeps the texture tender without overworking the batter.
Step 5: Bake the Cake
Pour your batter into the prepared pan, smoothing the top if needed. Bake for 35 to 40 minutes, or until a toothpick inserted into the center comes out clean. The kitchen will start smelling like holiday magic in no time.
Step 6: Cool and Frost
Allow the cake to cool in the pan for 10 minutes, then invert onto a wire rack to cool completely. While waiting, beat together cream cheese and butter until fluffy. Gradually add powdered sugar and vanilla extract and beat until silky smooth. Once the cake is fully cooled, generously frost it and decorate with festive sprinkles to make your Red Velvet Tree Cake Recipe truly come alive.
How to Serve Red Velvet Tree Cake Recipe

Garnishes
A dusting of edible glitter or an assortment of colorful sprinkles turns this cake into a celebration centerpiece. You can also add tiny edible pearls or star-shaped candies to mimic twinkling lights on your tree-shaped cake.
Side Dishes
Pair your Red Velvet Tree Cake Recipe with a scoop of vanilla ice cream or a dollop of freshly whipped cream for an indulgent contrast. For a seasonal touch, serve alongside hot mulled cider or a cup of spiced chai tea to enhance those cozy holiday vibes.
Creative Ways to Present
Get playful by layering the cake with extra cream cheese frosting between thin sliced layers to emphasize the tree shape. For an extra wow factor, serve individual mini “tree” cupcakes decorated similarly, allowing guests to grab their own festive treat.
Make Ahead and Storage
Storing Leftovers
Once frosted, cover your Red Velvet Tree Cake with plastic wrap or store in an airtight container in the refrigerator. It will stay fresh for up to 3 days and keep its moist texture and creamy topping intact.
Freezing
You can freeze the cake before frosting by wrapping it tightly in plastic wrap and aluminum foil. When you’re ready to enjoy, thaw it overnight in the fridge and then frost as usual. This works great for preparing the cake a few days ahead of your celebration.
Reheating
If you prefer your cake slightly warm, slice individual pieces and microwave for about 10 seconds. Avoid reheating the whole cake to preserve the integrity of the frosting. Enjoy that cozy warmth without sacrificing delicious texture.
FAQs
Can I use regular milk instead of buttermilk?
While regular milk can work, buttermilk adds a subtle tang and reacts with baking soda to give your Red Velvet Tree Cake Recipe its signature tender crumb. If you don’t have buttermilk, you can make a quick substitute by mixing 1 tablespoon of white vinegar or lemon juice into 1 cup of milk and letting it sit for 5 minutes.
What if I don’t have a tree-shaped pan?
No worries! You can bake this cake in a bundt or tube pan for a festive ring shape, or bake in a round or square pan and carve it into a tree with a sharp knife. The cream cheese frosting and decorations will help bring the tree design to life.
Is red food coloring necessary?
Red food coloring is what gives this cake its iconic bright red color, making it perfect for holidays and celebrations. If you prefer to avoid artificial coloring, you can experiment with natural sources like beet juice, but keep in mind the color might be less vibrant.
Can I make the cream cheese frosting ahead of time?
Absolutely! Cream cheese frosting can be made up to 2 days ahead and stored in an airtight container in the fridge. Let it come to room temperature and give it a quick whip before spreading on your cake for the best texture.
How do I prevent the cake from sticking to the pan?
Greasing your pan generously with butter or nonstick spray is key. For extra insurance, dust the pan lightly with powdered sugar or flour after greasing. This simple step will help your Red Velvet Tree Cake come out clean and intact.
Final Thoughts
This Red Velvet Tree Cake Recipe isn’t just a dessert; it’s a festive experience filled with love, color, and that rich, comforting flavor we all crave during the holidays. Whether you’re baking for a big gathering or a cozy night in, this cake is guaranteed to bring smiles and sweet moments. So grab your mixing bowls, channel your inner baker, and enjoy every delicious step of making this delightful holiday treat!
Print
Red Velvet Tree Cake Recipe
- Prep Time: 25 minutes
- Cook Time: 40 minutes
- Total Time: 1 hour 5 minutes
- Yield: 12 servings
- Category: Dessert
- Method: Baking
- Cuisine: American
- Diet: Vegetarian
Description
This Red Velvet Tree Cake is a festive holiday dessert featuring a moist, tender red velvet cake baked in a tree-shaped pan and topped with rich, creamy cream cheese frosting. Perfect for Christmas celebrations, it’s decorated with sprinkles to resemble a beautiful holiday tree, bringing both flavor and visual joy to your gathering.
Ingredients
Cake Ingredients
- 2 1/2 cups all-purpose flour
- 1 1/2 cups granulated sugar
- 1 tsp baking soda
- 1 tsp cocoa powder
- 1/2 tsp salt
- 1 1/2 cups vegetable oil
- 1 cup buttermilk, room temperature
- 2 large eggs
- 2 tbsp red food coloring
- 1 tsp white vinegar
- 2 tsp vanilla extract
Cream Cheese Frosting
- 8 oz cream cheese, softened
- 1/4 cup butter, softened
- 2 cups powdered sugar
- 1 tsp vanilla extract
Decorations (Optional)
- Festive sprinkles or decorations
- Nonstick spray or butter, for greasing the pan
Instructions
- Preheat and Prepare Pan: Preheat your oven to 350°F (175°C). Grease a tree-shaped cake pan or a standard bundt or tube pan with nonstick spray or butter to ensure easy cake removal.
- Mix Dry Ingredients: In a large mixing bowl, whisk together the all-purpose flour, granulated sugar, baking soda, cocoa powder, and salt until evenly combined.
- Combine Wet Ingredients: In a separate bowl, whisk together the vegetable oil, room temperature buttermilk, eggs, red food coloring, white vinegar, and vanilla extract until the mixture is smooth and uniform.
- Combine Wet and Dry Mixtures: Gradually pour the wet ingredients into the dry ingredients. Stir gently just until the batter is smooth and well combined, being careful not to overmix to keep the cake tender.
- Pour Batter and Bake: Pour the batter into the prepared cake pan, smoothing the top as needed. Bake in the preheated oven for 35 to 40 minutes, or until a toothpick inserted in the center comes out clean.
- Cool the Cake: Let the cake cool in the pan for about 10 minutes to set. Then carefully invert it onto a wire cooling rack and allow it to cool completely before frosting.
- Prepare Cream Cheese Frosting: While the cake cools, beat together the softened cream cheese and butter until fluffy using a mixer. Gradually add the powdered sugar and vanilla extract and beat until smooth and creamy.
- Frost and Decorate: Once completely cooled, spread the cream cheese frosting evenly over the cake. Decorate with festive sprinkles or decorations to resemble a Christmas tree for a festive finish.
Notes
- You can use a silicone tree mold or alternatively carve a tree shape from a sheet cake if a tree-shaped pan is not available.
- For extra holiday sparkle, add edible glitter or colored sugar atop the frosting.
- This cake can be made one day ahead; store it covered in the refrigerator to keep it fresh.


