
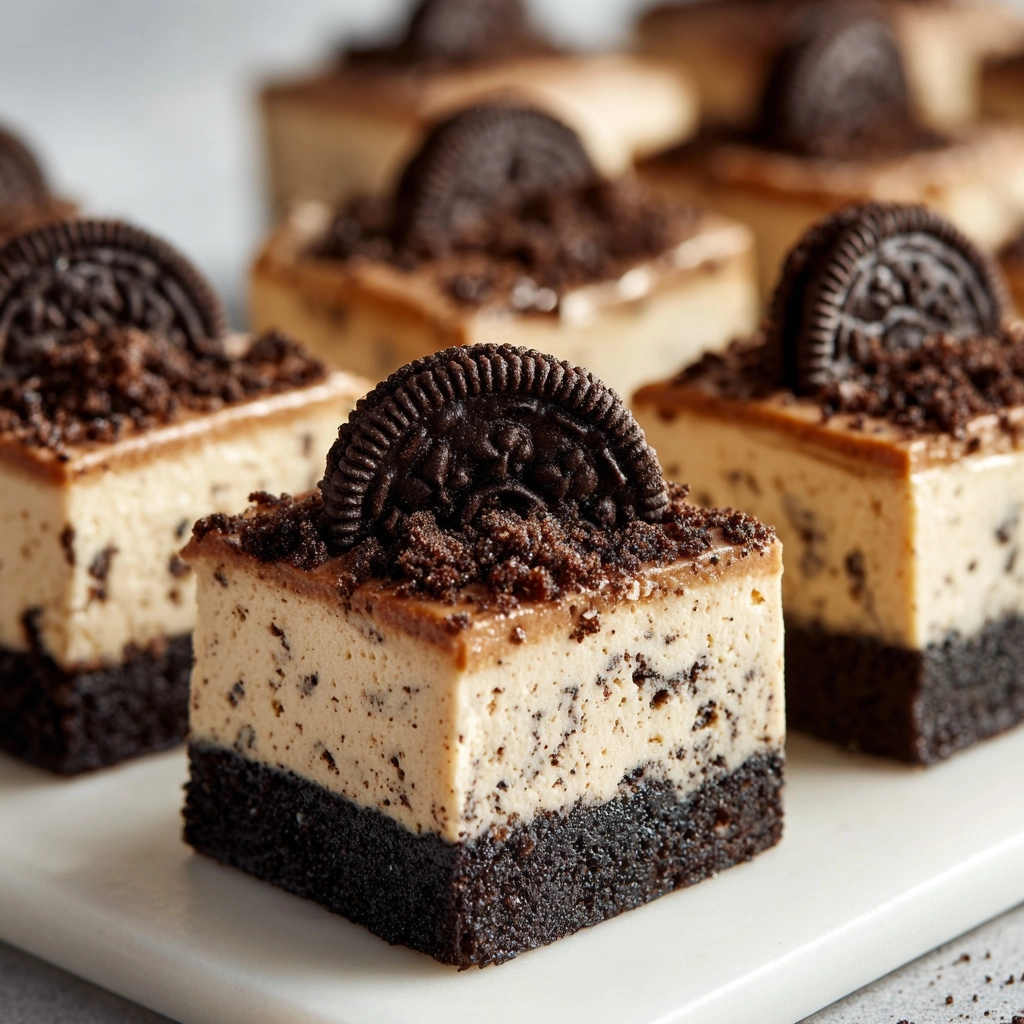
If you have ever dreamed of a dessert that perfectly balances creamy decadence with the nostalgic crunch of Oreos, this Oreo Cheesecake Slice Recipe is exactly what you need to try next. Imagine a rich, velvety cream cheese filling studded with chunks of Oreo cookies atop a buttery Oreo crust, creating a luscious dessert that’s simple to make yet impressively indulgent. Whether it’s a celebration or just a cozy afternoon sweet craving, these cheesecake slices promise the kind of comfort and joy every bite should bring.
Ingredients You’ll Need
Gathering the right ingredients is the first step to creating a truly irresistible Oreo Cheesecake Slice Recipe. Each one plays a crucial role in crafting the perfect texture and flavor, from the buttery crust to the silky cheesecake filling and those iconic Oreo pieces that elevate the whole dessert.
- Oreo cookies (24 crushed): Acts as the crunchy, chocolatey base for your crust, providing that distinct Oreo flavor with every bite.
- Unsalted butter (4 tablespoons, melted): Binds the Oreo crust together and adds a rich depth to the base.
- Cream cheese (3 packages, 8 ounces each, softened): The creamy heart of the cheesecake that provides the smooth texture and tangy flavor.
- Granulated sugar (3/4 cup): Sweetens the cheesecake filling perfectly without overpowering the Oreo flavor.
- Vanilla extract (1 teaspoon): Enhances the overall flavor with a warm, aromatic note.
- Large eggs (3): Help set the cheesecake while keeping it luxuriously creamy.
- Sour cream (1/2 cup): Adds moisture and a slight tang to balance the richness.
- Oreo cookies (10 chopped): Mixed into the batter for delightful cookie bursts inside each slice.
- Whipped cream (optional): Perfect for topping and adding extra creaminess and flair.
- Extra crushed Oreos (optional): Sprinkled on top for garnish, adding crunch and visual appeal.
How to Make Oreo Cheesecake Slice Recipe
Step 1: Prepare the Crust
Start by preheating your oven to 325°F (163°C) and lining an 8×8-inch baking pan with parchment paper, making sure there’s an overhang on the sides for easy removal later. Mix the crushed Oreos with melted butter in a bowl until the mixture feels like wet sand—this combination forms the perfect crust. Firmly press it down into the pan to create an even layer. Bake this crust for 10 minutes to set it, then let it cool slightly while you prepare the filling.
Step 2: Make the Cheesecake Filling
In a large bowl, beat the softened cream cheese until it’s completely smooth—this step ensures the filling is silky. Add in the sugar and vanilla extract and beat until everything blends beautifully. Add eggs one by one on low speed, scraping the sides after each addition to keep the texture uniform. Then, gently fold in the sour cream for that subtle tang and moisture, followed by the chopped Oreos to sprinkle those delightful cookie chunks throughout the filling.
Step 3: Bake the Cheesecake
Pour your creamy filling over the cooled crust and smooth the top with a spatula to ensure even baking and a pretty finish. Pop the pan into your oven and bake for 35 to 40 minutes or until the center is mostly set but still slightly jiggles when you gently shake the pan. This gentle wobble means your cheesecake will be beautifully creamy once chilled.
Step 4: Chill to Perfection
After baking, turn off the oven but crack the door open and let the cheesecake cool inside for about an hour; this helps prevent cracks and maintains that luscious texture. Once cooled, transfer the cheesecake pan to your refrigerator and chill it for at least 4 hours or, even better, overnight. This time allows the flavors to mingle and the texture to fully set, making slicing effortless and clean.
Step 5: Slice and Garnish
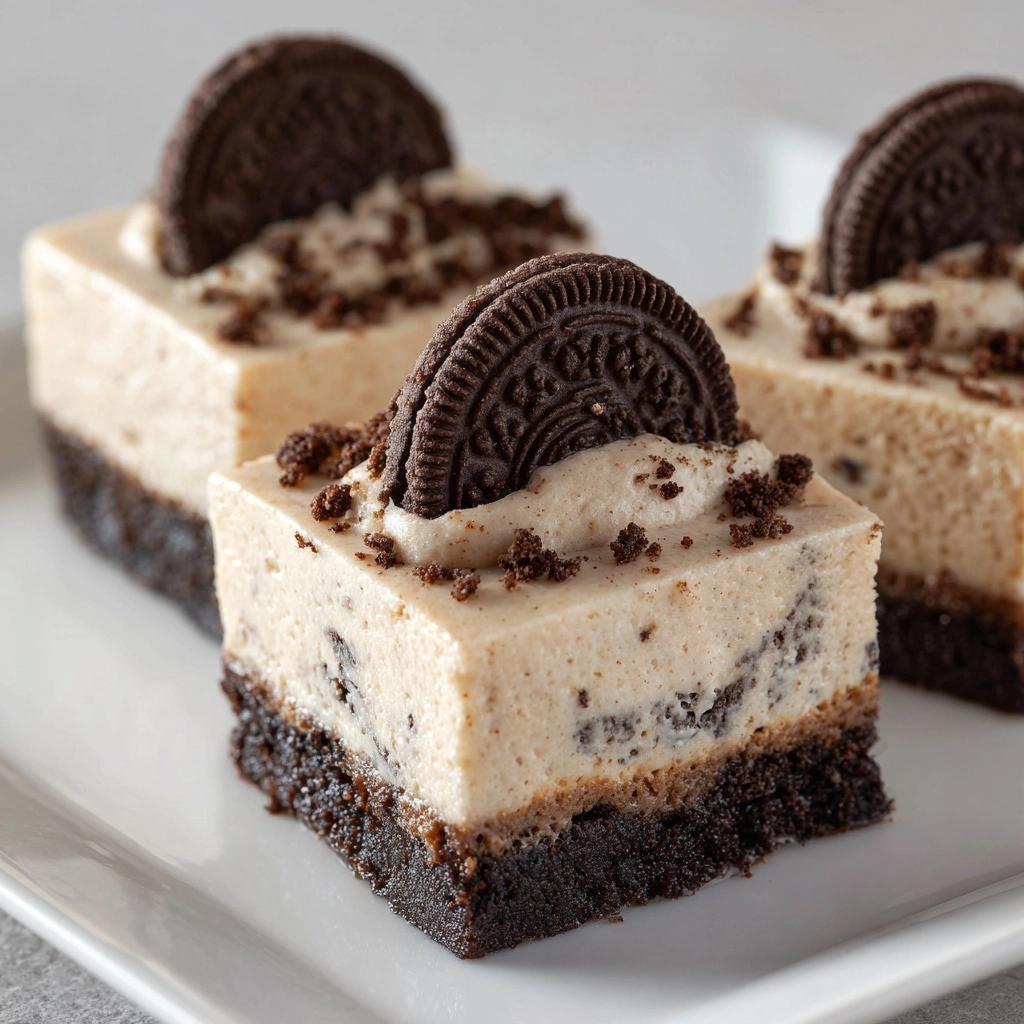
Using the parchment paper overhang, lift the cheesecake out of the pan onto a cutting board. Slice into 9 generous squares, then add your finishing touches with whipped cream and extra crushed Oreos if you’re feeling fancy. These little details take the Oreo Cheesecake Slice Recipe to the next level of deliciousness.
How to Serve Oreo Cheesecake Slice Recipe
Garnishes
The classic touch of whipped cream on top of these cheesecake slices adds an airy contrast to the dense creaminess beneath. Don’t forget a sprinkle of crushed Oreos for that irresistible crunch and visual appeal. You can also consider a drizzle of chocolate or caramel sauce for an even more decadent presentation.
Side Dishes
Oreo Cheesecake slices are a star on their own, but if you want to round out your dessert table, serve alongside fresh berries or a scoop of vanilla ice cream. The fruit adds a refreshing tartness that balances the rich, creamy cheesecake perfectly.
Creative Ways to Present
For a special occasion, serve these slices in clear glass cups layered with extra crushed Oreos and whipped cream for a playful parfait effect. Or arrange on a rustic wooden board with small bowls of toppings like chocolate chips, nuts, or fruit sauces so guests can customize their slices.
Make Ahead and Storage
Storing Leftovers
Once baked and chilled, store your leftover Oreo Cheesecake slices tightly covered in the refrigerator. They stay fresh for up to 4 days, making it easy to enjoy the dessert a little at a time without losing any of the creamy goodness.
Freezing
You can freeze these cheesecake slices for up to 2 months. Wrap each slice individually in plastic wrap and then in foil or a freezer-safe container to prevent freezer burn. When you’re ready to enjoy, thaw them overnight in the refrigerator for the best texture.
Reheating
While this cheesecake is best served chilled, if you prefer it slightly warmer, just allow thawed slices to sit at room temperature for 15–20 minutes before serving. Avoid microwaving as it can cause the creamy texture to split or become oily.
FAQs
Can I use regular Oreos instead of double-stuffed?
Absolutely! Regular Oreos work wonderfully and provide the classic flavor and crunch. Double-stuffed Oreos do make the crust extra creamy and indulgent, but both options yield delicious cheesecake slices.
What if I don’t have sour cream? Can I substitute something else?
Yes! Greek yogurt is a great substitute for sour cream since it adds similar creaminess and tang. Just use the same amount when replacing sour cream in this Oreo Cheesecake Slice Recipe.
How can I prevent cracks on my cheesecake?
Cooling the cheesecake slowly is key—letting it rest in the oven with the door slightly open and chilling it well before slicing helps prevent cracking and keeps the surface smooth and beautiful.
Is this recipe suitable for vegetarians?
Yes, this Oreo Cheesecake Slice Recipe is vegetarian-friendly as it contains no meat or gelatin. It’s always good to check labels if you’re strict, but Oreos and cream cheese are generally safe.
How long does it take to make this dessert from start to finish?
The active prep and cook time total about an hour, but including the chilling time the next step is patience—ideally 4 hours to overnight—to really let the cheesecake set perfectly and develop its flavor.
Final Thoughts
If you’re searching for a dessert that’s as fun to make as it is to devour, this Oreo Cheesecake Slice Recipe is your new go-to. The blend of creamy, dreamy cheesecake with the beloved crunch of Oreos creates a mouthwatering treat that’s perfect anytime you want to treat yourself or impress friends and family. Trust me, once you try this, it will quickly become a favorite slice to share and savor.
Print
Oreo Cheesecake Slice Recipe
- Prep Time: 20 minutes
- Cook Time: 40 minutes
- Total Time: 1 hour (plus at least 4 hours chilling time)
- Yield: 9 slices
- Category: Dessert
- Method: Baking
- Cuisine: American
- Diet: Vegetarian
Description
This Oreo Cheesecake Slice is a rich and creamy dessert featuring a classic Oreo cookie crust and a velvety cream cheese filling studded with chopped Oreos. Baked to perfection and chilled to set, it’s an indulgent treat that’s perfect for parties or any special occasion.
Ingredients
Crust
- 24 Oreo cookies, crushed
- 4 tablespoons unsalted butter, melted
Cheesecake Filling
- 3 (8-ounce) packages cream cheese, softened
- 3/4 cup granulated sugar
- 1 teaspoon vanilla extract
- 3 large eggs
- 1/2 cup sour cream
- 10 Oreo cookies, chopped
Topping (Optional)
- Whipped cream
- Extra crushed Oreos
Instructions
- Preheat and Prepare Pan: Preheat your oven to 325°F (163°C). Line an 8×8-inch baking pan with parchment paper, leaving an overhang on the sides for easy removal.
- Make the Crust: In a medium bowl, combine the crushed Oreo cookies with the melted butter and stir until the mixture resembles wet sand. Press the mixture firmly into the bottom of the prepared pan to form an even crust layer.
- Bake the Crust: Bake the crust in the preheated oven for 10 minutes. Remove it from the oven and allow it to cool slightly while you prepare the filling.
- Prepare the Filling: In a large mixing bowl, beat the softened cream cheese until smooth and creamy. Add the granulated sugar and vanilla extract, beating until well combined.
- Add Eggs: Add the eggs one at a time, mixing on low speed and scraping the bowl after each addition to ensure they are fully incorporated without overmixing.
- Add Sour Cream: Mix in the sour cream until just combined to keep the filling smooth and creamy.
- Fold in Chopped Oreos: Gently fold the chopped Oreo cookies into the cheesecake filling to distribute them evenly without deflating the batter.
- Assemble and Bake: Pour the filling over the cooled crust and smooth the top with a spatula. Bake for 35–40 minutes or until the center is set but still slightly jiggly to avoid overbaking.
- Cool in Oven: Turn off the oven and crack the door open. Let the cheesecake cool inside the oven for 1 hour to prevent cracking.
- Chill: Transfer the cheesecake to the refrigerator and chill for at least 4 hours or overnight to fully set and develop flavor.
- Serve: Once chilled, lift the cheesecake out of the pan using the parchment overhang and slice into 9 squares. Garnish with whipped cream and extra crushed Oreos if desired before serving.
Notes
- Use double-stuffed Oreos for an extra creamy and flavorful crust.
- Cheesecake slices can be frozen for up to 2 months. Thaw in the refrigerator overnight before serving.


