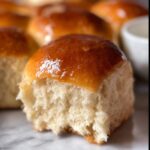
Description
These One Hour Quick Dinner Rolls are soft, tender, and perfectly golden, ideal for a speedy homemade bread option. With a simple yeast proofing step and quick rising method in a warm oven, this recipe yields fluffy rolls with just about an hour from start to finish, perfect as a side for any dinner or enjoyed warm with butter.
Ingredients
Scale
For Yeast Mixture
- 3 tablespoons warm water (105-110°F)
- 1 tablespoon active dry yeast
- 1 teaspoon sugar (to activate yeast)
For Dough
- 3 tablespoons sugar
- 1 teaspoon kosher salt
- 3 tablespoons shortening
- 3/4 cup milk (warm, 105-110°F)
- 1 large egg
- 2 1/2 cups all-purpose flour (spooned and leveled)
For Pan and Finishing
- 1 tablespoon butter (to grease pan)
- 1 tablespoon butter (to top finished rolls)
Instructions
- Proof the Yeast: In a small bowl or mug, add 3 tablespoons of warm water (105-110°F), 1 tablespoon active dry yeast, and 1 teaspoon sugar. Stir and let sit for 5 minutes until the mixture is bubbly, indicating the yeast is active.
- Prepare the Dough Base: In a large bowl or stand mixer, combine 3 tablespoons sugar, 1 teaspoon kosher salt, 3 tablespoons shortening, and 1 cup of the all-purpose flour. Stir to mix.
- Add Warm Milk: Microwave 3/4 cup milk in 30-second intervals until warm (105-110°F). Add this milk to the flour mixture and stir together, either with a wooden spoon, dough hook, or paddle attachment.
- Incorporate Yeast Mixture and Egg: Once the yeast is bubbly, add it to the flour mixture. Then add 1 large egg and beat well until everything is combined.
- Add Remaining Flour and Knead: Add the remaining flour gradually, mixing continuously. The dough should be smooth, soft, and slightly sticky—not pulling away completely from the bowl. Knead with the dough attachment for about 5 minutes, or by hand for 8 minutes on a floured surface.
- First Rest: Scrape dough onto a floured surface, shape into a ball, and cover with a clean tea towel. Let rest 5-10 minutes.
- Preheat and Prepare Pan: Preheat oven to 375°F for 2-3 minutes. Butter a 10-inch cast iron skillet or 9×13-inch baking pan with 1 tablespoon butter, place in oven until butter melts and pan is hot, then turn oven off.
- Shape Rolls: Press down the dough to release air bubbles. Divide into 12 equal portions (~2 ounces each). Shape each into a round roll by pinching the dough on one side and rounding the other. Place rolls in the hot greased pan with space between each.
- Proof Rolls in Warm Oven: Cover rolls with a tea towel and place in the turned-off oven set to warm (touch rack to ensure it’s not too hot). Leave in oven for 15 minutes.
- Continue Rising: Remove rolls from oven, place in a warm spot, and preheat oven back to 375°F. Let rolls rise for another 10-15 minutes until doubled in size.
- Bake Rolls: Remove towel and bake rolls at 375°F for about 12 minutes until tops are deep golden brown and internal temperature reaches 190°F.
- Butter and Serve: Immediately brush rolls with 1 tablespoon melted butter. Let set for 5 minutes before serving warm with additional butter or honey butter.
Notes
- Water and milk temperature for yeast proofing is critical—should be warm but not hot (105-110°F) to activate yeast properly.
- When adding flour, dough should stay slightly sticky for tender rolls, but still hold together well.
- Proofing rolls in a turned-off warm oven helps speed up rising time while preventing uneven cooking.
- You can use a cast iron skillet or standard baking pan depending on preference; both yield excellent results.
- For best results, measure flour by spooning it into the measuring cup and leveling it rather than scooping, to avoid dense dough.