
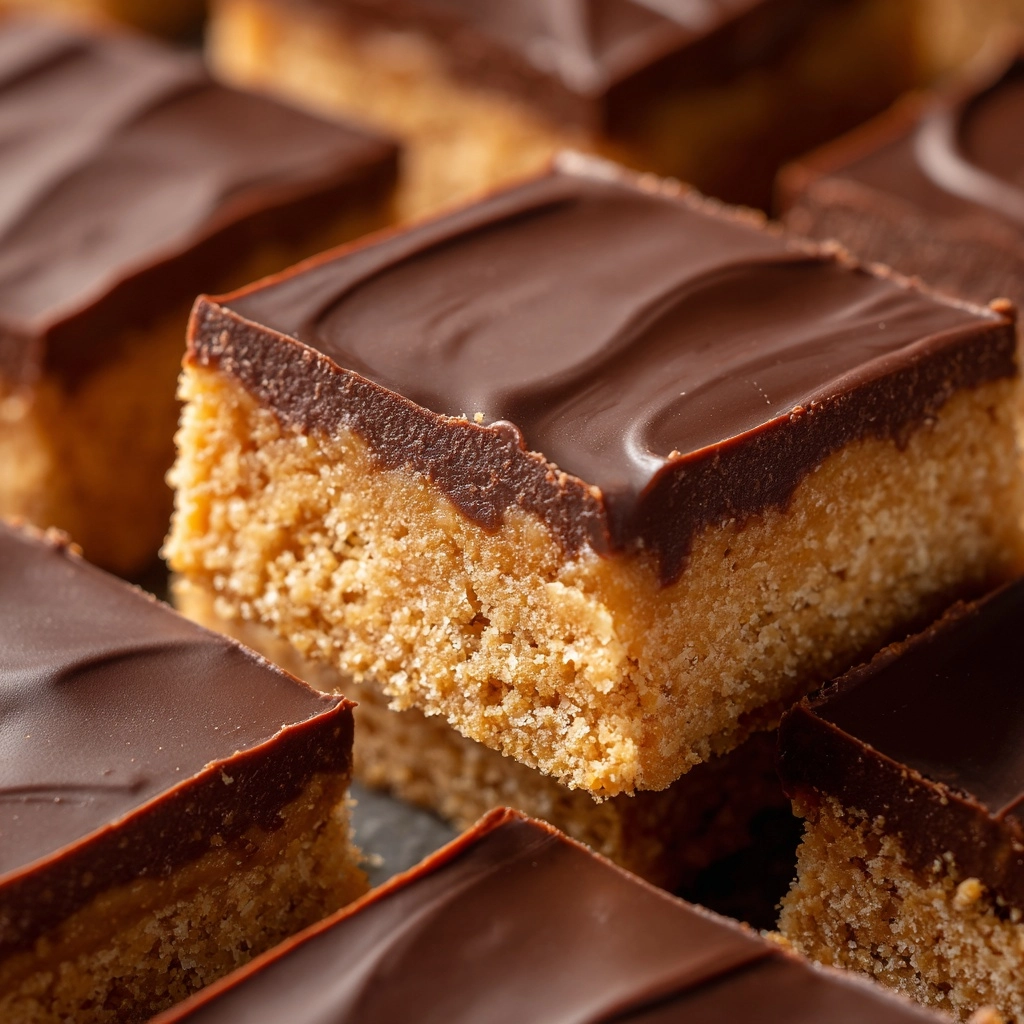
If you grew up looking forward to dessert at school, there’s a good chance that Lunch Lady Peanut Butter Bars are forever cemented in your memory as one of the all-time tastiest treats. Imagine thick, chewy bars crowned with a dreamy peanut butter frosting, packed with nostalgic flavor and a soft, melt-in-your-mouth texture. Whether you’re baking these for a family gathering, potluck, or just to treat yourself, they’re the perfect blend of sweet, salty, and irresistibly creamy. Trust me, one bite and you’ll feel like a kid again waiting in the lunch line with eager anticipation!
Ingredients You’ll Need
With just a handful of pantry staples, these Lunch Lady Peanut Butter Bars come together quickly and taste like pure bakery nostalgia. Each ingredient plays a crucial role in nailing that iconic flavor and texture we all crave.
- Unsalted butter: Softened butter gives these bars their rich, tender crumb and helps everything meld into a smooth, decadent dough.
- Granulated sugar: Adds just the right amount of sweetness without overpowering the peanut butter.
- Brown sugar: Packed brown sugar deepens the sweetness with a hint of molasses, making the bars moist and chewy.
- Eggs: Act as the essential binder and provide structure, ensuring your bars hold together beautifully.
- Vanilla extract: A dash of vanilla rounds out all the flavors for that irresistible homemade vibe.
- Creamy peanut butter (plus extra): The star of the show! It gives the bars their signature peanutty richness, and you’ll use it both in the base and as a luscious layer atop the warm bars.
- All-purpose flour: Your baking backbone, bringing everything together while keeping the bars soft, not dense.
- Baking soda: Gives just the right amount of lift for a perfectly thick and chewy bite.
- Salt: Enhances every other flavor and balances the sweet with savory depth.
- Quick oats: These work their magic by adding a subtle chew and a nostalgic, wholesome texture.
- Powdered sugar: Essential for the smooth, creamy frosting that sets these bars apart.
- Milk: Loosens up the frosting and helps it spread like a dream.
- Creamy peanut butter (for frosting): Takes the frosting over the top for a double hit of peanutty flavor.
How to Make Lunch Lady Peanut Butter Bars
Step 1: Prepare Your Pan and Ingredients
Begin by preheating your oven to 350°F and greasing a 9×13-inch baking pan. This will guarantee your bars release easily and bake evenly. Gather all your ingredients to ensure a smooth, stress-free process—no last-minute scrambles!
Step 2: Cream Butter and Sugars
In a large bowl, cream together the softened butter, granulated sugar, and brown sugar until the mixture is light and fluffy. This step creates the base for your Lunch Lady Peanut Butter Bars, ensuring they’re rich and perfectly sweet.
Step 3: Add Eggs, Vanilla, and Peanut Butter
Next, beat in the eggs one at a time, making sure each is fully incorporated before adding the next. Stir in the vanilla extract and a full cup of creamy peanut butter. At this point, the dough should smell heavenly and look impossibly smooth.
Step 4: Combine Dry Ingredients
In a separate bowl, whisk together the flour, baking soda, salt, and quick oats. Gradually add these dry ingredients to the wet mixture, mixing just until combined. The oats add that classic chew, and the flour keeps everything perfectly tender.
Step 5: Bake the Bars
Spread the dough evenly into your prepared pan. Bake for 20 to 25 minutes, or until the top is golden and the edges are set. Your kitchen will start to smell like an old-school cafeteria, but in the best possible way!
Step 6: Spread More Peanut Butter While Warm
When the bars come out of the oven, immediately spread a thin layer of creamy peanut butter over the warm surface. This layer forms the magical glue for the frosting, and adds that extra dose of peanutty richness. Let the bars cool completely before moving to the next step.
Step 7: Make the Frosting
While the bars are cooling, whip up the frosting by beating together powdered sugar, milk, and another generous scoop of creamy peanut butter until smooth and spreadable. This classic frosting is what takes these bars from tasty to utterly unforgettable.
Step 8: Frost and Slice
Spread the frosting gently over the cooled peanut butter layer. Let the bars set so the frosting doesn’t smudge when cutting. When ready, slice into even squares or rectangles, and prepare yourself for a flood of happy memories with every bite!
How to Serve Lunch Lady Peanut Butter Bars

Garnishes
For a truly nostalgic touch, leave the bars plain and let that creamy, swirled frosting steal the show. If you’re feeling fancy, a light dusting of crushed peanuts or a drizzle of melted chocolate can add crunch and extra decadence without stealing the spotlight from the classic Lunch Lady Peanut Butter Bars flavor.
Side Dishes
These bars are a natural fit with a cold glass of milk, which helps balance the sweetness and brings back those classic school lunch vibes. For more grown-up gatherings, try serving them with hot coffee or even a vanilla milkshake. The creamy, nutty bars pair perfectly with just about any comforting beverage.
Creative Ways to Present
If you’re craving something extra-festive, stack the bars in a pyramid on your dessert platter for dramatic effect or weave small squares onto wooden skewers for an unexpected peanut butter bar kabob experience. For parties, tuck pre-wrapped squares in parchment or colorful wax paper—guests will love grabbing a piece of childhood to-go!
Make Ahead and Storage
Storing Leftovers
Lunch Lady Peanut Butter Bars stay soft and delicious for up to three days stored in an airtight container at room temperature. If your kitchen’s especially warm, you might want to keep them in the fridge, where they’ll last even longer and firm up just a bit for easier slicing.
Freezing
Want to save a batch for later? Let the bars cool completely, slice into squares, and separate layers with parchment paper before placing in a freezer-safe container. They’ll keep beautifully for up to two months—just thaw at room temperature before serving to restore their chewy, nostalgic goodness.
Reheating
If you prefer peanut butter bars slightly warm (who could blame you?), simply pop a square in the microwave for about 10 seconds. This softens the frosting and brings out the aroma, making them taste as fresh as the day they were baked—never underestimate the power of a little warmth with these Lunch Lady Peanut Butter Bars!
FAQs
Can I use crunchy peanut butter instead of creamy?
Absolutely! Crunchy peanut butter will add delightful little peanut pieces throughout both the base and frosting, introducing extra texture while keeping all the classic flavor you love.
Are these bars safe for kids with nut allergies?
These classic bars center around peanut butter, making them unsuitable for those with peanut allergies. However, you can try swapping in sunflower seed butter or another nut-free alternative, just keep in mind it will alter the flavor.
Can I double the recipe for a crowd?
Yes, simply double the ingredients and bake in two 9×13 pans or a larger sheet pan. Be sure to check doneness as the baking time may adjust slightly with larger pans.
What’s the best way to get clean slices?
For neat, bakery-worthy squares, chill the bars until the frosting is firm, then use a sharp knife, wiping it clean between cuts. This helps each Lunch Lady Peanut Butter Bar look picture-perfect for your dessert table!
Do I really need to spread peanut butter on the warm bars before the frosting?
That thin layer is a game-changer—it prevents the frosting from melting into the bars and creates a luxurious, double-peanut-butter bite in every square. Don’t skip it if you want the authentic school cafeteria magic!
Final Thoughts
There’s something genuinely special about whipping up a batch of Lunch Lady Peanut Butter Bars, knowing you’re bringing a time-honored treat to your own kitchen. Share them with friends, family, or keep a stash for yourself—they’re the kind of sweet, peanutty comfort that never gets old. If you give them a try, I promise you’ll be hooked after just one bar!
Print
Lunch Lady Peanut Butter Bars Recipe
- Prep Time: 15 minutes
- Cook Time: 25 minutes
- Total Time: 40 minutes
- Yield: 24 bars
- Category: Dessert
- Method: Baking
- Cuisine: American
- Diet: Vegetarian
Description
Indulge in the nostalgia of school cafeteria desserts with these delicious Lunch Lady Peanut Butter Bars. A layer of peanut butter cookie topped with a creamy peanut butter frosting will have you reminiscing about simpler times.
Ingredients
For the bars:
- 1 cup unsalted butter (softened)
- 1 cup granulated sugar
- 1 cup packed brown sugar
- 2 large eggs
- 1 teaspoon vanilla extract
- 1 cup creamy peanut butter (plus extra for spreading)
- 2 cups all-purpose flour
- 1 teaspoon baking soda
- 1/2 teaspoon salt
- 2 cups quick oats
For the frosting:
- 2 cups powdered sugar
- 1/4 cup milk
- 1/2 cup creamy peanut butter (for frosting)
Instructions
- Preheat the oven: Preheat the oven to 350°F and grease a 9×13-inch baking pan.
- Mix wet ingredients: Cream together butter, granulated sugar, and brown sugar. Add eggs, vanilla, and 1 cup of peanut butter.
- Combine dry ingredients: Whisk flour, baking soda, salt, and oats. Gradually add to wet mixture.
- Bake: Spread dough in pan and bake for 20-25 minutes.
- Add peanut butter: Spread a layer of peanut butter over warm bars.
- Make frosting: Beat powdered sugar, milk, and 1/2 cup peanut butter. Spread on cooled bars.
- Serve: Let set before slicing into bars.
Notes
- Store bars at room temperature for 3 days or refrigerate for longer freshness.
- For a chocolate twist, add chocolate chips to the dough or drizzle melted chocolate over the frosting.
Nutrition
- Serving Size: 1 bar
- Calories: 280
- Sugar: 24g
- Sodium: 170mg
- Fat: 14g
- Saturated Fat: 5g
- Unsaturated Fat: 8g
- Trans Fat: 0g
- Carbohydrates: 34g
- Fiber: 1g
- Protein: 5g
- Cholesterol: 25mg

