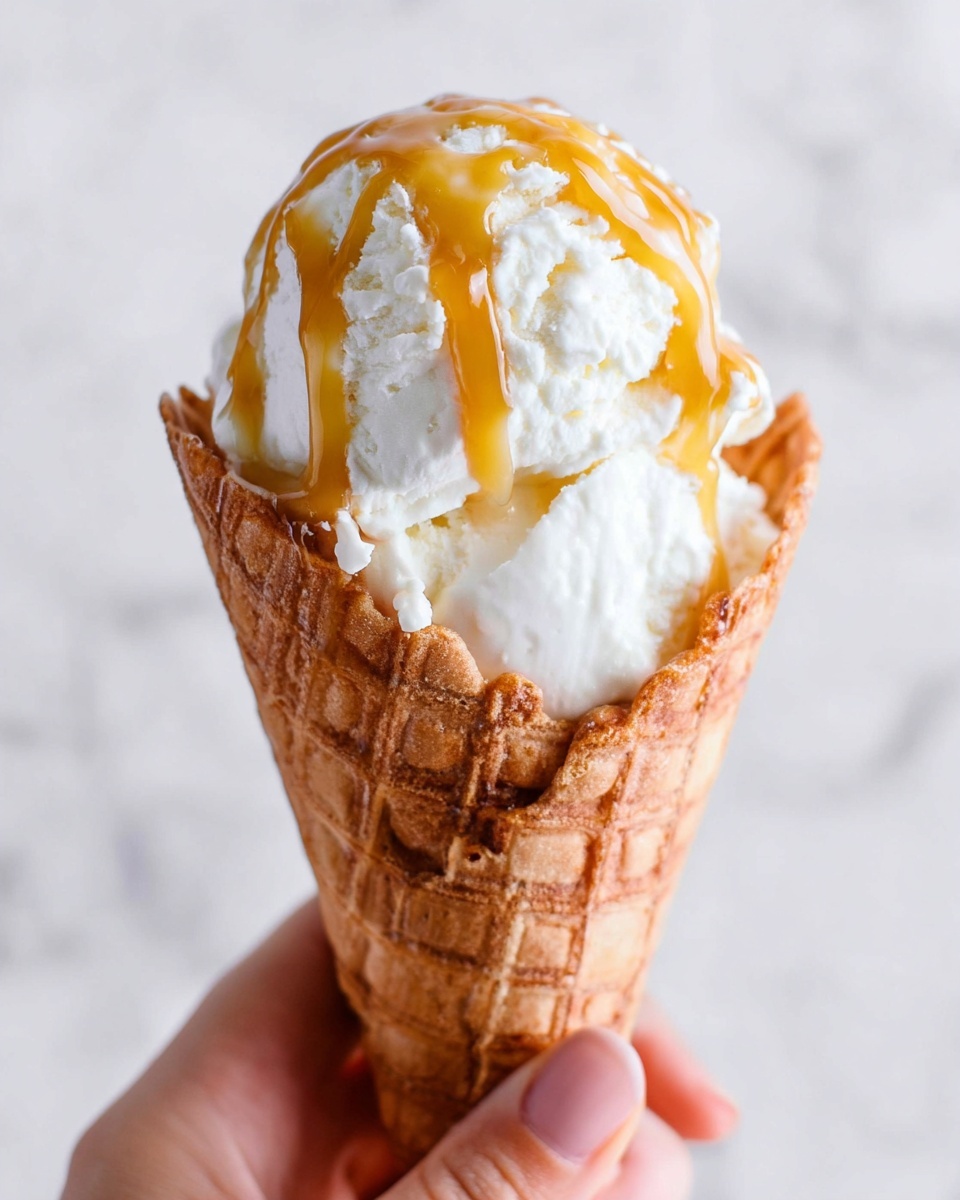
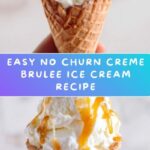
If you have a sweet tooth and love the luxurious flavor of creme brulee, then you are going to adore this Homemade No Churn Creme Brulee Ice Cream Recipe. Imagine all the creamy richness of classic creme brulee transformed into a luscious ice cream without the fuss of an ice cream machine. It perfectly balances caramelized sugar’s deep notes with velvety smooth cream, creating a dessert that feels indulgent yet refreshingly easy to make at home. Get ready for a show-stopping treat that’s sure to wow your family and friends!

Ingredients You’ll Need
Making this Homemade No Churn Creme Brulee Ice Cream Recipe is surprisingly simple because it relies on a handful of classic ingredients that build incredible flavor and perfect texture. Each one plays an essential role, from the caramelized sugar’s golden crunch to the smoothness of sweetened condensed milk. Let’s break down the essentials you’ll want close at hand.
- Granulated white sugar (1 cup): This is your base for creating that signature caramelized sugar topping.
- Corn syrup (2 tablespoons): Helps prevent crystallization for a silky caramel texture.
- Water (3 tablespoons): Allows the sugar mixture to dissolve evenly and caramelize properly.
- Salt (¼ teaspoon): A pinch that enhances the caramel flavor’s depth.
- Sweetened condensed milk (14 oz, chilled): Adds sweetness and creamy body without added churning.
- Heavy whipping cream (2 ½ cups, chilled): Whipped to fluffy perfection, this gives the ice cream its luscious texture.
- Powdered sugar (⅔ cup): Sweetens and stabilizes the whipped cream, adding lightness.
- Vanilla extract (2 teaspoons): Brings warm, familiar notes that complement the caramel beautifully.
How to Make Homemade No Churn Creme Brulee Ice Cream Recipe
Step 1: Prepare the Caramelized Sugar
Lay out a large baking sheet lined with parchment paper, lightly sprayed with cooking spray to prevent sticking. This will be the base for your caramel layer, so getting it right is key to a crunchy, golden topping.
Step 2: Combine Sugar Ingredients
In a medium saucepan, mix together granulated sugar, corn syrup, water, and salt. This combination ensures a smooth caramel base without any lumps or crystallization mishaps.
Step 3: Heat and Dissolve Sugar
Gently heat the mixture over medium heat in a stainless steel pan until the sugar dissolves and it just starts to simmer. Keep watch so it doesn’t burn at this stage.
Step 4: Caramelize without Stirring
Turn the heat to medium-low and let the mixture bubble away without stirring. You can gently swirl the pan every so often to keep things even. This slow cook creates that beautiful golden color and rich caramel flavor.
Step 5: Cook to Golden Perfection
Allow the sugar to cook for 10 to 15 minutes until it turns a light golden brown and thickens. The bubbly foam is part of the process—don’t rush it, but avoid burning for the best flavor.
Step 6: Spread and Cool the Caramel
Carefully pour the hot caramel onto your prepared baking sheet and use a greased spatula to spread it into a thin, even layer. Let it cool completely so it hardens into that crispy, crackly texture we all love.
Step 7: Break the Caramel
Once cooled, break the caramel into medium-sized pieces using a rolling pin, glass bottom, or meat tenderizer. These shards will be folded into your ice cream, adding delightful crunch.
Step 8: Prepare the Pan
Line a 9-inch loaf pan or similar freezer-safe container with parchment paper. This will make it easy to remove the ice cream later and keep it neat in the freezer.
Step 9: Chill Sweetened Condensed Milk
Pour the sweetened condensed milk into a large mixing bowl and place it in the freezer. Keeping it cold helps when you incorporate the whipped cream in a later step.
Step 10: Whip the Heavy Cream
Using a hand or stand mixer, whip the chilled heavy cream on high speed for 3 to 5 minutes until it becomes light and fluffy. This step is crucial for that melt-in-your-mouth ice cream texture.
Step 11: Add Powdered Sugar
Slowly beat in powdered sugar and continue whipping on high until firm peaks form. This sweetens and stabilizes your whipped cream, ensuring it holds its shape in the ice cream.
Step 12: Fold in Vanilla
Gently fold in vanilla extract to infuse your whipped cream with the warm, inviting flavor that pairs beautifully with caramel notes.
Step 13: Whip the Sweetened Condensed Milk
Remove the chilled condensed milk from the freezer and beat it on high speed for about 3 to 5 minutes until it looks white and airy. It won’t whip like cream but transforming its texture is key for creaminess.
Step 14: Combine Whipped Cream and Milk
Fold large scoops of the whipped cream into the condensed milk mixture one at a time. This careful folding keeps the mixture light, fluffy, and perfectly combined.
Step 15: Add Caramel Pieces
Reserve about one-third cup of the caramel shards for topping, and gently fold the rest into the ice cream mixture, distributing that crunchy bliss throughout.
Step 16: Transfer and Top
Pour the ice cream mixture into the prepared loaf pan, smoothing the top. Sprinkle the reserved caramel pieces evenly over the surface for a gorgeous finish.
Step 17: Freeze Until Firm
Cover your pan well and freeze for at least 24 hours. Patience here means you get that perfectly set, creamy, and caramel-packed ice cream you’re craving.
How to Serve Homemade No Churn Creme Brulee Ice Cream Recipe

Garnishes
Topping your Homemade No Churn Creme Brulee Ice Cream Recipe is where you can get creative! Fresh berries add a bright contrast, while a sprinkle of flaky sea salt can heighten the caramel flavor. For extra flair, a few mint leaves brighten the presentation and palate beautifully. The caramel shards from the ice cream itself add both texture and visual appeal.
Side Dishes
This ice cream pairs wonderfully with simple fruit crisps or warm chocolate brownies. You can also serve it alongside a slice of pound cake or a delicate shortbread cookie to add variety and elegance to your dessert plate.
Creative Ways to Present
Try scooping the ice cream into mini martini glasses for a chic dessert presentation or sandwiching it between buttery cookies for a delicious ice cream sandwich. Using edible flowers or a drizzle of homemade caramel sauce can transform this treat into a centerpiece at dinner parties.
Make Ahead and Storage
Storing Leftovers
If you’re lucky enough to have leftovers of this Homemade No Churn Creme Brulee Ice Cream Recipe, store them tightly covered in the freezer to maintain freshness and prevent freezer burn. Keeping it sealed also preserves the delicate textures and flavors for days.
Freezing
This no churn ice cream freezes beautifully thanks to the whipped cream and condensed milk base. Make sure to freeze it in an airtight container or tightly wrapped loaf pan to keep it creamy and avoid ice crystals forming. It’s best eaten within a week for optimal taste and texture.
Reheating
Ice cream doesn’t need reheating, of course, but letting it sit at room temperature for 5 to 10 minutes before scooping makes serving easier. This brief soften time allows the creamy texture to shine without melting excessively.
FAQs
Can I use regular milk instead of sweetened condensed milk?
Regular milk won’t provide the same creamy sweetness and thick texture needed for this recipe. Sweetened condensed milk’s richness is key to achieving that no-churn ice cream consistency and luscious flavor.
What if I don’t have corn syrup?
Corn syrup helps prevent crystallization in your caramel, but you can substitute light honey or glucose syrup. Keep in mind the flavor may be slightly different, but it will still work well.
Can I make this recipe dairy-free?
For dairy-free options, using coconut cream instead of heavy cream and a dairy-free sweetened condensed milk alternative can work. The texture might vary, but it’s a great way to adapt this recipe to diet restrictions.
How long does this ice cream last in the freezer?
For the best flavor and texture, enjoy your Homemade No Churn Creme Brulee Ice Cream Recipe within one week. After that, it can start to develop ice crystals and lose some creaminess.
Is there an easier way to caramelize the sugar?
While making the caramel on the stovetop is straightforward and gives great flavor, you could sprinkle sugar on top before torching for a quicker brulee crust effect. However, the homemade caramel pieces folded into the ice cream are what make this recipe so special!
Final Thoughts
There really is nothing quite like indulging in a homemade treat that combines the timeless elegance of creme brulee with the carefree joy of no churn ice cream. This Homemade No Churn Creme Brulee Ice Cream Recipe is irresistibly creamy, beautifully caramelized, and surprisingly simple to pull together. Whether you’re making it for a special occasion or just because you deserve a little sweetness today, it will quickly become one of your all-time favorite desserts. So grab your ingredients, invite some friends over, and get ready to savor every blissful bite!
Print
Homemade No Churn Creme Brulee Ice Cream Recipe
- Prep Time: 30 minutes
- Cook Time: 15 minutes
- Total Time: 24 hours 45 minutes
- Yield: 8 servings
- Category: Dessert
- Method: No-Cook
- Cuisine: French-inspired
- Diet: Vegetarian
Description
This homemade no-churn crème brûlée ice cream recipe combines the rich, creamy texture of traditional crème brûlée with the effortless preparation of no-churn ice cream. Featuring a luscious caramelized sugar topping mixed into the creamy base and sprinkled on top for an authentic brûlée crunch, this dessert is perfect for impressing guests or enjoying a decadent treat at home without an ice cream maker.
Ingredients
Caramelized Sugar
- 1 cup granulated white sugar
- 2 tablespoons corn syrup
- 3 tablespoons water
- ¼ teaspoon salt
Ice Cream Base
- 14 oz can sweetened condensed milk, chilled
- 2 ½ cups heavy whipping cream, chilled
- ⅔ cup powdered sugar
- 2 teaspoons vanilla extract
Instructions
- Prepare caramelized sugar: Line a large baking sheet with parchment paper and lightly spray with cooking spray to prevent sticking.
- Combine caramel ingredients: In a medium stainless steel saucepan, mix sugar, corn syrup, water, and salt.
- Heat mixture: Place the saucepan over medium heat and stir until sugar dissolves and mixture starts to simmer.
- Simmer gently: Reduce heat to medium-low and continue heating without stirring, gently swirling the pan occasionally to ensure even cooking.
- Cook to golden color: Allow the mixture to cook for 10-15 minutes until it becomes thick and golden brown, noticing foamy bubbles forming during cooking. Avoid overcooking to prevent burnt taste.
- Spread caramel: Carefully pour the hot caramel onto the prepared baking sheet, spreading it thinly and evenly with a greased spatula.
- Cool and break: Let the caramel cool completely, then break it into small pieces using a glass bottom, rolling pin, or meat tenderizer.
- Prepare freezing pan: Line a 9-inch loaf pan or similar freezer-safe container with parchment paper.
- Chill condensed milk: Pour sweetened condensed milk into a large mixing bowl and place it in the freezer to chill while whipping cream.
- Whip heavy cream: Using a hand or stand mixer, beat the heavy whipping cream on high speed for 3-5 minutes until it becomes light and fluffy.
- Add powdered sugar: Gradually beat in the powdered sugar and continue mixing on high until firm peaks form, about 2-3 more minutes.
- Incorporate vanilla: Gently fold in vanilla extract, then refrigerate the whipped cream mixture to keep chilled.
- Whip condensed milk: Remove chilled condensed milk bowl from freezer and beat on high speed for 3-5 minutes until the mixture turns white and airy, though it will not form peaks.
- Combine mixtures: Fold the whipped cream into the condensed milk mixture in batches until light and fully incorporated.
- Add caramelized sugar: Reserve one-third cup of caramel pieces. Gently fold the remaining caramelized sugar into the ice cream mixture to distribute evenly.
- Assemble ice cream: Transfer the mixture into the prepared loaf pan and sprinkle the reserved caramel sugar evenly over the top.
- Freeze: Cover the pan tightly and freeze the ice cream for at least 24 hours before serving to achieve the best texture.
Notes
- Do not stir the caramel mixture during cooking to avoid crystallization; gentle swirling is sufficient.
- Ensure all dairy ingredients are well chilled before whipping for best volume and texture.
- Breaking the caramel into small pieces evenly throughout the ice cream creates the signature brûlée crunch.
- This recipe requires no ice cream maker and is ideal for an effortless homemade frozen treat.
- Store finished ice cream covered to prevent ice crystals and maintain smooth texture.


