
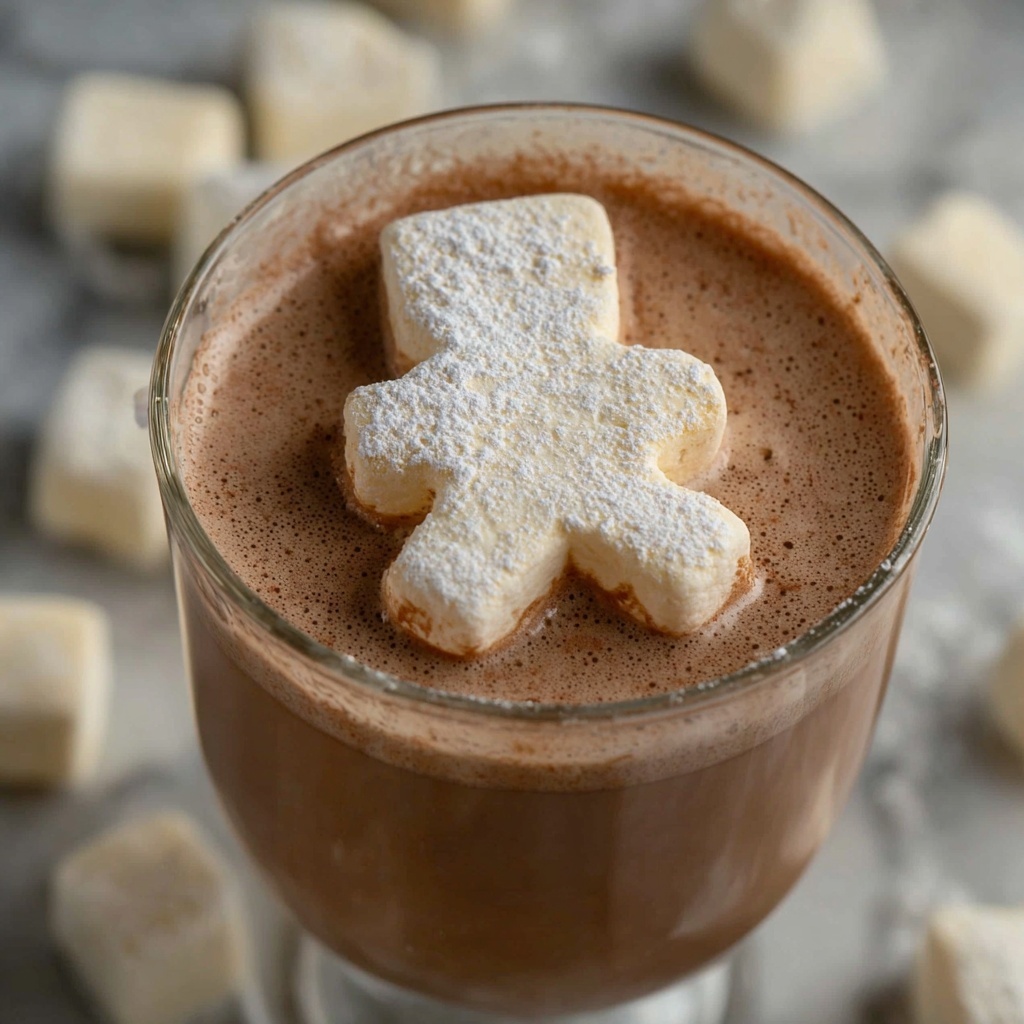
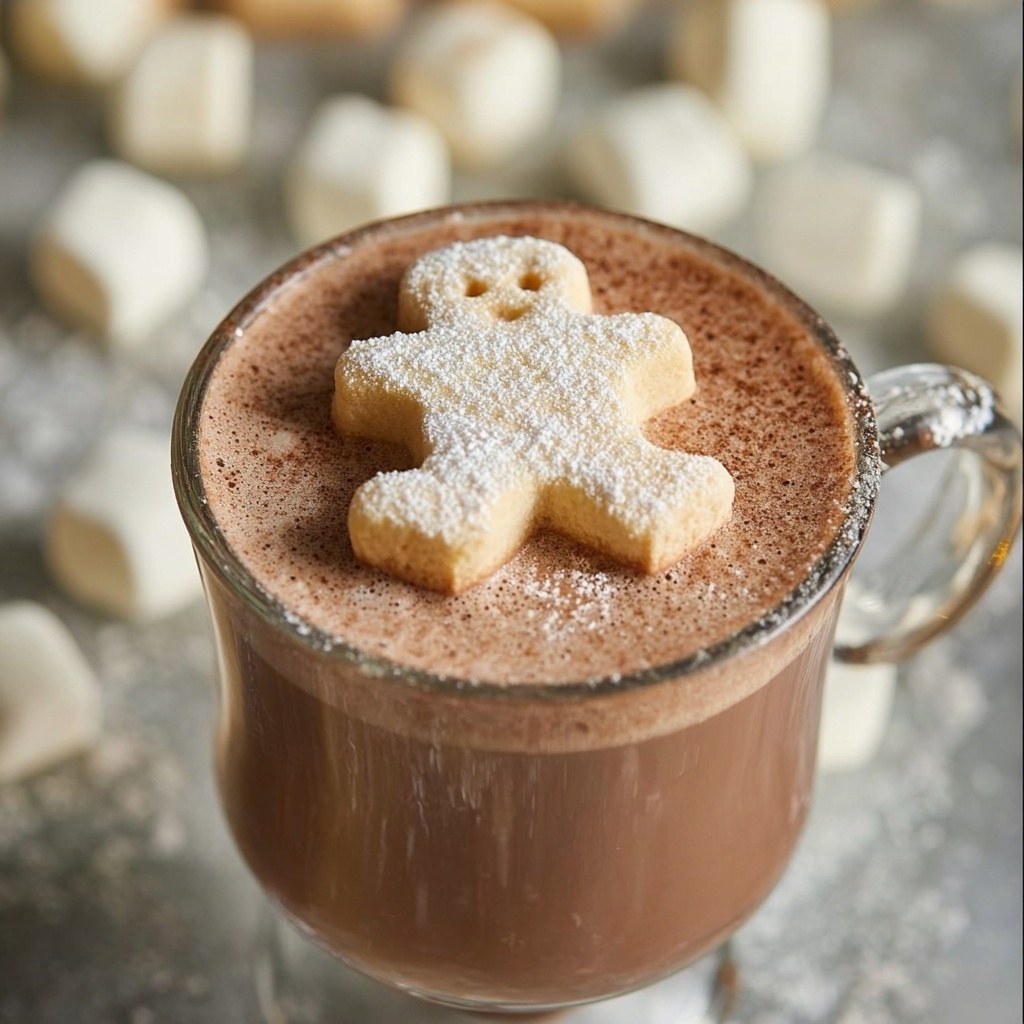
If you’ve ever dreamed of taking a cozy winter treat to the next level, this Homemade Gingerbread Marshmallows Recipe is just what you need. These fluffy, aromatic marshmallows bring together the nostalgic warmth of gingerbread spices with the soft, melt-in-your-mouth texture that only fresh marshmallows can deliver. Perfect for adding a festive twist to your hot cocoa or just enjoying as a sweet snack, this recipe will quickly become a holiday favorite you’ll want to make year after year.
Ingredients You’ll Need
Gathering simple, wholesome ingredients is the foundation to making marshmallows that are fluffy, flavorful, and absolutely irresistible. Each element plays a crucial role — from texture to taste, and even the lovely warm color.
- 2 packs unflavored Knox gelatin (or 2 tablespoons): This is the secret to the marshmallow’s signature bounce and softness.
- 2 cups granulated sugar: Provides the sweet backbone and helps create that perfect glossy finish.
- 2 tablespoons molasses: Infuses the marshmallows with a rich, deep gingerbread flavor and a warm brown color.
- 1 teaspoon gingerbread spice: The heart of the recipe, this blend of cinnamon, ginger, and cloves brings all the cozy holiday vibes.
- 1 tablespoon cold or room temperature butter: Ensures the marshmallow mixture doesn’t stick and adds a subtle richness.
- ~1/4 cup cornstarch for dusting: Keeps your marshmallows from sticking together once cut, making them fun to handle and eat.
How to Make Homemade Gingerbread Marshmallows Recipe
Step 1: Bloom the Gelatin
Begin by mixing 1/4 cup of cold water with the gelatin in a small bowl. Let it sit for about 10 minutes to “bloom.” This softens the gelatin, preparing it to blend smoothly into your hot sugar syrup later on, which is key for that perfect marshmallow texture.
Step 2: Prepare Your Pan
Grab a 9×13 pan and generously grease it with butter. This step might seem small, but it’s essential for making sure your marshmallows release easily after setting — trust me, there’s nothing worse than a sticky mess!
Step 3: Make the Sugar Syrup
In a saucepan, combine the granulated sugar and 1 cup of water. Warm over medium heat, stirring just until the sugar dissolves completely. Once dissolved, resist the urge to stir further and bring the syrup to a gentle simmer. Carefully add in the bloomed gelatin, stirring just enough to incorporate it fully.
Step 4: Boil Without Stirring
Let the syrup gently boil for 15 minutes without stirring. It’s important to keep your heat at medium or lower — too hot and the sugar can scorch. If the mixture bubbles too vigorously, lift the pan off the heat briefly to calm it down. Patience here pays off with a smooth, stable marshmallow base.
Step 5: Start Whisking with the Mixer
Pour the hot mixture into the bowl of your stand mixer. Immediately add the molasses and gingerbread spice for that signature flavor kick. Begin whisking slowly on low speed to prevent splatters. After 3 minutes, the mixture starts to thicken and lighten in color — it’s so exciting to watch!
Step 6: Increase Mixer Speed
Bump up your mixer to medium speed for 2 more minutes. The marshmallows will become even foamier and lighter, building that iconic fluffy texture. It’s basically whipped clouds in the making.
Step 7: Whip to Fluffy Perfection
Now, crank the speed up to high and whisk for a full 9 minutes. This total 14-minute whisking session transforms the mixture into an airy, glossy fluff that’s just begging to be shaped. When a dollop holds its shape without dripping, you’ll know you’re there!
Step 8: Spread Into the Pan
Use a spatula to carefully spread the marshmallow mixture evenly in the buttered pan. Smooth the top gently and then cover it up to rest for 3 hours. During this time, the marshmallows set into the soft, springy treats you’ve been waiting for.
Step 9: Flip and Dust
Once set, dust cornstarch over the top and your clean work surface to prevent stickiness. Rub cornstarch over all sticky, open surfaces and then invert the pan onto the surface. If the pan was well greased, your marshmallow slab will come out cleanly — if not, gently pry it free.
Step 10: Cut and Coat
Sprinkle more cornstarch on top and use a pizza cutter, knife, or cookie cutters to cut your marshmallows into the shapes you love. Keep a damp cloth handy to rinse your cutter as needed to prevent sticking. Toss the pieces in cornstarch to finish — this helps them stay separate and ready for snacking or gifting.
How to Serve Homemade Gingerbread Marshmallows Recipe
Garnishes
For a charming presentation, consider dusting your marshmallows lightly with cinnamon or a pinch of crushed gingerbread crumbs. These subtle accents enhance the flavor and make each bite feel extra special. If you want to get festive, a drizzle of melted white chocolate or a sprinkle of edible gold dust adds a delightful touch.
Side Dishes
These gingerbread marshmallows are a dream paired with warm drinks like hot chocolate, mulled cider, or even spiced coffee. They melt beautifully on top, softening into little pillows of cozy flavor. If you’re hosting a holiday gathering, try serving them alongside gingerbread cookies or a spiced fruitcake for a complete winter treat spread.
Creative Ways to Present
Think beyond the classic cube! Use cookie cutters to craft festive shapes like stars, trees, or gingerbread men, perfect for gifting or decorating dessert platters. You can also skewer marshmallows on sticks for fun, portable treats or toast them lightly over a fire for that nostalgic campfire vibe. The possibilities are endless and all so much fun.
Make Ahead and Storage
Storing Leftovers
You can keep your homemade gingerbread marshmallows fresh for up to a week stored in an airtight container at room temperature. Make sure they are fully coated in cornstarch and separated well to prevent sticking. This way, they stay soft and ready whenever the craving hits.
Freezing
If you want to plan way ahead, these marshmallows freeze beautifully. Place them in a single layer on parchment-lined trays to freeze initially, then transfer to a sealed freezer bag or container. When frozen, they’ll keep for several months without sacrificing texture or flavor.
Reheating
If you pull marshmallows from the freezer, allow them to thaw at room temperature while still in the airtight container to avoid condensation. To refresh their fluffiness, give them a few seconds in the microwave on low power, but be careful not to melt them completely!
FAQs
Can I use a different spice mix instead of gingerbread spice?
Absolutely! While gingerbread spice is perfect here, feel free to experiment with pumpkin pie spice, cinnamon alone, or even a pinch of cardamom for a unique twist. Just start with 1 teaspoon and adjust to your taste.
What if I don’t have a stand mixer?
Making marshmallows without a stand mixer is doable but requires a lot of arm strength for whisking. An electric hand mixer works better than doing it by hand, as sustained high-speed whisking is essential to get that fluffy texture.
Can I make smaller batches of this Homemade Gingerbread Marshmallows Recipe?
Yes, you can halve the recipe, but keep in mind that timing and mixing performance might vary with smaller quantities. Just be patient with the whipping and watch for the texture cues.
Why do marshmallows sometimes turn out sticky?
If your marshmallow mixture isn’t fully set or you haven’t used enough cornstarch for dusting and coating, it can stay sticky. Make sure to generously dust and separate each marshmallow piece to avoid clumping.
Is molasses necessary, or can I substitute it?
Molasses is key for authentic gingerbread flavor and that deep color. You can experiment with honey or dark corn syrup, but the flavor and color will be noticeably different. If you love the gingerbread profile, molasses is worth using.
Final Thoughts
This Homemade Gingerbread Marshmallows Recipe is a delightful way to bring whimsy and warmth to your holiday kitchen. From the first fluffy bite, you’ll taste the magic of homemade goodness combined with cozy spices that make this season so special. Put on your apron, invite a friend, and get ready for some seriously fun marshmallow-making — once you try this recipe, store-bought treats will never feel quite the same!
Print
Homemade Gingerbread Marshmallows Recipe
- Prep Time: 10 minutes
- Cook Time: 30 minutes
- Total Time: 3 hours 40 minutes
- Yield: Approximately 76 marshmallows
- Category: Dessert
- Method: Stovetop
- Cuisine: American
Description
This recipe for Homemade Gingerbread Marshmallows combines the fluffy, pillowy texture of traditional marshmallows with warm, spicy gingerbread flavors. Perfect for holiday treats or cozy drinks, these marshmallows are made using gelatin, molasses, gingerbread spices, and a touch of butter to ensure soft, flavorful results. The marshmallows are carefully whipped to the perfect consistency and lightly dusted with cornstarch to prevent sticking.
Ingredients
Marshmallow Base
- 2 packs unflavored Knox gelatin (or 2 tablespoons)
- 2 cups granulated sugar
- 1 cup water (divided: 1/4 cup cold water for gelatin blooming, 1 cup for sugar syrup)
- 2 tablespoons molasses
- 1 teaspoon gingerbread spice
- 1 tablespoon cold or room temperature butter
Finishing
- Approximately 1/4 cup cornstarch for dusting
Instructions
- Bloom the Gelatin: In a small bowl, mix 1/4 cup cold water with the gelatin powder. Stir and let it sit for about 10 minutes to allow the gelatin to bloom and soften.
- Prepare the Pan: Heavily grease a 9×13-inch pan with butter to prevent sticking when pouring the marshmallow mixture.
- Make the Sugar Syrup: In a saucepan, combine 2 cups granulated sugar with 1 cup water. Stir over medium heat until the sugar dissolves completely, then bring to a gentle simmer.
- Add Bloomed Gelatin: Stir the bloomed gelatin into the simmering sugar syrup until fully dissolved.
- Boil the Mixture: Without stirring, allow the mixture to boil gently for 15 minutes. Maintain a medium heat setting (around 4-5 if numbered), and monitor carefully. If the mixture foams up, remove from heat until it subsides, then return to burner.
- Whisk in Mixer – Slow Speed: Remove the saucepan from heat and gently pour the hot syrup into the bowl of a stand mixer fitted with a whisk attachment. Add the molasses and gingerbread spice. Whisk at low speed (setting 2 on KitchenAid) for 3 minutes to avoid splattering.
- Increase Speed to Medium: Raise mixer speed to medium (setting 4) and whip for another 2 minutes. The mixture will begin to cool, lighten in color, and become foamy.
- Whip to High Speed: Increase mixer to high speed (setting 8) and whip for 9 additional minutes. The mixture will become lighter, fluffier, and hold shape without dripping.
- Pour and Spread: Immediately use a spatula to spread the fluffy marshmallow mixture evenly into the prepared, greased pan.
- Rest the Marshmallows: Cover the pan and let the marshmallows set at room temperature for 3 hours until firm.
- Dust and Release: Sprinkle cornstarch over the top and a clean surface. Use your hands to dust the marshmallows thoroughly to prevent stickiness, gently loosen the edges, then invert the pan sharply onto the surface to release the marshmallow slab.
- Cut and Coat: Dust the top with cornstarch again. Cut marshmallows into desired shapes using a pizza cutter, knife, or cookie cutter, rinsing and drying the cutter as needed to prevent sticking. Toss marshmallows in cornstarch to coat fully, preventing them from sticking together.
- Store: Place marshmallows in an airtight container and store at room temperature for up to one week for best freshness.
Notes
- Keep the heat moderate to avoid burning the sugar syrup; adjust burner settings as needed.
- Use a stand mixer with a whisk attachment for best whipping results; a handheld mixer could work but might be less efficient.
- Make sure the pan is well-greased to easily release the marshmallows after setting.
- Cornstarch coating is essential to prevent stickiness and clumping.
- If you want extra flavor, you can adjust the amount of gingerbread spice or add a pinch of cinnamon or nutmeg.

