Description
This Homemade Bread Bowls recipe guides you through creating warm, crusty bread bowls perfect for serving your favorite soups or stews. Made from scratch using active dry yeast and bread flour, these bread bowls are soft inside with a golden crust outside, providing an impressive and edible serving vessel that adds rustic charm and delicious flavor to any meal.
Ingredients
Scale
Yeast Mixture
- 2 packets of Active Dry Yeast (about 2 Tablespoons)
- 2 ½ cups of warm water (about 110°F, warm but not hot)
- 1 tablespoon of granulated sugar
- 2 teaspoons of salt
Dough
- 6-7 cups of bread flour
- 1 tablespoon of olive oil
Egg Wash
- 1 egg
- A splash of milk
Instructions
- Activate the Yeast: Place your two packets of active dry yeast into your warm water. Place a towel over the bowl and allow it to sit for 5-10 minutes until it bubbles and is frothy, indicating the yeast is active.
- Mix in Sugar and Salt: Once your yeast is activated, whisk in the granulated sugar and salt to the yeast mixture.
- Combine with Flour: In a large mixing bowl, scoop in 3 cups of bread flour and pour in your yeast mixture. Mix well to combine.
- Add Remaining Flour and Knead: Gradually add the remaining flour until the dough no longer sticks to the sides of the bowl. Knead the dough for 6-8 minutes until it forms a smooth, elastic ball.
- First Rise: Remove the dough from the bowl, spray the inside of the bowl with non-stick spray, rub olive oil over the dough ball, and place it back into the bowl. Cover and set in a warm environment to rise for about 1.5 hours. For a warm environment, preheat your oven to 200°F, turn it off, and place the dough inside with the door slightly cracked.
- Deflate and Shape: Once risen, knead the dough down to remove air bubbles. Roll it out into a long loaf shape on a floured surface.
- Portion into Balls: Cut the loaf into 6 equal pieces and roll each piece into a ball.
- Second Rise: Preheat the oven to 400°F. Place the dough balls onto a parchment-lined baking sheet, cover them with a clean towel, and allow them to rise at room temperature for 20 minutes while the oven preheats.
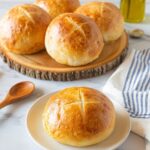
- Prepare for Baking: After the second rise, brush each dough ball with the egg wash mixture made from one beaten egg and a splash of milk. Carve an ‘X’ on top of each dough ball to release air bubbles and create a guide for cutting the tops off later.
- Bake the Bread Bowls: Bake the dough balls in the preheated oven for 30 minutes, or until golden brown and crusty.
- Cool the Bread: Remove the bread bowls from the oven and cool them on a wire rack. Cooling thoroughly makes them easier to cut without crushing.
- Create the Bowls: Using a bread knife, cut around the ‘X’ to remove the top of each bread bowl. Hollow out the interior by removing the soft bread from inside, leaving the walls of the bowl thick enough to hold soups.
- Serve and Enjoy: Fill your homemade bread bowls with your favorite soup or stew and enjoy a warm, hearty meal presented in an edible bowl.
Notes
- Ensure your water is warm (around 110°F) but not hot to avoid killing the yeast.
- Kneading thoroughly develops gluten, which results in a better bread structure.
- The second rise is important for a fluffy bread bowl interior and a good crust.
- The egg wash helps give the bread a beautiful golden, glossy crust.
- Cooling completely before hollowing prevents the bread from becoming soggy.
- You can use these bread bowls for any soup, chili, or dip of your choice.
- If your kitchen is cold, use the warmed and turned-off oven method to create a perfect rising spot.