
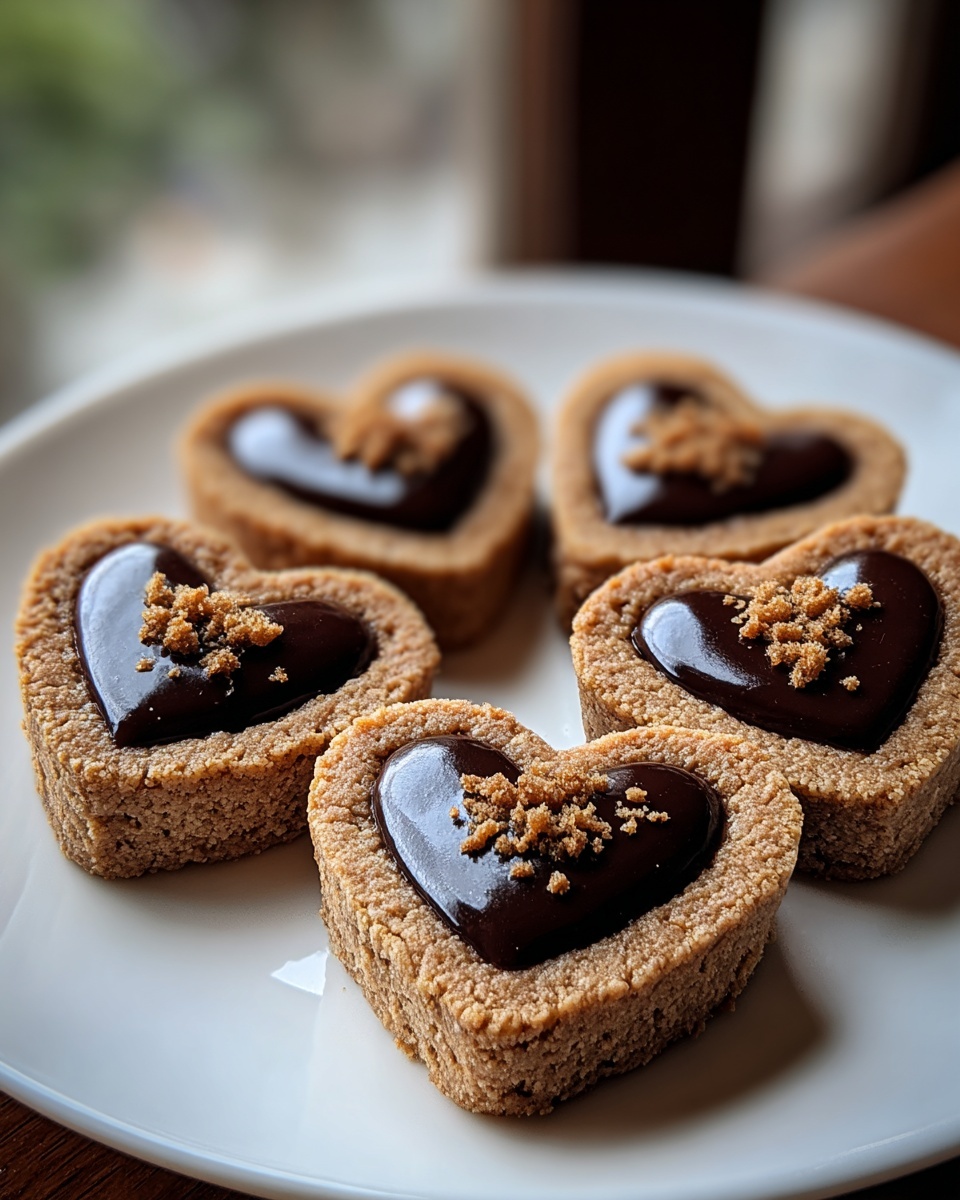
If you’re looking for a charming, irresistible treat to share with someone special or simply to brighten your day, the Heart Shaped Chocolate Thumbprint Cookies Recipe is exactly what you need. These cookies combine rich cocoa flavor with a tender, buttery crumb and a burst of fruity jam right in the center, making every bite a beautiful harmony of sweet and chocolatey goodness. The heart shape adds a definite touch of love that makes this recipe perfect for gifts, celebrations, or simply indulging your cookie cravings in the most delightful way.
Ingredients You’ll Need
This Heart Shaped Chocolate Thumbprint Cookies Recipe relies on simple, wholesome ingredients that come together effortlessly to create something truly magical. Each component plays its part, whether it’s creating the rich chocolate base, adding tenderness, or delivering that lovely fruity surprise in the middle.
- 1 ½ cups all-purpose flour: Provides the sturdy structure needed for the cookies to hold their shape perfectly.
- ½ cup cocoa powder: Adds deep chocolate flavor and a beautiful dark color that makes these cookies look indulgent.
- 1 teaspoon baking powder: Gives just enough lift to make the cookies light and tender, not cakey.
- ¼ teaspoon salt: Enhances all the flavors and balances the sweetness wonderfully.
- ½ cup unsalted butter (softened): Creates that melt-in-your-mouth richness and ensures a tender crumb.
- ½ cup granulated sugar: Sweetens the dough evenly without overpowering the chocolate and jam.
- 1 large egg: Acts as a binder and adds moisture for a soft, chewy texture.
- 1 teaspoon vanilla extract: Amplifies the overall flavor with its warm, comforting notes.
- ¼ cup milk: Helps bring the dough together smoothly while keeping it moist.
- ¼ cup fruit jam (raspberry, strawberry, or your favorite flavor): Provides a tangy, sweet, and colorful center that contrasts beautifully with the chocolate.
How to Make Heart Shaped Chocolate Thumbprint Cookies Recipe
Step 1: Preheat the Oven and Prepare Baking Sheet
Start by heating your oven to 350°F (175°C) and lining a baking sheet with parchment paper. This simple preparation ensures the cookies won’t stick and promotes even baking, setting the stage for cookie perfection.
Step 2: Combine Dry Ingredients
In a medium bowl, whisk together the flour, cocoa powder, baking powder, and salt. Mixing these dry ingredients first helps distribute everything evenly so the cookies bake uniformly with a consistent texture and flavor.
Step 3: Cream Butter and Sugar
In a separate bowl, beat the softened butter and granulated sugar until light and fluffy. This step incorporates air into your dough, which results in tender, melt-in-your-mouth cookies you’ll love.
Step 4: Add Egg and Vanilla
Mix the egg and vanilla extract into the butter-sugar mixture, ensuring it’s smooth and fully combined. The egg adds moisture and structure while vanilla contributes a lovely fragrance and flavor boost.
Step 5: Incorporate Dry Ingredients
Gradually add the dry ingredients into the wet mixture, stirring until just combined. Avoid overmixing here—keeping it gentle will make your cookies tender and softly crumbed.
Step 6: Add Milk to Form Dough
Pour in the milk and stir until the dough comes together in a soft, workable ball. The milk keeps everything moist and makes the dough easier to shape into those adorable hearts.
Step 7: Shape the Cookies
Roll your dough into small balls, about 1 inch in diameter, and place them spaced on the prepared baking sheet. The size is perfect for bite-sized, delightful cookies that hold their shape beautifully when baked.
Step 8: Create the Thumbprint
Using your thumb or the back of a spoon, gently press an indentation into the center of each cookie. This is where your jam will go, so make sure it’s a nice, even dip without pressing all the way through.
Step 9: Fill with Jam
Spoon about ½ teaspoon of your chosen fruit jam into each indentation. The fruity jam centers will add a juicy burst of flavor that contrasts perfectly with the rich chocolate dough.
Step 10: Bake Until Set
Bake the cookies for 10-12 minutes. You’ll know they’re done when they become firm to the touch yet remain soft inside. The aroma that fills your kitchen at this stage is truly irresistible.
Step 11: Cool the Cookies
Allow the cookies to cool on the baking sheet for a few minutes, then transfer them to a wire rack to cool completely. This step ensures they firm up just right without losing their tender texture.
How to Serve Heart Shaped Chocolate Thumbprint Cookies Recipe

Garnishes
For an extra-special touch, lightly dust your cookies with powdered sugar or drizzle a bit of melted white chocolate on top to highlight their heart shape. Fresh berries on the side can also add a lovely pop of color and fresh flavor.
Side Dishes
Serve these cookies alongside a warm cup of coffee, tea, or a glass of cold milk for a classic pairing. They also complement a scoop of vanilla ice cream beautifully if you’re craving a more decadent dessert experience.
Creative Ways to Present
Arrange your Heart Shaped Chocolate Thumbprint Cookies Recipe on a pretty platter lined with parchment paper and scatter edible rose petals or colorful sprinkles for celebrations. Gift them in a cute, heart-themed box wrapped with ribbon—perfect for Valentine’s Day or any heartfelt occasion.
Make Ahead and Storage
Storing Leftovers
Keep leftover cookies fresh by storing them in an airtight container at room temperature. They stay soft and tasty for up to a week, letting you enjoy these chocolatey delights over several days.
Freezing
You can freeze the baked cookies by placing them in a sealed container or freezer bag with parchment paper between layers. When properly stored, they maintain their flavor and texture for up to three months.
Reheating
To bring back that freshly baked warmth, gently reheat the cookies in a low oven (around 300°F or 150°C) for a few minutes. This helps revive the softness and intensifies the chocolate aroma, making each bite comforting and nostalgic.
FAQs
Can I use other types of jam besides raspberry or strawberry?
Absolutely! Feel free to experiment with any fruit jam you love—apricot, cherry, blueberry, or even marmalade create delightful variations and keep the cookies exciting.
How do I make sure the cookies hold their heart shape during baking?
Chilling the dough balls slightly before baking can help them keep their shape. Also, be gentle when pressing the thumbprint so you don’t flatten the dough too much.
Is it possible to make these cookies gluten-free?
Yes, you can substitute the all-purpose flour with a gluten-free baking blend that measures cup-for-cup. Just be sure it contains xanthan gum for structure.
Can I make the dough ahead of time?
Definitely! You can prepare the dough and refrigerate it for up to 24 hours before shaping and baking. This actually can deepen the chocolate flavor and make shaping easier.
What’s the best way to avoid the jam from spreading too much?
Use a thicker jam or gently heat it to thicken before filling the cookie centers. Avoid overly runny preserves, and don’t overfill the indentations to keep the jam neatly in place.
Final Thoughts
Honestly, making the Heart Shaped Chocolate Thumbprint Cookies Recipe is like sending a little love note through your baking. Each bite brings a perfect balance of chocolate richness and fruity sweetness, making these cookies a surefire crowd-pleaser. Whether you’re baking for a special occasion or just to treat yourself, I promise these will become one of your favorite go-to treats. So grab your ingredients, preheat that oven, and enjoy every delicious moment!
Print
Heart Shaped Chocolate Thumbprint Cookies Recipe
- Prep Time: 15 minutes
- Cook Time: 10-12 minutes
- Total Time: 27 minutes
- Yield: 18 cookies
- Category: Dessert
- Method: Baking
- Cuisine: American
Description
Delightfully rich and tender heart-shaped chocolate thumbprint cookies filled with your favorite fruit jam. These cookies combine cocoa and a buttery dough, creating a perfect sweet treat with a burst of jammy goodness in every bite. Ideal for special occasions or a charming homemade snack.
Ingredients
Dry Ingredients
- 1 ½ cups all-purpose flour
- ½ cup cocoa powder
- 1 teaspoon baking powder
- ¼ teaspoon salt
Wet Ingredients
- ½ cup unsalted butter (softened)
- ½ cup granulated sugar
- 1 large egg
- 1 teaspoon vanilla extract
- ¼ cup milk
Filling
- ¼ cup fruit jam (raspberry, strawberry, or your favorite flavor)
Instructions
- Preheat Oven: Preheat your oven to 350°F (175°C) and line a baking sheet with parchment paper to prevent sticking and ensure even baking.
- Mix Dry Ingredients: In a medium bowl, whisk together all-purpose flour, cocoa powder, baking powder, and salt to evenly combine them and remove any lumps.
- Cream Butter and Sugar: In a separate bowl, cream the softened unsalted butter and granulated sugar until the mixture becomes light and fluffy, which ensures a tender cookie texture.
- Add Egg and Vanilla: Beat in the egg and vanilla extract until fully incorporated, which enriches the dough with moisture and flavor.
- Combine Wet and Dry: Gradually add the dry ingredients into the wet mixture, stirring gently to avoid overmixing and maintaining a tender crumb.
- Add Milk and Form Dough: Stir in the milk until the dough comes together into a soft and manageable consistency.
- Shape Cookies: Roll the dough into 1-inch diameter balls and place them spaced on the prepared baking sheet.
- Create Indentations: Press your thumb or the back of a spoon into the center of each ball to create a shallow well for the jam.
- Fill Cookies: Spoon about ½ teaspoon of fruit jam into each indentation, ensuring a generous filling without overflow.
- Bake: Bake the cookies in the preheated oven for 10 to 12 minutes, until they are firm to the touch but still soft inside.
- Cool: Let the cookies cool on the baking sheet for a few minutes before transferring them to a wire rack to cool completely, which helps them set and firm up.
Notes
- Use room temperature butter for easier creaming and better cookie texture.
- You can substitute jam flavors depending on your preference or seasonal availability.
- Ensure not to overbake to maintain the cookies’ soft center.
- These cookies can be stored in an airtight container for up to one week.
- For a decorative touch, sprinkle powdered sugar or drizzle melted chocolate over cooled cookies.

