
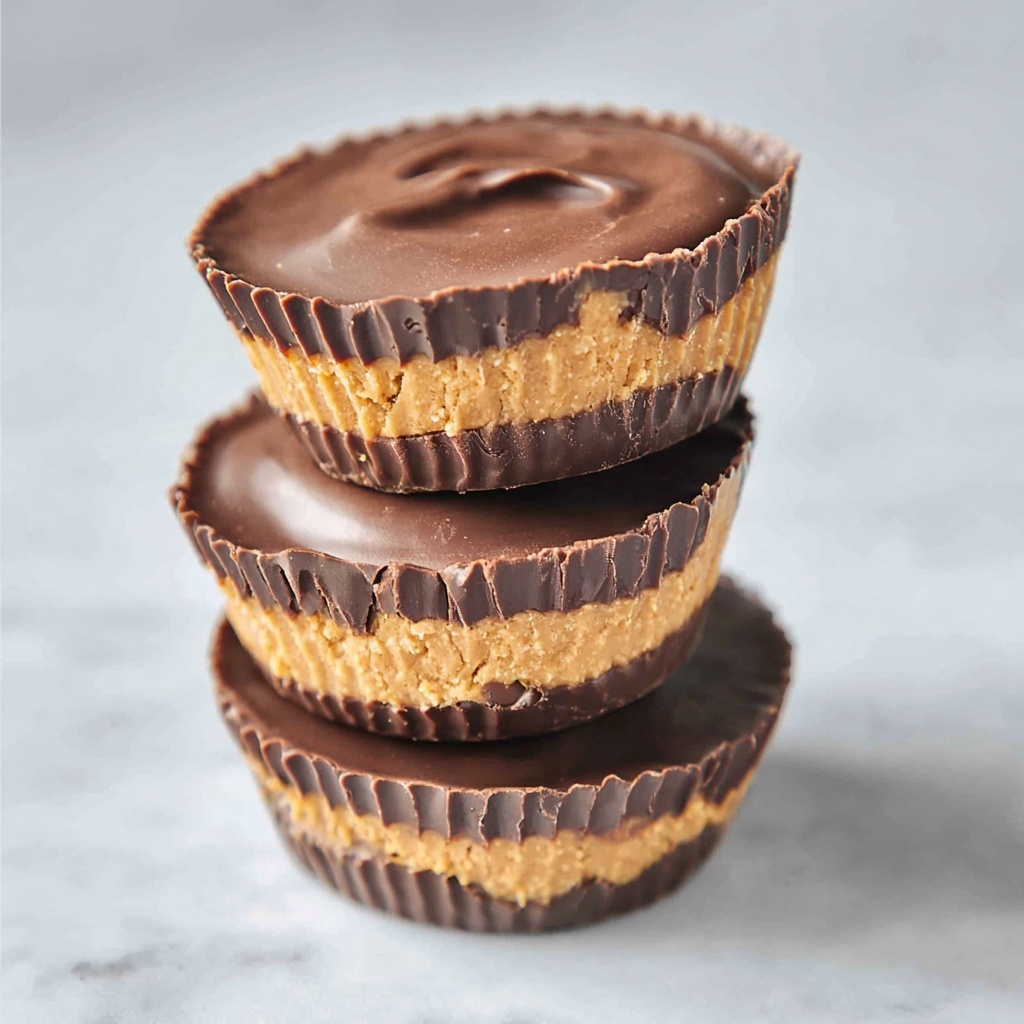
If you’re craving a sweet indulgence that won’t derail your healthy lifestyle, you’re going to love this Healthier Peanut Butter Cups Recipe. These little delights perfectly balance rich, creamy peanut butter with smooth, semi-sweet chocolate, all while keeping things simple and wholesome. Ready in just minutes without any baking required, this treat is a fantastic twist on the classic peanut butter cup, letting you feel good about snacking guilt-free. Let me take you through how to make these irresistible little cups that are as nutritious as they are delicious.
Ingredients You’ll Need
The magic of this Healthier Peanut Butter Cups Recipe lies in how few ingredients it calls for, and how each one plays a vital role in creating the perfect harmony of flavor and texture. Every element is simple, yet essential, giving you that satisfying crunch and sweetness without any unnecessary extras.
- Semi-sweet chocolate chips: Choose a quality brand, as this is the star that brings that luscious chocolate flavor and shine to your treats.
- Natural peanut butter: Look for an option with no added sugar or oils for a clean, nutty taste that’s both creamy and wholesome.
How to Make Healthier Peanut Butter Cups Recipe
Step 1: Melt and Layer the Chocolate Base
Start by melting half of your chocolate chips gently, either in a microwave or over a double boiler. Once melted to silky perfection, pour the chocolate evenly across the bottoms of 8 silicone cupcake liners. Spread the chocolate just a bit up the sides to create a sturdy shell for your peanut butter filling, making sure every cup has a nice, even coating.
Step 2: Chill the Chocolate Base
Pop your tray of chocolate-lined cupcake liners into the freezer and chill for 2 minutes. This crucial step helps the chocolate set quickly, making it easier to build on top later without mixing the layers.
Step 3: Add the Peanut Butter Center
Once the chocolate base is firm, scoop a tablespoon of natural peanut butter atop each cup. Use the back of your spoon to spread it evenly, forming a smooth peanut butter layer that plays the perfect counterpoint to the rich chocolate.
Step 4: Freeze the Peanut Butter Layer
Return the cups to the freezer for another 2 minutes so the peanut butter sets firm and holds shape when you add the final chocolate layer. This step is key for those neat, irresistible layers.
Step 5: Melt the Remaining Chocolate
While the peanut butter sets, melt the rest of the chocolate chips just like you did in Step 1. Keep it warm and silky so it’s easy to pour and spread in the next step.
Step 6: Top with Chocolate and Add a Swirl
Pour the remaining melted chocolate evenly over each peanut butter layer. Spread gently with a spoon, then create little swirls on top for that homemade, artisanal look that makes these peanut butter cups all the more inviting.
Step 7: Final Chill Before Serving
Freeze your peanut butter cups one last time for 5 minutes to fully set the final chocolate layer. After that, they’re ready to pop out and enjoy immediately or save for later.
How to Serve Healthier Peanut Butter Cups Recipe

Garnishes
Though these peanut butter cups shine on their own, a sprinkle of flaky sea salt on top before the final freeze adds a gourmet touch that enhances the chocolate’s sweetness and the peanut butter’s savoriness beautifully.
Side Dishes
Pair these with a refreshing cup of herbal tea or a cold glass of almond milk, which complements the rich texture and provides a nice palate cleanser after each bite. They also go wonderfully with fresh berries for a fresh, fruity contrast.
Creative Ways to Present
Present your Healthier Peanut Butter Cups Recipe on a rustic wooden board or in mini cupcake wrappers with decorative liners for parties or gift-giving. Tie them in a little box with ribbon or stack them in a cute jar for a charming homemade gift.
Make Ahead and Storage
Storing Leftovers
Keep your peanut butter cups fresh by storing them in an airtight container in the refrigerator. They will stay deliciously firm for up to one week, making it easy to satisfy your chocolate cravings anytime.
Freezing
If you want these treats to last longer, freeze them in a single layer on a baking sheet until firm, then transfer to a freezer-safe bag or container. They keep beautifully for up to one month and thaw quickly in the fridge when you’re ready to indulge.
Reheating
No reheating needed here—these cups taste best chilled or at room temperature to maintain their perfect texture. If refrigerated or frozen, just let them sit out a few minutes before enjoying.
FAQs
Can I use crunchy peanut butter in the Healthier Peanut Butter Cups Recipe?
Absolutely! Crunchy peanut butter adds a delightful texture to your cups, giving a little extra crunch that contrasts nicely with the smooth chocolate.
Is it necessary to use silicone cupcake liners?
While silicone liners make it easy to pop the peanut butter cups out without sticking, you can also use paper liners. Just be extra gentle when removing them to keep the cups intact.
Can I substitute the semi-sweet chocolate chips with dark chocolate?
Yes, dark chocolate works wonderfully here for a richer, less sweet flavor that pairs beautifully with natural peanut butter.
How long does it take to prepare and chill these peanut butter cups?
The active prep time is around 12 minutes, with a few short chilling intervals making the total process quick and hands-off, perfect for busy days.
Are these peanut butter cups suitable for kids?
These are definitely kid-friendly treats! Since they use natural peanut butter and minimal sugar, they are a smarter alternative to store-bought candies.
Final Thoughts
I’m so excited for you to try this Healthier Peanut Butter Cups Recipe! It’s a delicious way to enjoy a timeless favorite without the guilt. Once you taste how creamy, rich, and perfectly balanced these treats are, you’ll wonder why you ever bought the store-bought versions. Happy snacking, friend!
Print
Healthier Peanut Butter Cups Recipe
- Prep Time: 12 minutes
- Cook Time: 0 minutes
- Total Time: 19 minutes
- Yield: 8 peanut butter cups
- Category: Dessert
- Method: No-Cook
- Cuisine: American
- Diet: Low Fat
Description
These Healthier Peanut Butter Cups are a delicious homemade treat made with natural peanut butter and semi-sweet chocolate. Perfectly portioned into eight cups, they offer a balanced indulgence with a rich chocolate exterior and creamy peanut butter center. Easy to prepare without baking, they make a great guilt-free dessert or snack.
Ingredients
Ingredients
- 1 (12-ounce) bag semi-sweet chocolate chips
- 8 tablespoons natural peanut butter
Instructions
- Melt first half of chocolate: Melt half of the semi-sweet chocolate chips until smooth and creamy, either using a microwave in short bursts or a double boiler on the stovetop.
- Prepare chocolate base: Divide the melted chocolate evenly among 8 silicone cupcake liners. Spread the chocolate to cover the bottom and slightly up the sides of each liner.
- Freeze the chocolate base: Place the liners with chocolate in the freezer for 2 minutes to set the chocolate firmly.
- Add peanut butter layer: Spoon one tablespoon of natural peanut butter onto each chocolate base. Spread it evenly across the set chocolate surface.
- Freeze peanut butter layer: Return the peanut butter cups to the freezer for another 2 minutes to help the peanut butter layer firm up.
- Melt remaining chocolate: While the peanut butter sets, melt the remaining half of the semi-sweet chocolate chips until smooth.
- Top peanut butter with chocolate: Distribute the melted chocolate evenly over the peanut butter layers in each cup. Use a spoon to gently swirl the chocolate topping for a decorative effect.
- Final freeze: Place the cups back in the freezer for 5 minutes to allow the top chocolate layer to firm up completely before serving.
Notes
- Use natural peanut butter with no added sugars or oils for a healthier option.
- Silicone cupcake liners make it easy to remove the peanut butter cups once they are set.
- If you prefer, you can use dark chocolate chips for a richer flavor and slightly lower sugar content.
- Store the peanut butter cups in an airtight container in the freezer to keep them firm.
- Allow a few minutes at room temperature before eating for easier biting and enhanced flavor.

