
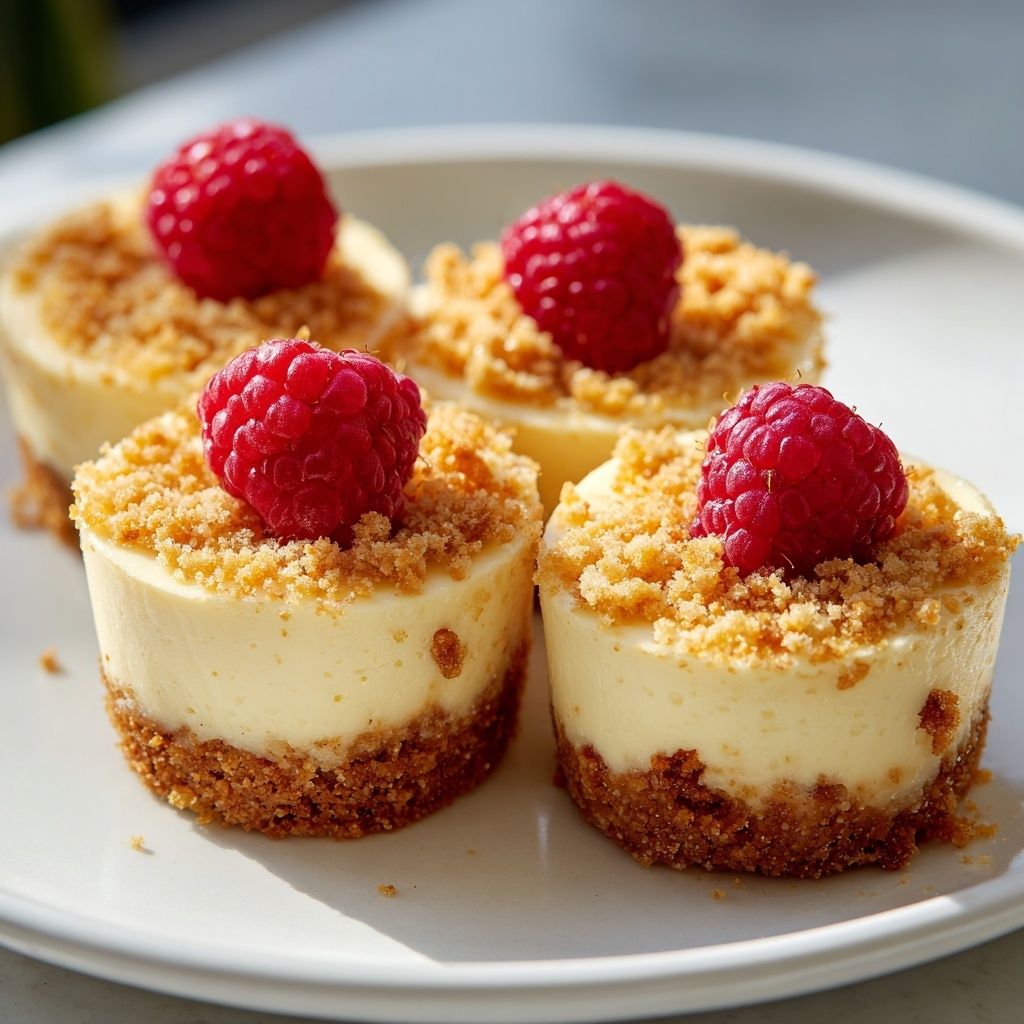
If you have a soft spot for cheesecake but need to avoid gluten, this Gluten-Free Mini Cheesecakes Recipe will quickly become your new favorite comforting treat. These adorable, single-serving cheesecakes capture all the creamy, tangy goodness you crave without any gluten-containing ingredients. Each bite delivers a smooth, luscious filling sitting atop a perfectly crisp gluten-free graham cracker crust, creating a delightful balance of textures. Whether you’re hosting guests or just indulging in a personal sweet moment, these mini cheesecakes bring elegance and ease to your dessert table.
Ingredients You’ll Need
For this Gluten-Free Mini Cheesecakes Recipe, we’ve kept the ingredient list straightforward and pantry-friendly, emphasizing quality and simplicity. Each component plays an essential role in creating the perfect texture, flavor, and visual appeal of these mini delights.
- 1 cup gluten-free graham cracker crumbs: The base of your crust, providing that classic cheesecake crunch without gluten.
- 3 tablespoons melted butter: Binds the crumbs together and adds a subtle, rich flavor.
- 2 tablespoons granulated sugar: Sweetens and helps the crust caramelize slightly in the oven.
- 16 ounces cream cheese, softened: The star of the filling, delivering the signature creamy and tangy profile.
- 1/2 cup granulated sugar: Balances the cream cheese with just the right amount of sweetness.
- 2 large eggs: Provide structure and a smooth, custard-like texture.
- 1/2 cup sour cream: Adds moisture and a gentle tang, keeping the filling silky and light.
- 1 teaspoon vanilla extract: Brings warmth and depth to the flavor.
- Fresh berries or fruit topping (optional): For a burst of color, freshness, and a complementary sweet-tart bite.
How to Make Gluten-Free Mini Cheesecakes Recipe
Step 1: Prepare the Crust
Start by preheating your oven to 325°F (160°C). Line a 12-cup muffin tin with paper liners to make removal easier and keep your minis neat. In a small bowl, combine the gluten-free graham cracker crumbs, melted butter, and 2 tablespoons of sugar. Stir until the mixture resembles wet sand. Spoon about 1 tablespoon of this crust mixture into each muffin cup and press it down firmly with the back of a spoon or your fingers to form a compact crust. Pop the tray in the oven for 5 minutes to let the crust set, then remove it and allow it to cool slightly while you prepare the filling.
Step 2: Prepare the Cheesecake Filling
In a large bowl, beat the softened cream cheese until it becomes smooth and creamy using an electric mixer or a sturdy whisk. Gradually add half a cup of granulated sugar and beat until fully combined and fluffy. Add the eggs one at a time, mixing on low speed to avoid incorporating too much air, and scrape down the sides to ensure everything is mixed thoroughly. Finally, stir in the sour cream and vanilla extract until your filling is silky and lump-free. This filling promises a luscious texture and rich flavor in every bite.
Step 3: Assemble and Bake
Divide the cheesecake filling evenly over the prepared crusts, filling each muffin cup nearly to the top but leaving a little room for the cheesecakes to rise a bit. Bake the cheesecakes for 18 to 20 minutes—watch for the centers to become set with a slight jiggle, which means they’re perfectly baked. After baking, allow the cheesecakes to cool in the pan for 30 minutes before transferring them to the refrigerator. Chill for at least 2 hours to let them fully set and develop that signature creamy texture.
Step 4: Add Final Touches
Once chilled, carefully peel off the paper liners. To elevate these mini treats visually and flavor-wise, top them with fresh berries or your favorite fruit compote just before serving. These additions not only add vibrant color but also introduce a fresh, juicy contrast that complements the rich cheesecake beautifully.
How to Serve Gluten-Free Mini Cheesecakes Recipe

Garnishes
Don’t skip on garnishes—they turn an everyday dessert into a special occasion. Fresh raspberries, blueberries, or sliced strawberries provide a natural sweetness with a bit of tartness that pairs wonderfully with the creamy filling. For a drizzle of elegance, a spoonful of fruit compote or a light dusting of powdered sugar instantly elevates presentation and flavor.
Side Dishes
These mini cheesecakes are perfect on their own but can also shine alongside a cup of rich coffee or a fresh herbal tea, which help balance the richness of the cream cheese. For brunch or dessert gatherings, consider serving them with a simple mixed green salad with citrus vinaigrette or alongside delicate shortbread cookies for a textural contrast.
Creative Ways to Present
Think beyond the muffin tin! Arrange your mini cheesecakes on a beautiful platter with edible flowers sprinkled around for an Instagram-worthy display. You can even experiment by layering the crust and filling in small mason jars or clear cups for a layered parfait effect, making these treats as fun to look at as they are to eat.
Make Ahead and Storage
Storing Leftovers
After enjoying your cheesecake minis, store leftovers in an airtight container in the refrigerator. They will keep well for up to 4 days, maintaining their creamy texture and fresh flavors. Be sure not to leave them out at room temperature for too long to ensure food safety and texture quality.
Freezing
These mini cheesecakes freeze beautifully, making them an excellent option for prepping ahead of time or saving for later indulgence. Wrap each cheesecake individually in plastic wrap and place them in a freezer-safe container or bag. They can be frozen for up to 2 months without losing their taste or texture, so you can enjoy them whenever a sweet craving hits.
Reheating
When ready to enjoy frozen mini cheesecakes, thaw them overnight in the refrigerator. Since they’re best served chilled, there’s no need to reheat. Let them come to just the right temperature for that velvety bite, and you’re good to go!
FAQs
Can I use almond flour instead of gluten-free graham cracker crumbs for the crust?
Absolutely! Almond flour makes a great gluten-free crust alternative, adding a subtle nutty flavor and lovely texture. Just mix it with melted butter and sugar similarly, then press it into the muffin tin to prepare the base.
Do I need a water bath to bake these mini cheesecakes?
Because these are mini cheesecakes baked in muffin cups, a water bath isn’t necessary. Their small size helps prevent cracking and ensures a creamy consistency without extra moisture during baking.
Can I make this recipe dairy-free as well?
The classic recipe uses cream cheese and sour cream for that signature tang and creaminess, but if you want a dairy-free version, you can substitute with plant-based cream cheese and vegan sour cream—just note that texture and flavor might be a bit different.
How do I prevent the cheesecakes from cracking?
To avoid cracks, be sure not to overbeat the eggs, and don’t overbake. The centers should still have a gentle jiggle when done baking. Cooling them gradually and chilling thoroughly also helps maintain a smooth surface.
Can I double the recipe for a larger batch?
Yes, doubling the ingredients and using two muffin tins will work perfectly. Just be sure to watch the baking times closely, as oven performance may vary. The chilling time remains the same.
Final Thoughts
There’s something truly special about a bite-sized dessert that packs so much flavor and elegance into a single serving, and this Gluten-Free Mini Cheesecakes Recipe does just that. It’s approachable enough for bakers of all levels and impressive enough to wow guests or brighten your day. I hope you give these little delights a try—they might just become your go-to gluten-free dessert whenever you’re craving something creamy, sweet, and utterly satisfying.
Print
Gluten-Free Mini Cheesecakes Recipe
- Prep Time: 15 minutes
- Cook Time: 20 minutes
- Total Time: 2 hours 35 minutes
- Yield: 12 mini cheesecakes
- Category: Dessert
- Method: Baking
- Cuisine: American
- Diet: Gluten Free, Vegetarian
Description
These Gluten-Free Mini Cheesecakes are a delightful individual dessert perfect for any occasion. Featuring a crisp gluten-free graham cracker crust and a rich, creamy cream cheese filling, these cheesecakes are baked to perfection and topped optionally with fresh berries or fruit compote. Easy to make and perfectly portioned, they offer a delicious gluten-free, vegetarian treat that can be enjoyed fresh or frozen for later.
Ingredients
Crust
- 1 cup gluten-free graham cracker crumbs
- 3 tablespoons melted butter
- 2 tablespoons granulated sugar
Filling
- 16 ounces cream cheese, softened
- 1/2 cup granulated sugar
- 2 large eggs
- 1/2 cup sour cream
- 1 teaspoon vanilla extract
Topping (optional)
- Fresh berries or fruit topping
Instructions
- Prepare crust: Preheat the oven to 325°F (160°C) and line a 12-cup muffin tin with paper liners. In a small bowl, combine the gluten-free graham cracker crumbs, melted butter, and 2 tablespoons sugar until well mixed. Spoon about 1 tablespoon of this mixture into each muffin cup and press firmly to form even crusts. Bake the crusts for 5 minutes, then remove from oven and allow them to cool slightly.
- Make filling: In a large bowl, beat the softened cream cheese until smooth and creamy using an electric mixer. Gradually add 1/2 cup granulated sugar and mix well. Add eggs, one at a time, beating on low speed and scraping down the sides of the bowl as needed. Then mix in the sour cream and vanilla extract until the mixture is fully combined and smooth.
- Fill and bake: Spoon the cream cheese filling evenly over each prepared crust, filling the muffin cups nearly to the top. Place the muffin tin back into the oven and bake for 18–20 minutes, or until the centers are set but still slightly jiggly when you gently shake the pan.
- Cool and chill: After baking, remove the cheesecakes from the oven and let them cool in the pan for 30 minutes. Then transfer the pan to the refrigerator and chill the mini cheesecakes for at least 2 hours or until fully set.
- Serve: When ready to serve, carefully remove the paper liners from each cheesecake. Garnish with fresh berries or your favorite fruit compote if desired for an added burst of flavor and color.
Notes
- Use certified gluten-free graham crackers to ensure these cheesecakes are truly gluten-free.
- For a crust alternative, almond flour can be used instead of graham cracker crumbs.
- These mini cheesecakes freeze well; wrap each individually in plastic wrap and store in an airtight container for up to 2 months.
- Allow cheesecakes to fully chill before removing liners to prevent cracking or sticking.
