
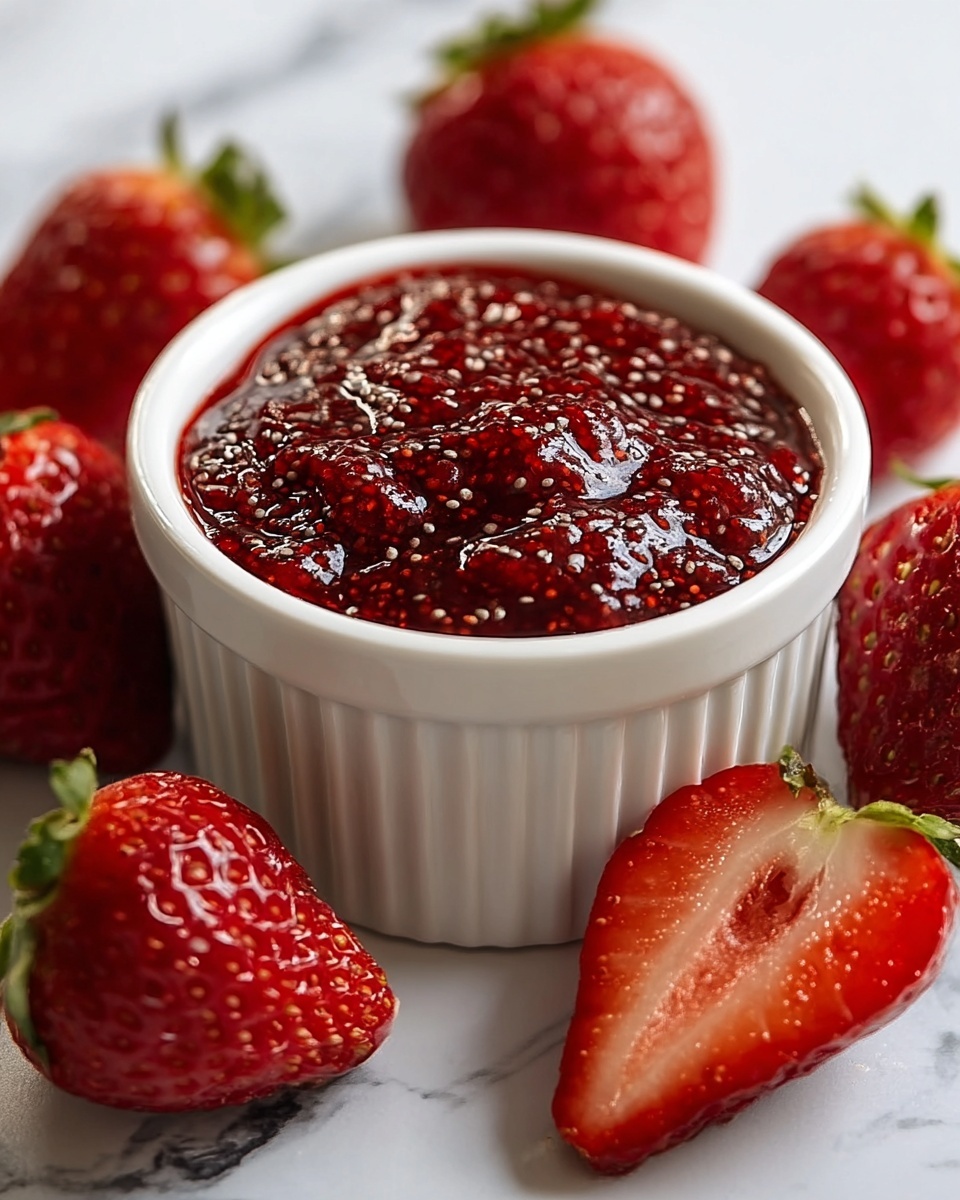
If you have a soft spot for sweet, fruity spreads that are both wholesome and incredibly simple to whip up, you’re going to fall head over heels for this Easy Homemade Chia Seed Strawberry Jam Recipe. It’s a delightful mix of ripe, juicy strawberries combined with the magic thickening power of chia seeds, sweetened naturally with honey or maple syrup, and brightened by fresh lemon juice. This jam is a fresh take on a classic favorite that requires no cooking, no pectin, and minimal fuss, making it a perfect go-to treat any time you want a burst of summery strawberry goodness.
Ingredients You’ll Need
All the ingredients here are refreshingly simple but play vital roles in creating the perfect balance of taste, texture, and vibrant color that makes this jam irresistible. Each component is chosen not only for flavor but for healthful benefits and easy preparation.
- 2 cups Fresh Strawberries: Ripe, juicy, and washed to bring that natural sweetness and vibrant red hue to your jam.
- 1/4 cup Chia Seeds: These tiny powerhouses not only thicken the jam naturally but add fiber and omega-3 nutrients.
- 2-3 tablespoons Honey or Maple Syrup: Adjust the sweetness to your liking, adding a natural, lightly floral sweetness without refined sugars.
- 1 tablespoon Fresh Lemon Juice: Provides a zesty brightness that enhances flavor and helps keep your jam fresh longer.
- 1/4 cup Water: Essential for hydrating the chia seeds and blending all ingredients into a perfect consistency.
How to Make Easy Homemade Chia Seed Strawberry Jam Recipe
Step 1: Prep and Mash the Strawberries
Start by washing your strawberries thoroughly and hulling them to remove the green leafy tops. Once cleaned, mash them gently in a mixing bowl until you reach your preferred chunkiness—whether that’s completely smooth or with some delightful strawberry bits to savor.
Step 2: Add the Chia Seeds
Sprinkle in the chia seeds and stir them evenly into the mashed strawberries. These little seeds will start absorbing the moisture, thickening your jam naturally as the mixture sets.
Step 3: Sweeten to Taste
Now, pour in your honey or maple syrup based on how sweet you want your jam. Give it a good mix so the sweetness blends perfectly with the bright strawberry flavor.
Step 4: Brighten with Lemon Juice and Add Water
Add the fresh lemon juice along with water to the jam mixture. This helps balance the sweetness with a hint of tang and ensures the chia seeds have enough liquid to swell, creating that perfect jam-like texture.
Step 5: Let it Thicken
Set your mixture aside for 10 to 15 minutes. During this time, the chia seeds will absorb the liquid and expand, thickening your jam beautifully without any heat.
Step 6: Check Consistency and Adjust
After waiting, check the thickness of your jam. If you want it thicker, simply let it rest a little longer; the chia seeds work their magic slowly but surely.
Step 7: Store Your Jam
Once you’re happy with how thick it is, transfer the jam to a clean glass jar and seal it tightly. Keep it refrigerated to maintain freshness and flavor.
Step 8: Enjoy!
Spread it on your morning toast, swirl into yogurt, or dollop onto pancakes—the uses are endless and delicious.
How to Serve Easy Homemade Chia Seed Strawberry Jam Recipe

Garnishes
Take your jam presentation up a notch by garnishing with fresh strawberry slices or a sprinkle of extra chia seeds for crunch and visual appeal. A small sprig of mint also adds a refreshing touch that complements the fruity notes beautifully.
Side Dishes
This strawberry chia seed jam pairs wonderfully with warm toast, flaky croissants, or as a topping for creamy Greek yogurt. It’s also divine dolloped over vanilla ice cream or stirred into oatmeal for a naturally sweet kick.
Creative Ways to Present
Consider layering the jam in parfait cups with granola and whipped cream for a quick dessert or mixing it into smoothies for a fresh strawberry flavor boost. You can even use it as a filling for crepes or spread inside peanut butter sandwiches to combine textures and flavors in a fun way.
Make Ahead and Storage
Storing Leftovers
Keep your homemade jam in an airtight glass jar in the refrigerator, where it will stay fresh for up to two weeks. Always use a clean spoon to avoid contamination and keep that fresh flavor intact.
Freezing
If you make a large batch, you can freeze portions in small containers or freezer bags. Just thaw in the fridge when ready to use, and give it a good stir before serving to restore its natural texture.
Reheating
This jam is best enjoyed chilled or at room temperature, but if you like it warm, simply microwave a small amount for 10-15 seconds. Heat gently to preserve the fresh flavors and nutrients.
FAQs
Can I use frozen strawberries for this recipe?
Yes, frozen strawberries can be used if fresh ones aren’t available. Just thaw and drain any excess water before mashing, so your jam doesn’t become too runny.
How long does the jam last in the refrigerator?
Stored properly in an airtight container, the jam will stay fresh for up to two weeks, retaining its great flavor and texture throughout.
Is chia seed jam suitable for people on a low-sugar diet?
Absolutely! Using natural sweeteners like honey or maple syrup allows you to control the sugar content, and chia seeds add fiber which helps balance blood sugar levels.
Can I substitute chia seeds with something else?
Chia seeds are unique for their gelling properties, but if you’re out, ground flaxseeds can be a substitute, although the texture might vary slightly. For traditional jam thickening, commercial pectin is an option but involves cooking.
Do I need to cook this jam?
No cooking needed here! The Easy Homemade Chia Seed Strawberry Jam Recipe is raw, which keeps it fresh, healthy, and quick to prepare, perfect for when you want jam in a flash.
Final Thoughts
If you’re craving a bright, fresh, and wholesome strawberry jam that you can easily make without spending hours in the kitchen, this Easy Homemade Chia Seed Strawberry Jam Recipe is exactly what you need. It’s simple, nutritious, and bursting with natural sweetness that lifts any meal or snack. Give it a try, and I promise it will become a staple in your kitchen, just like it is in mine!
Print
Easy Homemade Chia Seed Strawberry Jam Recipe
- Prep Time: 15 minutes
- Cook Time: 0 minutes
- Total Time: 15 minutes (plus chilling time)
- Yield: 4 servings
- Category: Spread
- Method: No-Cook
- Cuisine: American
- Diet: Gluten Free
Description
This Easy Homemade Chia Seed Jam with Fresh Strawberries is a quick and healthy alternative to traditional jams. Made with ripe strawberries, chia seeds, and natural sweeteners, this no-cook recipe is perfect for a nutritious spread full of fiber, antioxidants, and omega-3s.
Ingredients
Main Ingredients
- 2 cups Fresh Strawberries (washed and hulled, ripe and juicy for best flavor)
- 1/4 cup Chia Seeds (these seeds thicken the jam and add nutrients)
- 2–3 tablespoons Honey or Maple Syrup (adjust based on desired sweetness)
- 1 tablespoon Fresh Lemon Juice (adds brightness and helps preserve the jam)
- 1/4 cup Water (helps dissolve chia seeds and create consistency)
Instructions
- Prepare Strawberries: Wash and hull the strawberries, then mash them in a mixing bowl to your desired consistency, whether chunky or smooth, depending on preference.
- Add Chia Seeds: Incorporate the chia seeds into the mashed strawberries and mix thoroughly to evenly distribute them throughout the mixture.
- Sweeten the Jam: Stir in honey or maple syrup, adjusting the amount to achieve your preferred sweetness level.
- Add Lemon Juice and Water: Pour in fresh lemon juice and water, then mix well to combine all ingredients for a balanced flavor and proper consistency.
- Let Jam Thicken: Allow the mixture to rest for 10-15 minutes so the chia seeds can absorb liquid and thicken the jam naturally.
- Check Consistency: Assess the thickness of the jam, and if it isn’t thick enough, let it sit longer until the desired texture is achieved.
- Store Properly: Transfer the chia seed jam into a clean glass jar, seal it tightly, and refrigerate to preserve freshness and flavor.
- Serve: Enjoy your homemade jam spread on toast, pancakes, or stirred into yogurt for a delicious treat.
Notes
- Use ripe, juicy strawberries for the best flavor and natural sweetness.
- This jam is naturally sweetened, but you can adjust honey or maple syrup according to taste or dietary needs.
- The jam thickens further as it chills in the refrigerator.
- Store jam in the refrigerator for up to 1 week.
- For a smoother jam, blend strawberries before mixing with chia seeds.


