
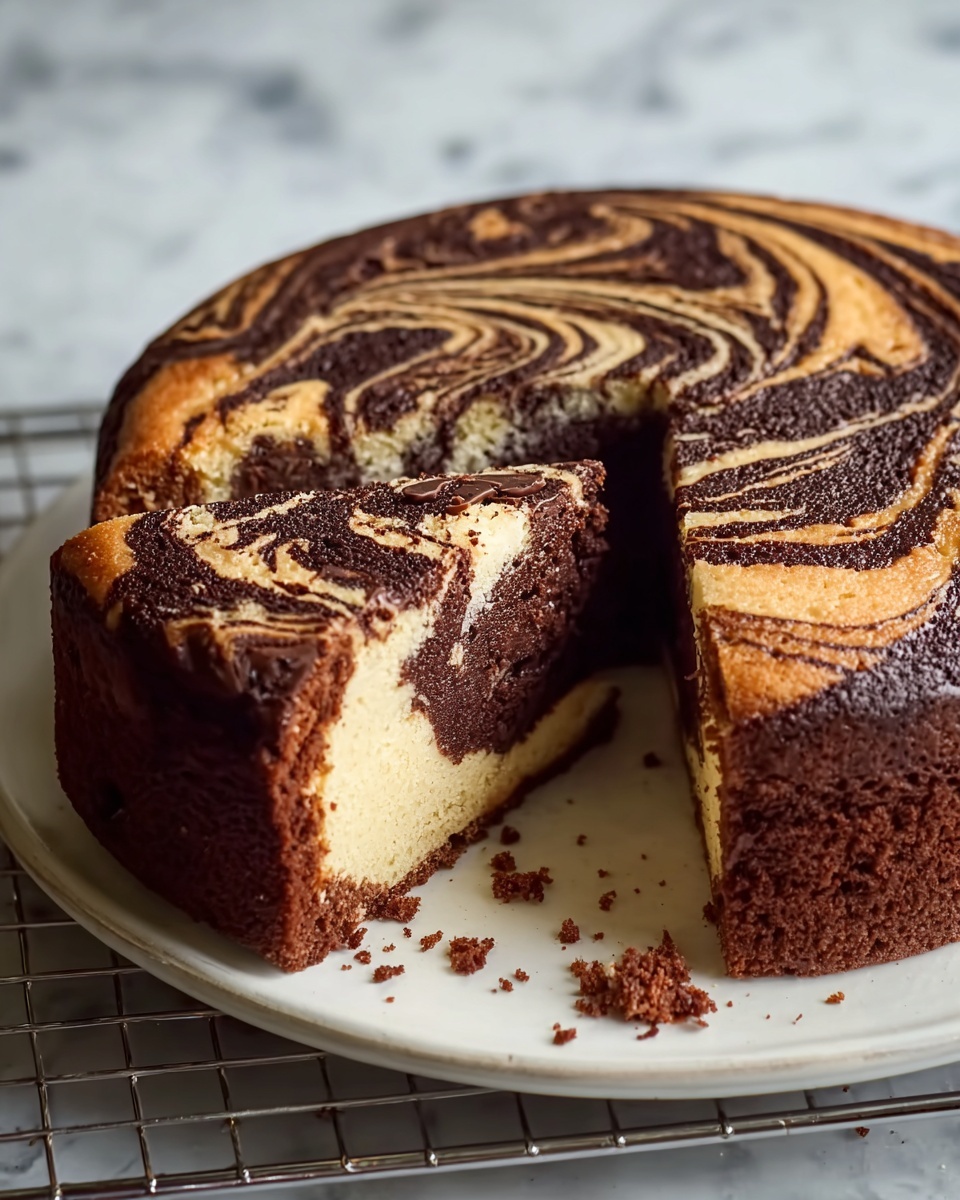
If you’ve ever wanted to bake a dessert that’s as beautiful as it is delicious, this Classic Marble Cake Recipe is exactly what you need. Combining the rich flavors of vanilla and chocolate in a swirled, marbled pattern, this cake offers the perfect balance of light and decadent. It’s moist, tender, and so inviting that it quickly becomes a favorite for any occasion. Every bite brings a nostalgic warmth, like a comforting hug from the oven, making it an absolute must-try for anyone who loves a timeless dessert with a little flair.

Ingredients You’ll Need
The beauty of this cake lies in its simplicity, relying on a handful of essential ingredients that come together to create a moist texture, rich flavor, and that classic marbled visual. Each component plays a unique role, from the creamy butter enriching the batter to the cocoa powder bringing depth with every swirl.
- 2 cups all-purpose flour: The foundation of your cake, providing structure and a soft crumb.
- 1 cup white sugar: Adds sweetness and helps create a tender texture.
- 1 cup milk: Keeps the batter moist and smooth throughout baking.
- 2 large eggs: Essential for binding ingredients and contributing to the cake’s lift.
- ½ cup butter, softened: Provides richness and a velvety crumb.
- 2 teaspoons baking powder: The leavening agent that makes the cake light and fluffy.
- 1 teaspoon vanilla extract: Infuses the batter with a sweet, aromatic flavor.
- ½ teaspoon salt: Balances sweetness while enhancing all the flavors.
- 2 tablespoons unsweetened cocoa powder: Creates the deep chocolate swirls that make this cake unmistakably marble.
How to Make Classic Marble Cake Recipe
Step 1: Prepare Your Oven and Pan
Begin by preheating your oven to 350 degrees F (175 degrees C). While it heats up, grease and flour a 9-inch round cake pan to ensure your cake releases easily once baked. This prep step is crucial for getting a smooth, even bake and perfect presentation.
Step 2: Combine the Main Ingredients
In a large bowl, place your flour, sugar, milk, eggs, softened butter, baking powder, vanilla extract, and salt. This is where the magic begins, as the combination of these ingredients sets the stage for a perfectly tender cake.
Step 3: Mix Into a Smooth Batter
Start mixing slowly to moisten all dry ingredients, then take your electric mixer to medium speed and beat for about two minutes. This step ensures a light and smooth batter, free from lumps, which will help your cake bake evenly with a fluffy texture.
Step 4: Separate a Portion for Chocolate Swirls
Set aside ¾ cup of the vanilla batter in a small bowl—this will become your chocolate component. Meanwhile, pour the remaining batter into your prepared cake pan. Having this separation is key to the beautiful marbled effect.
Step 5: Add Cocoa to the Reserved Batter
Stir the unsweetened cocoa powder into your reserved batter until it’s fully blended and deep brown in color. The cocoa adds a bold cocoa flavor and contrasting color that makes the marbling so stunning.
Step 6: Create the Marble Effect
Drop spoonfuls of the chocolate batter sporadically over the vanilla batter in the pan. Then, take a knife and gently swirl through both batters to create a beautiful marble pattern. Don’t overmix—the goal is to keep distinct swirls of both flavors.
Step 7: Bake to Perfection
Pop your cake into the preheated oven and bake for 30 to 35 minutes. Use a toothpick inserted into the center to check for doneness—it should come out clean or with just a few crumbs attached, signaling your cake is baked just right.
Step 8: Cool and Unmold
Allow the cake to cool on a wire rack briefly before flipping it onto a serving plate or cooling rack. Give it enough time to cool completely, ensuring the flavors settle and the cake slices beautifully.
How to Serve Classic Marble Cake Recipe
Garnishes
A simple dusting of powdered sugar highlights those lovely swirls, or for a more indulgent touch, serve with a drizzle of chocolate ganache or a dollop of whipped cream. Fresh berries can add a refreshing contrast to the sweet richness.
Side Dishes
Pair this cake with your favorite cup of coffee or tea to make teatime extra special. A scoop of vanilla ice cream on the side turns this classic into a delicious dessert perfect for warm evenings.
Creative Ways to Present
Slice the cake into generous wedges and layer on a dessert plate with fresh fruit and a drizzle of caramel sauce for a café-style treat at home. You can also serve it as mini cupcakes by dividing the batter into muffin tins before swirling for a fun party treat.
Make Ahead and Storage
Storing Leftovers
Wrap your leftover Classic Marble Cake tightly in plastic wrap or place it in an airtight container. It will stay moist and delicious for up to 3 days at room temperature, making it easy to enjoy later without any fuss.
Freezing
This cake freezes beautifully. Cut it into slices, wrap each piece individually in plastic wrap, and place in a freezer-safe bag or container. When you’re ready to enjoy, simply thaw overnight in the fridge for a fresh-from-the-oven taste.
Reheating
Warm slices gently in the microwave for about 10-15 seconds or in a low oven for 5-10 minutes. This refreshes the texture and enhances the flavors, making the cake just as satisfying as when freshly baked.
FAQs
Can I use a different type of flour for this Classic Marble Cake Recipe?
All-purpose flour works best for this recipe because it gives the right balance of structure and tenderness. Using cake flour will make the cake lighter but might affect the texture slightly.
Is it necessary to swirl the chocolate and vanilla batter, or can I just layer them?
The hallmark of a marble cake is that beautiful swirl pattern, so swirling is recommended. However, layering without swirling will still give you two distinct flavors, just without the classic marble look.
Can I substitute the butter with oil or margarine?
Butter adds richness and flavor that oil or margarine can’t fully replicate. If substituting, use a mild-flavored oil like vegetable oil and expect a slightly different texture and taste.
How can I make this cake gluten-free?
You can substitute the all-purpose flour with a gluten-free flour blend designed for baking. Make sure the blend contains xanthan gum or add some for structure to mimic gluten’s texture.
Can I add nuts or chocolate chips to the recipe?
Absolutely! Adding chopped nuts or chocolate chips can add a delightful crunch and extra bursts of flavor. Fold them into the batter just before swirling to keep the distribution even.
Final Thoughts
Trust me, once you try this Classic Marble Cake Recipe, it will find a permanent spot in your baking repertoire. It’s simple, satisfying, and endlessly charming — a perfect cake to share with loved ones or simply enjoy with a cozy cup of tea. Give it a go, and watch how the swirled vanilla and chocolate flavors bring warmth and smiles every time!
Print
Classic Marble Cake Recipe
- Prep Time: 20 minutes
- Cook Time: 30 minutes
- Total Time: 50 minutes
- Yield: 1 nine-inch cake (8-10 servings)
- Category: Dessert
- Method: Baking
- Cuisine: American
Description
This Classic Marble Cake recipe combines rich vanilla and chocolate batters swirled together to create a beautifully marbled effect. Moist and tender, this cake is perfect for any occasion and simple to prepare with basic pantry ingredients.
Ingredients
Dry Ingredients
- 2 cups all-purpose flour
- 2 teaspoons baking powder
- ½ teaspoon salt
- 2 tablespoons unsweetened cocoa powder
Wet Ingredients
- 1 cup white sugar
- 1 cup milk
- 2 large eggs
- ½ cup butter, softened
- 1 teaspoon vanilla extract
Instructions
- Preheat Oven and Prepare Pan: Preheat your oven to 350°F (175°C). Grease and flour a 9-inch round cake pan to ensure the cake doesn’t stick.
- Combine Ingredients: In a large bowl, place the all-purpose flour, sugar, milk, eggs, softened butter, baking powder, vanilla extract, and salt.
- Mix Batter: Mix the ingredients slowly just to moisten them, then beat with an electric mixer on medium speed for about 2 minutes until the batter is smooth and well combined.
- Separate Batter: Reserve ¾ cup of the batter in a separate bowl, and pour the remaining batter into the prepared cake pan.
- Add Cocoa: Stir the unsweetened cocoa powder into the reserved batter until the mixture is evenly colored and chocolatey.
- Create Marble Effect: Drop large spoonfuls of the chocolate batter on top of the vanilla batter in the pan. Using a knife, swirl the two batters together carefully to create a marbled pattern without overmixing.
- Bake: Place the pan in the preheated oven and bake until a toothpick inserted into the center of the cake comes out clean, about 30 to 35 minutes.
- Cool: Remove the cake from the oven and allow it to cool briefly on a wire rack. Carefully invert the cake onto a serving plate or another cooling rack and let it cool completely before serving.
Notes
- Use room temperature butter and eggs for better batter consistency.
- Be careful not to over-swirl the batter to maintain the distinct marble design.
- You can substitute milk with buttermilk for a tangier flavor and more tender crumb.
- If you don’t have a 9-inch pan, adjust baking time accordingly for other pan sizes.
- Check doneness with a toothpick around 30 minutes to avoid overbaking.

