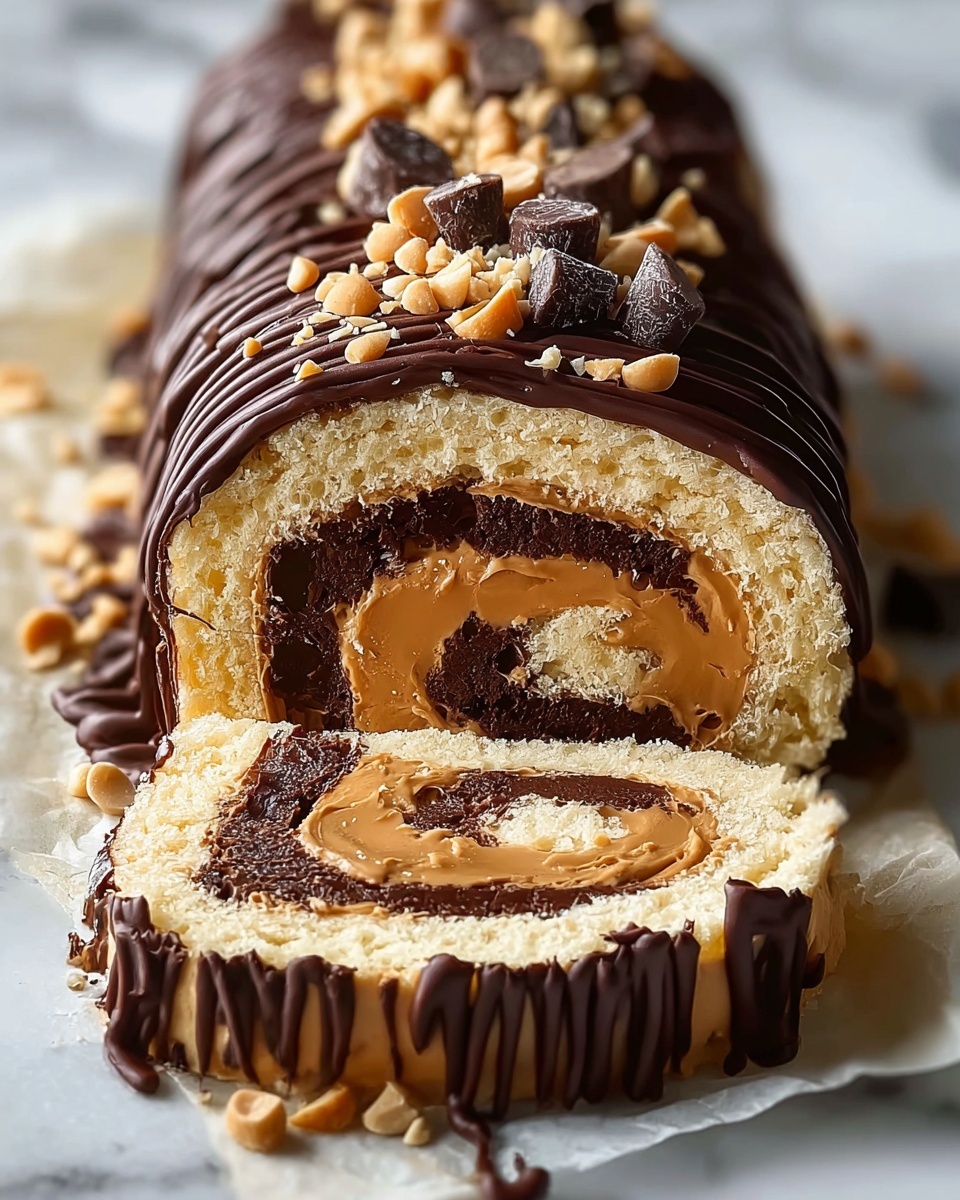
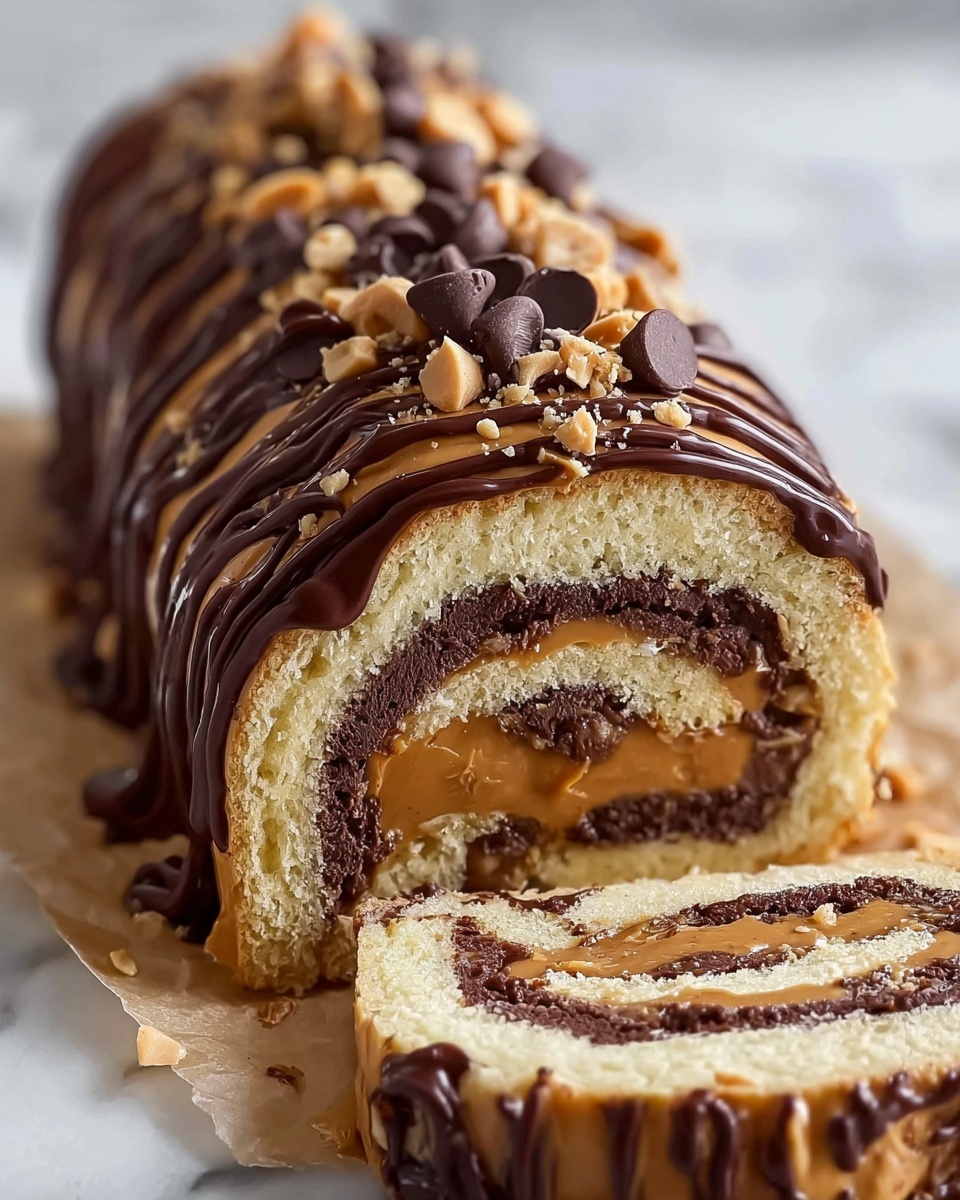
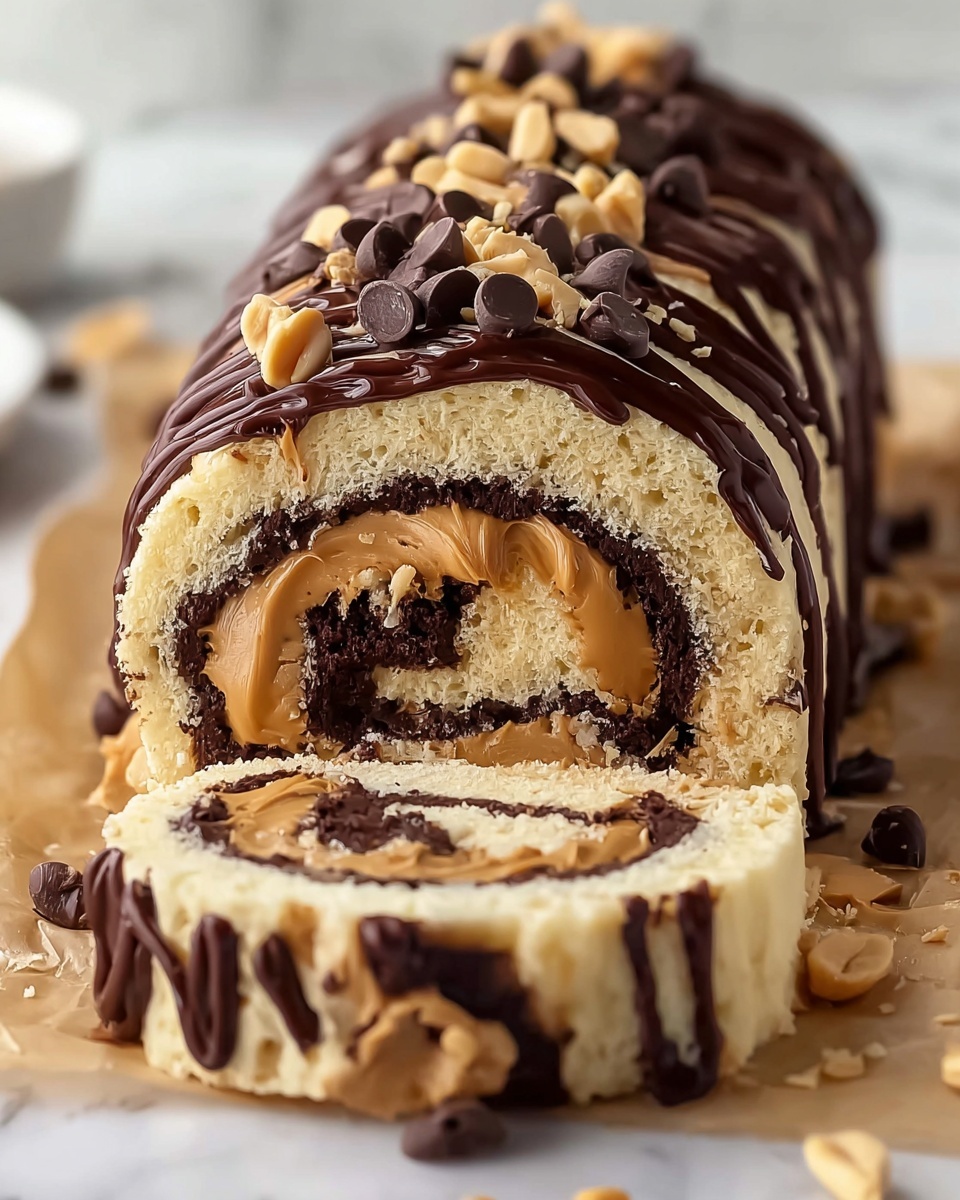
If you have a sweet tooth and crave the perfect union of chocolate and peanut butter, you are in for a treat with this Chocolate Peanut Butter Dream Roll Recipe. This delightful dessert features a tender chocolate cake rolled around a luscious, creamy peanut butter filling, studded with crunchy peanut butter cups for that extra burst of flavor and texture. It’s a stunning showstopper that’s deceptively simple but feels so indulgent—ideal for sharing with friends or treating yourself after a long day. Once you try this roll, it will become a go-to recipe you’ll want to make again and again.
Ingredients You’ll Need
The beauty of this Chocolate Peanut Butter Dream Roll Recipe lies in its straightforward ingredients. Each component plays a pivotal role, from the rich chocolate cake base to the creamy peanut butter filling, finishing with the crunchy Reese’s cups to add texture and that iconic flavor fusion.
- 1 box chocolate cake mix: The foundation of the cake, bringing moistness and deep chocolate flavor with minimal effort.
- Ingredients listed on the box (usually eggs, water, and oil): Essential for binding the cake and achieving the perfect texture.
- 1 cup creamy peanut butter: Adds a velvety, nutty richness to the filling that complements the chocolate perfectly.
- 2 cups whipped topping (such as whipped cream or whipped non-dairy topping): Lightens the peanut butter filling, making it fluffy and dreamy.
- 1 cup chopped Reese’s peanut butter cups: Provides delightful chunks of peanut butter chocolate confection, adding crunch and bursts of flavor throughout the roll.
- Extra whipped topping (for garnish): To add a luscious, decorative finish on top of the roll.
- Extra chopped Reese’s peanut butter cups (for garnish): Sprinkle on top to make it look as irresistible as it tastes.
How to Make Chocolate Peanut Butter Dream Roll Recipe
Step 1: Prepare the Pan and Preheat the Oven
Start by preheating your oven to the temperature recommended on your cake mix box, usually around 350°F (175°C). Line a 10×15-inch jelly roll pan with parchment paper, then lightly grease it to prevent sticking and ensure your cake rolls out easily later.
Step 2: Mix and Pour the Batter
Follow the instructions on the cake mix box to prepare your chocolate batter, incorporating the eggs, water, and oil as directed. Pour the batter evenly into your prepared pan, smoothing it out with a spatula to create a uniform layer that will bake evenly.
Step 3: Bake the Cake
Bake the cake for 12 to 15 minutes, watching carefully so it becomes firm yet remains soft and pliable. It’s important not to overbake because a dry cake is prone to cracking when you roll it, and we want a soft, bendy canvas for our peanut butter filling.
Step 4: Roll the Cake While Warm
Once the cake is out of the oven, immediately use the parchment paper to carefully roll it up from the short end into a log. This step “trains” the cake to hold the roll shape, making it easier to fill later. Allow the rolled cake to cool completely in this shape—this cooling period is crucial for a beautiful, crack-free roll at the end.
Step 5: Prepare the Peanut Butter Filling
In a mixing bowl, blend the creamy peanut butter with the whipped topping until you achieve a smooth, fluffy mixture. This airy filling contrasts perfectly with the dense cake and prevents the roll from feeling heavy or overly rich.
Step 6: Unroll, Fill, and Sprinkle
Carefully unroll the cooled cake, then spread the fluffy peanut butter filling evenly over the surface. Next, sprinkle the chopped Reese’s peanut butter cups liberally over the filling, adding delightful pockets of peanut butter and chocolate within every bite.
Step 7: Re-roll and Chill
Gently but firmly re-roll the cake without the parchment paper, taking care not to crack the delicate cake. Place the roll seam-side down on a serving plate to keep it secure. Refrigerate for at least one hour to allow the filling to set and flavors to meld magnificently.
Step 8: Garnish Before Serving
Just before serving, slather the top with extra whipped topping and sprinkle with additional chopped Reese’s peanut butter cups for that perfect finishing touch. This not only adds visual appeal but also an extra hit of texture and taste.
How to Serve Chocolate Peanut Butter Dream Roll Recipe
Garnishes
To make your Chocolate Peanut Butter Dream Roll Recipe truly shine, don’t skimp on the garnishes. A generous topping of whipped cream and a handful of chopped Reese’s never fail to impress. For extra flair, you can drizzle warmed chocolate or peanut butter sauce over the top for a glossy finish that screams indulgence.
Side Dishes
This roll pairs beautifully with simple accompaniments like fresh berries or a scoop of vanilla ice cream. The tartness of berries cuts through the richness, while the cool ice cream offers a creamy counterpoint. For a cozy touch, serve alongside a hot cup of coffee or rich hot chocolate.
Creative Ways to Present
If you want to elevate your presentation, slice the roll into thick, even pieces and plate each slice with a decorative swirl of peanut butter or chocolate sauce. You could also serve individual slices with mini spoons of peanut butter mousse or crushed nuts for added texture and elegance at a dinner party.
Make Ahead and Storage
Storing Leftovers
Keep your leftover Chocolate Peanut Butter Dream Roll Recipe tightly wrapped in plastic wrap or stored in an airtight container in the refrigerator. It will stay fresh for up to 3 days, making it easy to enjoy a decadent treat anytime without baking again.
Freezing
This roll freezes wonderfully. Wrap it tightly in plastic wrap and then aluminum foil to prevent freezer burn. When properly stored, it will maintain its flavor and texture for up to 2 months. Thaw overnight in the fridge before serving.
Reheating
Since this dessert is best served chilled, reheating is not generally recommended. However, if you prefer a slightly warmer bite, let it sit at room temperature for 30 minutes after refrigeration to soften slightly before slicing and serving.
FAQs
Can I use crunchy peanut butter instead of creamy?
Absolutely! Crunchy peanut butter adds an extra layer of texture to the filling, making each bite even more exciting. Just be aware it may be a little firmer when mixed with the whipped topping.
What if I don’t have whipped topping? Can I use whipped cream?
Yes, real whipped cream works beautifully and adds a luscious, fresh element to the filling. Just make sure it is whipped to soft peaks to blend smoothly with the peanut butter.
Can I make this roll gluten-free?
Yes, by swapping the chocolate cake mix for a gluten-free version, you can enjoy this dessert while adhering to gluten-free dietary needs without sacrificing taste or texture.
How do I prevent the cake from cracking when rolling?
Rolling the cake while it’s still warm and pliable is the key. The parchment paper helps create a smooth roll and cooling it in the rolled shape trains the cake. Avoid overbaking to keep the cake soft and flexible.
Is it okay to prepare this dessert a day ahead?
Definitely! In fact, making the Chocolate Peanut Butter Dream Roll Recipe a day in advance allows the flavors to meld beautifully and the filling to set perfectly, making your dessert even more delicious.
Final Thoughts
This Chocolate Peanut Butter Dream Roll Recipe is pure comfort and joy wrapped in a chocolatey, peanut buttery embrace. It strikes the perfect balance of flavor and texture with such ease, making it a total crowd-pleaser for any occasion. I promise once you try it, it will become a cherished favorite on your dessert menu. Grab your ingredients and start rolling—your taste buds will thank you!
Print
Chocolate Peanut Butter Dream Roll Recipe
- Prep Time: 20 minutes
- Cook Time: 15 minutes
- Total Time: 35 minutes plus 1 hour chilling
- Yield: 10 servings
- Category: Dessert
- Method: Baking
- Cuisine: American
Description
Indulge in this decadent Chocolate Peanut Butter Dream Roll, a luscious dessert featuring a moist chocolate cake rolled with a fluffy peanut butter and whipped topping filling, studded with chopped Reese’s peanut butter cups for a delightful crunch. Perfect for any occasion, this roll cake is easy to make and irresistibly delicious.
Ingredients
Cake
- 1 box chocolate cake mix
- Ingredients listed on the box (usually eggs, water, and oil)
Filling and Garnish
- 1 cup creamy peanut butter
- 2 cups whipped topping (such as whipped cream or whipped non-dairy topping)
- 1 cup chopped Reese’s peanut butter cups
- Extra whipped topping (for garnish)
- Extra chopped Reese’s peanut butter cups (for garnish)
Instructions
- Preheat Oven and Prepare Pan: Preheat your oven to 350°F (175°C) or as directed on your cake mix box. Line a 10×15-inch jelly roll pan with parchment paper and lightly grease it to prevent sticking.
- Prepare Cake Batter: Follow the cake mix package instructions using the required eggs, water, and oil. Pour the batter into the prepared pan and spread it evenly for consistent baking.
- Bake the Cake: Bake the cake for 12–15 minutes until it is set but still soft to the touch. Avoid overbaking to ensure it remains pliable for rolling without cracks.
- Roll the Warm Cake: While the cake is still warm, carefully use the parchment paper to roll it from the short end into a log. Allow the cake to cool completely while rolled to help it retain its shape.
- Make the Filling: In a mixing bowl, combine the creamy peanut butter with the whipped topping. Mix until smooth and fluffy, creating a creamy filling.
- Unroll and Fill the Cake: Gently unroll the cooled cake and spread the peanut butter filling evenly across the surface. Sprinkle the chopped Reese’s peanut butter cups evenly over the filling.
- Re-roll the Cake: Carefully roll the cake back up without the parchment paper. Keep the roll tight but handle delicately to avoid cracking. Place it seam-side down on a serving plate.
- Chill and Garnish: Refrigerate the cake roll for at least 1 hour to let it set properly. Before serving, top with extra whipped topping and sprinkle more chopped Reese’s peanut butter cups for decoration.
Notes
- Be careful not to overbake the cake to prevent cracking during rolling.
- Use parchment paper for easy rolling and to help the cake keep its shape.
- Refrigerating helps the filling set and makes slicing easier.
- For a dairy-free version, use non-dairy whipped topping.
- Chopped Reese’s peanut butter cups add both texture and flavor; you can adjust the quantity or substitute with other peanut butter candy.


