
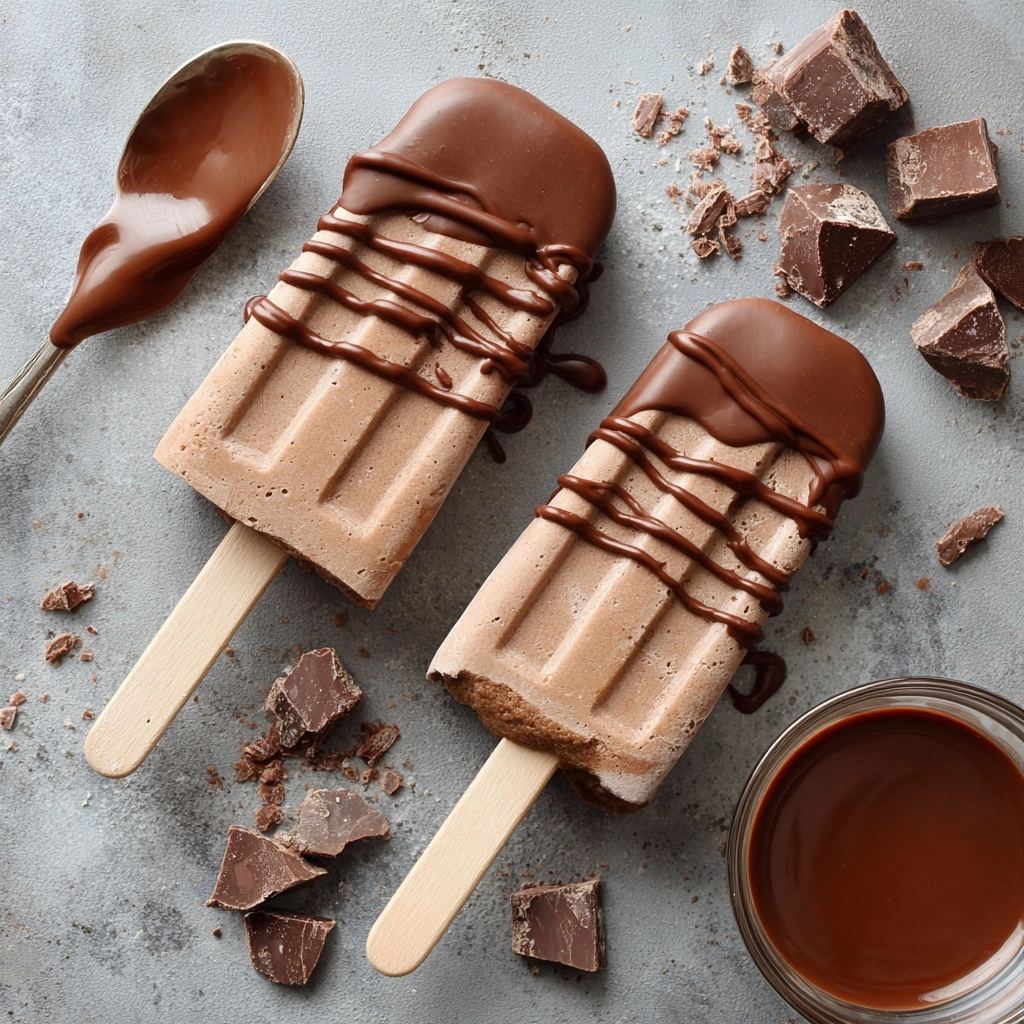
If you’re searching for a supremely decadent, frosty treat you can whip up at home, look no further than these Chocolate Ice Cream Bars. Velvety chocolate ice cream gets dipped in a shattering layer of rich chocolate coating, striking the perfect balance between creaminess and crunch. Whether you’re reminiscing about classic childhood summertime treats or updating dessert for just about any occasion, this recipe brings pure chocolate bliss—with a sprinkle of nostalgia and all the comfort of homemade goodness.
Ingredients You’ll Need
Simplicity is the secret here: each ingredient serves a critical purpose in creating the smoothest texture and the boldest chocolate flavor. With just a handful of essentials, you’ll be on your way to producing Chocolate Ice Cream Bars that rival anything from the ice cream truck.
- Heavy Cream: The star for richness and that irresistible creamy mouthfeel.
- Whole Milk: Lightens the base and keeps it from being too dense.
- Granulated Sugar: Sweetens the ice cream and helps prevent iciness.
- Unsweetened Cocoa Powder: Packs a punch of deep, authentic chocolate flavor in every bite.
- Vanilla Extract: Elevates and rounds out the chocolate notes—it’s the little secret that makes the flavor pop.
- Salt: Just a pinch! Enhances all the other flavors and keeps the chocolate profile from feeling flat.
- Semi-Sweet Chocolate Chips (for coating): Melted into a luscious shell that sets perfectly around the frozen bars.
- Coconut Oil (for coating): Thins the chocolate for smoother dipping and a crisp, glossy finish.
- Wooden Sticks or Popsicle Molds: For easy molding and a handheld, nostalgic feel.
How to Make Chocolate Ice Cream Bars
Step 1: Prepare the Chocolate Ice Cream Base
In a large mixing bowl, combine the heavy cream, whole milk, granulated sugar, unsweetened cocoa powder, vanilla extract, and salt. Whisk vigorously until the mixture is completely smooth and the sugar has dissolved. This blend is where all the magic begins, promising spoonfuls of silky goodness with each bite.
Step 2: Pour and Freeze
Gently pour the chocolate mixture into your favorite popsicle molds, leaving about a half-inch at the top for expansion as they freeze. Carefully insert the wooden sticks for that classic bar style. Place the molds in the coldest part of your freezer and let them set for at least 6 hours, or overnight if you can—patience means perfect texture here!
Step 3: Make the Chocolate Coating
When your bars are deeply chilled, it’s time for that irresistible final layer. In a microwave-safe bowl, combine the semi-sweet chocolate chips and coconut oil. Heat in 30-second intervals, stirring between each burst until the mixture is glossy and velvety. This simple blend guarantees a shell that snaps with each bite, harkening to those beloved store-bought treats.
Step 4: Dip the Bars
Once the bars are fully frozen, carefully remove them from the molds (a little warm water on the molds helps!). Working quickly, dip each bar into the chocolate coating, turning to ensure complete coverage. Let any extra chocolate drip off, then place the dipped bar onto a parchment-lined baking sheet. This step is your ticket to that signature chocolate shell!
Step 5: Set and Enjoy
Pop the chocolate-dipped bars back in the freezer for 10 to 15 minutes so the coating sets into a heavenly, crackly shell. After that short wait, you’re ready to savor homemade Chocolate Ice Cream Bars that truly deliver on flavor, nostalgia, and pure joy.
How to Serve Chocolate Ice Cream Bars

Garnishes
For an extra-special touch, try rolling your freshly-dipped Chocolate Ice Cream Bars in crushed nuts, sprinkles, toasted coconut flakes, or even a drizzle of melted white chocolate before the shell hardens. Each accent brings a new dimension of texture and flavor, letting your bars shine as more than just a simple frozen treat.
Side Dishes
The pure, chocolatey bliss of these bars pairs perfectly with fresh strawberries or a scoop of tart raspberry sorbet on the side. If you’re hosting, offer a platter of sliced fresh fruit, whipped cream, or petite cookies to round out this refreshing dessert experience.
Creative Ways to Present
Make dessert a playful affair! Serve Chocolate Ice Cream Bars stacked whimsically in a chilled glass, nestled in cupcake liners for grab-and-go fun at parties, or atop a shallow bowl of chocolate shavings for a truly memorable presentation. For family night, offer a DIY topping bar and let everyone decorate their own bar to taste.
Make Ahead and Storage
Storing Leftovers
Wrap any uneaten Chocolate Ice Cream Bars individually in plastic wrap or parchment, then place them in an airtight container. This simple step prevents freezer odors and ice crystals, keeping your bars tasting as fresh as the day you dipped them.
Freezing
For maximum quality, keep your bars in the deepest, coldest part of your freezer; they’ll keep beautifully for up to two weeks. If you’re planning ahead for a gathering, these bars are a host’s best friend—make them days in advance and simply pull out when it’s time to serve.
Reheating
No need to reheat, but if your bars spend too long out of the freezer and soften, simply pop them back in for 15 to 20 minutes until they reach their ideal frozen state. Always enjoy them frosty and firm for that signature contrast between creamy ice cream and snappy chocolate shell.
FAQs
Can I use a different type Dessert
Absolutely! Feel free to swap semi-sweet chips for dark, milk, or even white chocolate. Each kind gives your Chocolate Ice Cream Bars a unique flavor spin, so don’t be afraid to experiment with your favorites.
Can I make these bars dairy-free?
Yes! Substitute the heavy cream and whole milk with full-fat canned coconut milk or a non-dairy milk alternative, and be sure to use dairy-free chocolate chips for the coating. You’ll get a luscious, creamy treat that everyone can enjoy.
How can I prevent the chocolate coating from falling off?
Make sure your ice cream bars are thoroughly frozen before dipping and work quickly. The chocolate should be slightly cooled but still liquid, which ensures it sets up instantly for a perfectly smooth, crisp shell.
Why is coconut oil added to the coating?
Coconut oil is the key to achieving that gorgeous, glossy finish and crisp snap on your Chocolate Ice Cream Bars. It thins the chocolate perfectly so it goes on smoothly and hardens quickly once cold.
Are silicone molds better than plastic ones?
Silicone molds make unmolding much easier, especially for thick ice cream bases like this. If you have them, use them—you can pop the bars out without any tugging or breaking.
Final Thoughts
These Chocolate Ice Cream Bars are the stuff summer daydreams are made of: rich, cold, and utterly satisfying. Give them a try, make them your own with a creative twist or topping, and enjoy that unbeatable feeling of biting into a homemade classic. It’s a joy you simply have to taste!
Print
Chocolate Ice Cream Bars Recipe
- Prep Time: 15 minutes
- Cook Time: 0 minutes
- Total Time: 6 hours 15 minutes
- Yield: 8 bars
- Category: Dessert
- Method: Freezing
- Cuisine: American
- Diet: Vegetarian
Description
Indulge in the creamy, chocolatey goodness of these homemade Chocolate Ice Cream Bars. Perfect for a summer treat, these frozen delights are easy to make and even easier to enjoy. A rich and satisfying dessert that will have everyone coming back for more!
Ingredients
Ice Cream Base:
- 2 cups heavy cream
- 1 cup whole milk
- 3/4 cup granulated sugar
- 1/2 cup unsweetened cocoa powder
- 1 teaspoon vanilla extract
- 1/2 teaspoon salt
Coating:
- 2 cups semi-sweet chocolate chips
- 2 tablespoons coconut oil
Additional:
- Wooden sticks or popsicle molds
Instructions
- Mix the Base: In a mixing bowl, combine heavy cream, milk, sugar, cocoa powder, vanilla extract, and salt until smooth.
- Freeze: Pour the mixture into popsicle molds, insert sticks, and freeze for at least 6 hours or overnight.
- Coat: Melt chocolate chips and coconut oil, dip the frozen bars, and place on a baking sheet to set.
- Serve: Enjoy the frozen Chocolate Ice Cream Bars straight from the freezer!
Notes
- Enhance flavor with instant espresso powder or add toppings like crushed nuts or coconut before coating.
- Use silicone molds for easy removal of bars.
Nutrition
- Serving Size: 1 bar
- Calories: 320
- Sugar: 24 g
- Sodium: 70 mg
- Fat: 22 g
- Saturated Fat: 14 g
- Unsaturated Fat: 7 g
- Trans Fat: 0 g
- Carbohydrates: 28 g
- Fiber: 3 g
- Protein: 3 g
- Cholesterol: 40 mg
