
If you’re in the mood for a treat that combines the nostalgic coziness of pie with the ease of a classic bar dessert, look no further than these Cherry Pie Bars. Each bite blends buttery vanilla-almond dough with pockets of juicy cherry filling and a sweet glaze on top—creating the perfect crowd-pleasing dessert that’s both simple and stunning. Whether you’re entertaining friends or just hoping to satisfy a sweet tooth, you’ll love how quickly this recipe comes together and how gorgeously it showcases the flavors of classic cherry pie.

Ingredients You’ll Need
There’s something magical about turning a handful of pantry basics and one star ingredient into a dessert everyone raves about. These simple yet essential ingredients ensure each layer of Cherry Pie Bars is bursting with flavor, delicious textures, and a picture-perfect look.
- Unsalted butter (1 cup, softened): The rich foundation for both flavor and tenderness in your bars—make sure it’s soft for extra creamy blending.
- Granulated sugar (1¾ cups): Adds just enough sweetness to highlight the cherries and create a golden crust.
- Large eggs (4): Bring structure and a custardy richness that balances the tart fruit filling.
- Vanilla extract (1 tsp): Gives depth and classic warmth—pure vanilla makes a big difference here.
- Almond extract (½ tsp): The secret ingredient that brings out the cherry flavor and makes these bars extra special.
- All-purpose flour (3 cups): Forms the soft, sturdy base and holds the bars together for perfect slicing.
- Salt (½ tsp): Just enough to balance the sweetness and enhance all the flavors.
- Cherry pie filling (1 can, 21 oz): The star! Luscious, tangy cherries add color and jammy bursts in every bite.
- Powdered sugar (1 cup): For the glaze—gives a silky finish and a touch of extra sweetness.
- Milk (2–3 tbsp): Loosens the glaze to the perfect drizzling consistency.
- Vanilla or almond extract (½ tsp): Adds a fragrant twist to the glaze—choose your favorite!
How to Make Cherry Pie Bars
Step 1: Prepare Your Pan and Heat the Oven
Start by preheating your oven to 350°F (175°C). Line a 9×13-inch baking pan with parchment paper or give it a generous greasing—this makes it a breeze to lift out your Cherry Pie Bars and keeps every slice looking sharp.
Step 2: Cream the Butter and Sugar
In a large mixing bowl, beat together the softened butter and granulated sugar until the mixture is light, fluffy, and almost cloud-like. Giving this extra minute here helps your bars bake up soft and tender.
Step 3: Add Eggs and Extracts
One at a time, add in your four eggs, mixing well after each for a silky-smooth batter. Follow with the vanilla and almond extracts, and inhale that sweet, nutty aroma—the almond is truly what makes these Cherry Pie Bars pop!
Step 4: Mix the Dry Ingredients
In a separate bowl, whisk together the flour and salt. Gradually add this to the wet mixture, mixing only until just combined. Over-mixing can make bars dense, so stop as soon as the flour disappears.
Step 5: Layer the Batter and Cherry Filling
Spread about two-thirds of the batter in an even layer over the bottom of your prepared pan. Spoon the cherry pie filling evenly over this layer, letting those luscious cherries shine through. Drop the remaining batter in spoonfuls over the top—it won’t cover everything, but those ruby-red peeks are the charm!
Step 6: Bake to Golden Perfection
Slide the pan into your oven and bake for 35 to 40 minutes, until the top is lightly golden and a toothpick comes out with just a few moist crumbs. Your kitchen will smell incredible at this point.
Step 7: Cool and Glaze
Allow the bars to cool completely in the pan. Meanwhile, whisk together your powdered sugar, milk, and a splash of extract to form a smooth glaze. Once cool, drizzle the glaze over the bars in zigzags or swirls—whatever makes you happy!
Step 8: Slice and Serve
Once the glaze has set, use the parchment to lift your Cherry Pie Bars out of the pan. Slice into squares or rectangles and get ready for oohs and aahs!
How to Serve Cherry Pie Bars

Garnishes
Brighten up your Cherry Pie Bars with a sprinkle of powdered sugar, slivered almonds, or even a few extra fresh cherries on the side. A dollop of softly whipped cream is a gorgeous addition for special occasions!
Side Dishes
Keep things simple and let these bars shine, or pair them with a scoop of vanilla ice cream or a glass of cold milk. If you’re serving a spread, fresh fruit salad or a platter of cheese and crackers brings balance and variety to the dessert table.
Creative Ways to Present
For a party-perfect presentation, stack the bars on a cake stand or dessert tier for height and drama. Cut them into bite-size squares for finger-food buffets or package a few in cellophane bags tied with ribbon for sweet take-home gifts at gatherings.
Make Ahead and Storage
Storing Leftovers
Keep Cherry Pie Bars fresh by covering them tightly at room temperature for up to 2 days—perfect for make-ahead treats! If you’d like them to last longer, pop them in an airtight container in the fridge, where they’ll stay moist and delicious for up to 5 days.
Freezing
You can freeze these bars, too! Once cooled and cut, layer them with parchment in a freezer-safe container. They’ll keep beautifully for up to 3 months—just defrost at room temperature before serving and your Cherry Pie Bars will taste oven-fresh once again.
Reheating
If you’d like to rewarm your Cherry Pie Bars, a quick 10 seconds in the microwave brings back that soft, just-baked texture. For a slightly crispier finish, place a slice in a 300°F oven for 5-7 minutes. Add glaze after reheating, if possible, to keep things pretty.
FAQs
Can I use homemade cherry pie filling instead of canned?
Absolutely! Homemade cherry pie filling takes these bars to the next level. Just make sure it’s thick and cooled before layering, so the bars bake up evenly and aren’t soggy.
Are there other flavors I can try with this recipe?
Yes, you can swap cherry pie filling for blueberry, apple, or peach—each brings its own delicious twist. Try mixing almond extract with blueberries or using cinnamon in the batter for apple bars!
Can I make Cherry Pie Bars gluten-free?
Definitely. Substitute your favorite cup-for-cup gluten-free flour blend for the all-purpose flour and check your pie filling for additives—your Cherry Pie Bars will be just as soft and scrumptious.
Do the bars need to be refrigerated?
They’re fine at room temperature for up to 2 days, but if your kitchen is extra warm or you plan to keep them longer, refrigeration keeps them fresh and prevents the glaze from soaking in.
How do I prevent the bars from sticking to the pan?
Lining the baking pan with parchment paper is a real gamechanger—it not only prevents sticking but also makes lifting and cutting the bars super easy. If you’re out of parchment, a solid greasing with butter or nonstick spray works too.
Final Thoughts
If you’re searching for a dessert that’s easy, gorgeous, and bursting with flavors everyone loves, Cherry Pie Bars are the answer. Make a batch and watch them disappear—these bars never disappoint, and they just might become your new sweet tradition!
Print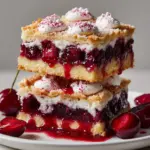
Cherry Pie Bars Recipe
- Prep Time: 15 minutes
- Cook Time: 40 minutes
- Total Time: 55 minutes
- Yield: 24 bars
- Category: Dessert
- Method: Baking
- Cuisine: American
- Diet: Vegetarian
Description
Indulge in these delectable Cherry Pie Bars – a delightful twist on the classic pie! A buttery base topped with sweet cherry filling, finished with a creamy glaze. Perfect for any occasion!
Ingredients
For the Bars:
- 1 cup unsalted butter (softened)
- 1¾ cups granulated sugar
- 4 large eggs
- 1 teaspoon vanilla extract
- ½ teaspoon almond extract
- 3 cups all-purpose flour
- ½ teaspoon salt
- 1 (21 oz) can cherry pie filling
For the Glaze:
- 1 cup powdered sugar
- 2–3 tablespoons milk
- ½ teaspoon vanilla or almond extract
Instructions
- Preheat oven and prepare pan: Preheat oven to 350°F (175°C) and grease or line a 9×13-inch baking pan with parchment paper.
- Mix wet ingredients: Cream butter and sugar, add eggs, vanilla, and almond extracts.
- Combine dry ingredients: Whisk flour and salt, then mix into wet ingredients.
- Layer and bake: Spread most of the batter in the pan, top with cherry filling, dot with remaining batter. Bake until golden.
- Prepare glaze and finish: Whisk powdered sugar, milk, and extract. Drizzle over cooled bars.
Notes
- Try other fruit fillings like blueberry or apple.
- Store bars at room temperature for 2 days or refrigerate for up to 5 days.
Nutrition
- Serving Size: 1 bar
- Calories: 210
- Sugar: 18g
- Sodium: 90mg
- Fat: 9g
- Saturated Fat: 5g
- Unsaturated Fat: 3g
- Trans Fat: 0g
- Carbohydrates: 30g
- Fiber: 1g
- Protein: 2g
- Cholesterol: 45mg

